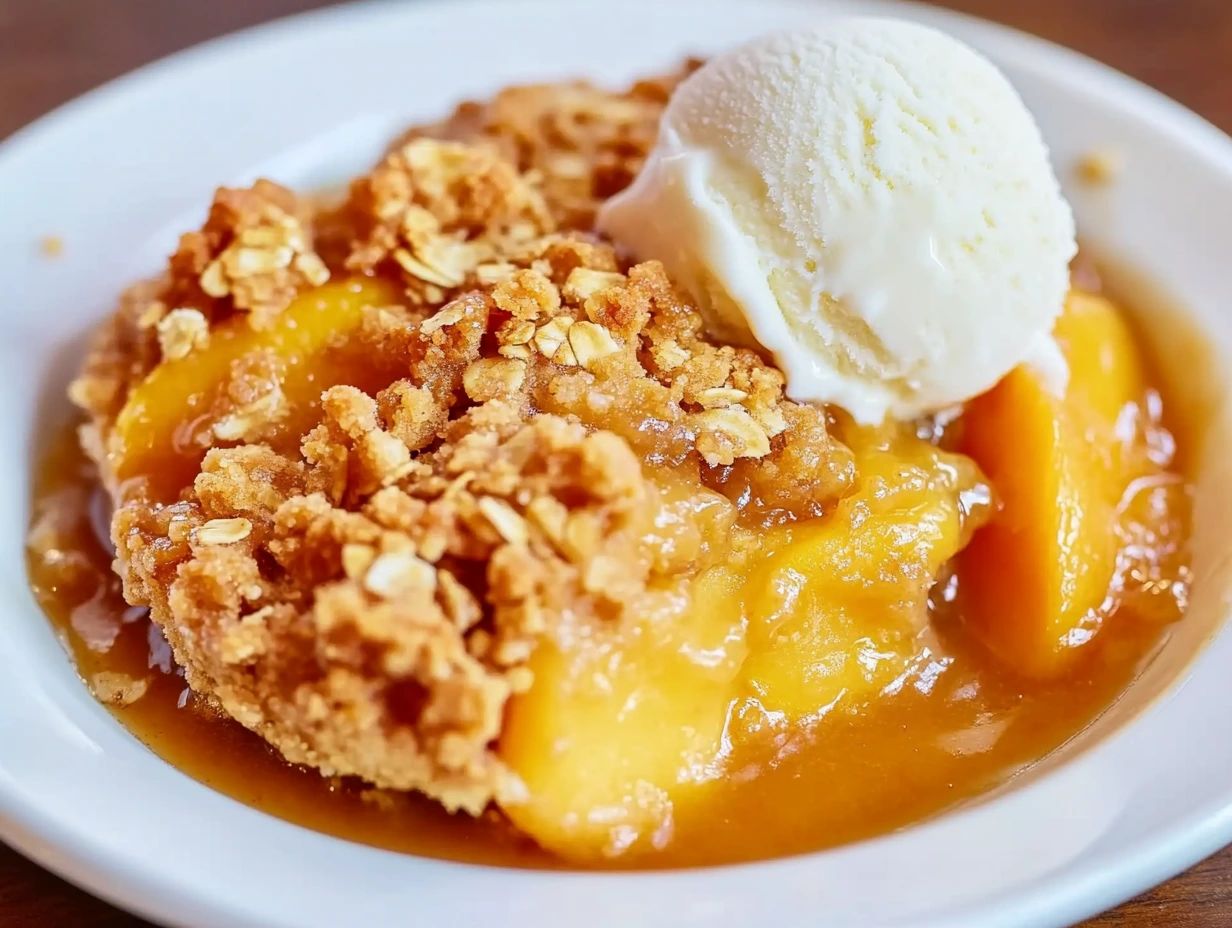
There’s just something magical about a fruit crisp, isn’t there? Especially when it involves sweet, juicy peaches fresh from the farmer’s market or your local grocery store. This Fresh Peach Crisp is the kind of dessert that brings back all those cozy, end-of-summer memories—barefoot in the backyard, golden hour sun, and the scent of baked peaches wafting from the kitchen. It’s warm, buttery, lightly spiced, and practically begging to be topped with a scoop of vanilla ice cream.
This recipe is all about simplicity. You don’t need fancy tools or complicated steps—just fresh ingredients and a little bit of kitchen love. What I love most about this peach crisp (besides the fact that it disappears within minutes every time I serve it) is how forgiving and flexible it is. Got extra ripe peaches? Perfect. Want to make the topping ahead of time? Totally doable. Need a make-ahead dessert that still tastes like it came straight from the oven? This one’s got your back.
Let’s dive into the first part of this peachy perfection.
Why You’ll Love This Fresh Peach Crisp
-
Incredibly easy to make – No pie crusts or dough rolling here!
-
Perfect balance of flavors – Sweet, juicy peaches with a warm, buttery topping.
-
Customizable – Add nuts, swap in nectarines, or tweak the spices.
-
Make-ahead friendly – Prepped in advance, baked when you’re ready.
Ingredients You’ll Need
Let’s keep things simple and fresh. Here’s what you’ll need to make both the filling and that golden, oat-packed topping.
For the peach filling:
-
3 pounds fresh peaches, peeled, pitted, and sliced into eighths
-
⅔ cup granulated sugar
-
2 tablespoons cornstarch
-
1 teaspoon vanilla extract
-
¼ teaspoon ground cinnamon
-
¼ teaspoon salt
For the crisp topping:
-
¾ cup light brown sugar, packed
-
¾ cup all-purpose flour
-
⅔ cup old fashioned rolled oats
-
½ teaspoon ground cinnamon
-
¼ teaspoon ground nutmeg
-
¼ teaspoon salt
-
½ cup (1 stick) cold unsalted butter, grated or diced small
STEP 1: Preheat and Prep Your Dish
Start by preheating your oven to 350°F. This gives it plenty of time to come up to temperature while you prep everything else. Then, lightly grease a 9-inch round or square baking dish with either baking spray or a bit of butter. Set it aside for now—you’ll come back to it once your peach filling is ready to go.
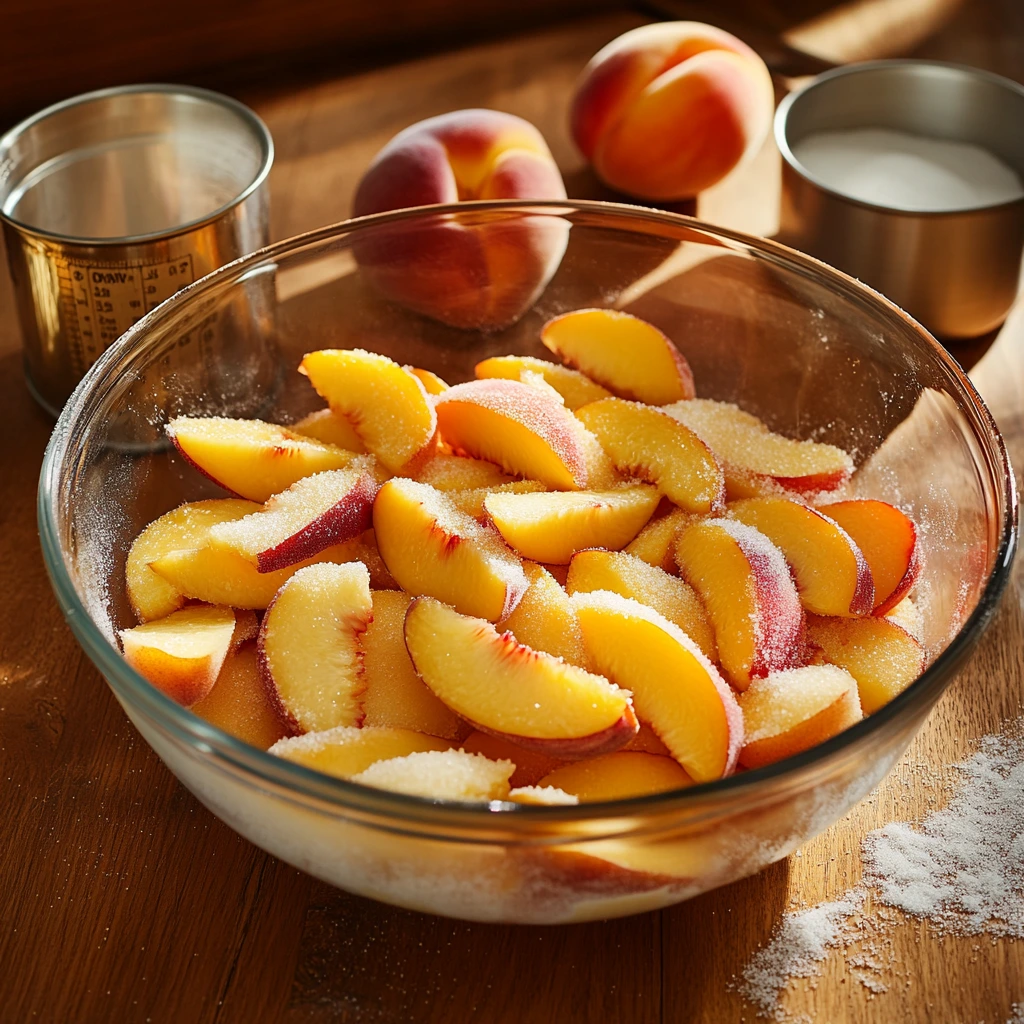
STEP 2: Sweeten and Soften Those Peaches
Place your sliced peaches into a large mixing bowl. Sprinkle the ⅔ cup of granulated sugar over them and toss gently to coat. Let this sit for about 15 minutes at room temperature. This is an important step—it lets the peaches release their natural juices, which helps create that lovely syrupy base once everything is baked.
STEP 3: Make the Crisp Topping
While your peaches are doing their thing, go ahead and make the topping. In a separate medium bowl, combine the brown sugar, flour, oats, cinnamon, nutmeg, and salt. Stir until everything is evenly mixed.
Then add the cold, grated (or small diced) butter into the mix. Use your fingers or a pastry cutter to work it into the dry ingredients. You’re looking for a texture similar to clumpy wet sand—some pea-sized pieces of butter are totally fine (and actually help create that perfect crumbly texture).
Once everything is well combined, pop the topping mixture into the fridge to keep it cold while you finish prepping the filling. This helps it stay nice and crisp when baked.
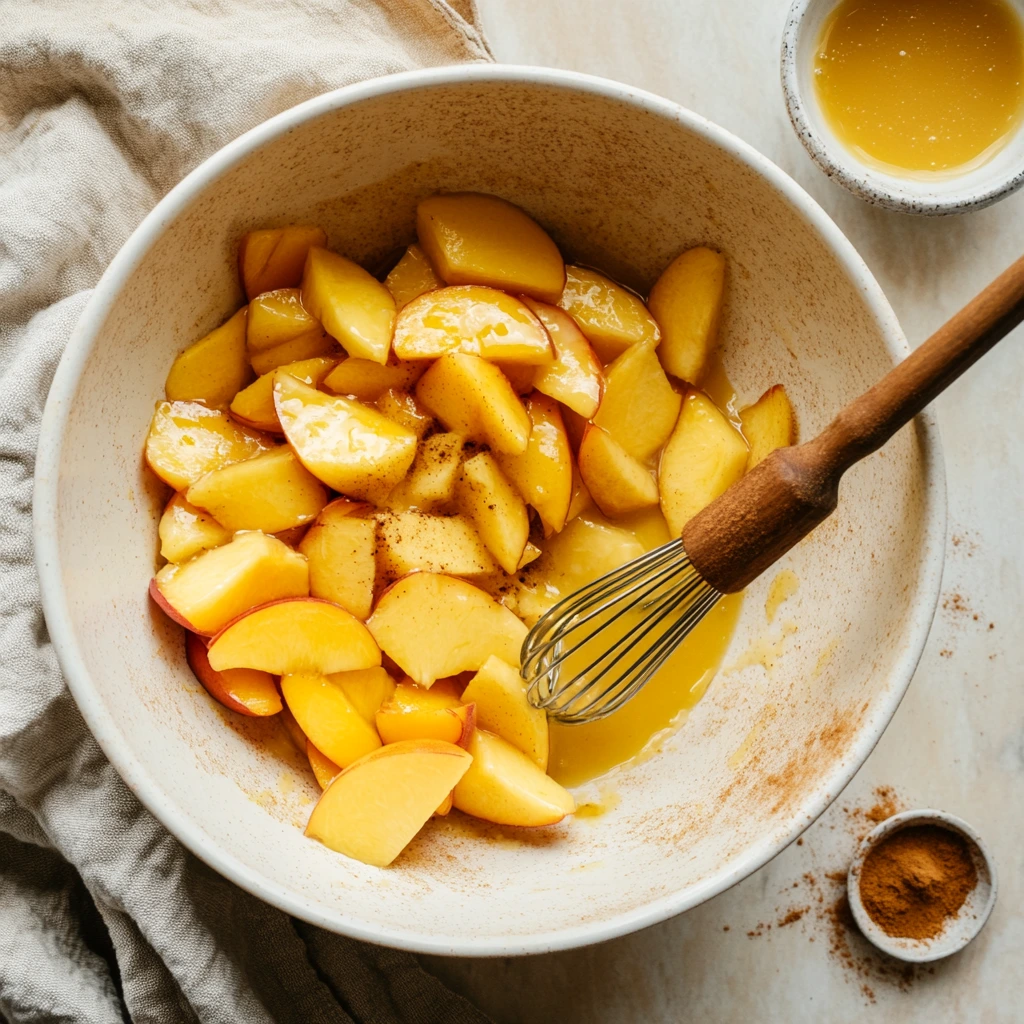
STEP 4: Thicken and Flavor the Filling
Once your peaches have had time to sit, drain them over a large bowl to catch all those flavorful juices. You only need ¼ cup of the juice, so measure that out and discard or save the rest for something else (like mixing into iced tea!).
To the ¼ cup of peach juice, whisk in the cornstarch, vanilla, cinnamon, and salt until smooth and well combined. This step helps to thicken the peach filling so you don’t end up with a runny crisp.
Toss the peaches back into the bowl with the sauce and mix until everything’s well coated.

Assembling, Baking & Pro Tips for the Best Crisp Ever
Now that your filling is prepped and your buttery topping is chilling in the fridge, it’s time for the best part—assembling everything and getting it into the oven. This step is where it all comes together, and you’ll start to smell that sweet, peachy aroma floating through your kitchen in no time.
One of the best things about fruit crisps like this one is how forgiving they are. There’s no pressure to make it look perfect—just rustic, golden, and irresistibly delicious. Whether you’re serving it at a casual cookout or making it for a cozy night in, this peach crisp never disappoints.
Let’s jump back in and finish what we started.
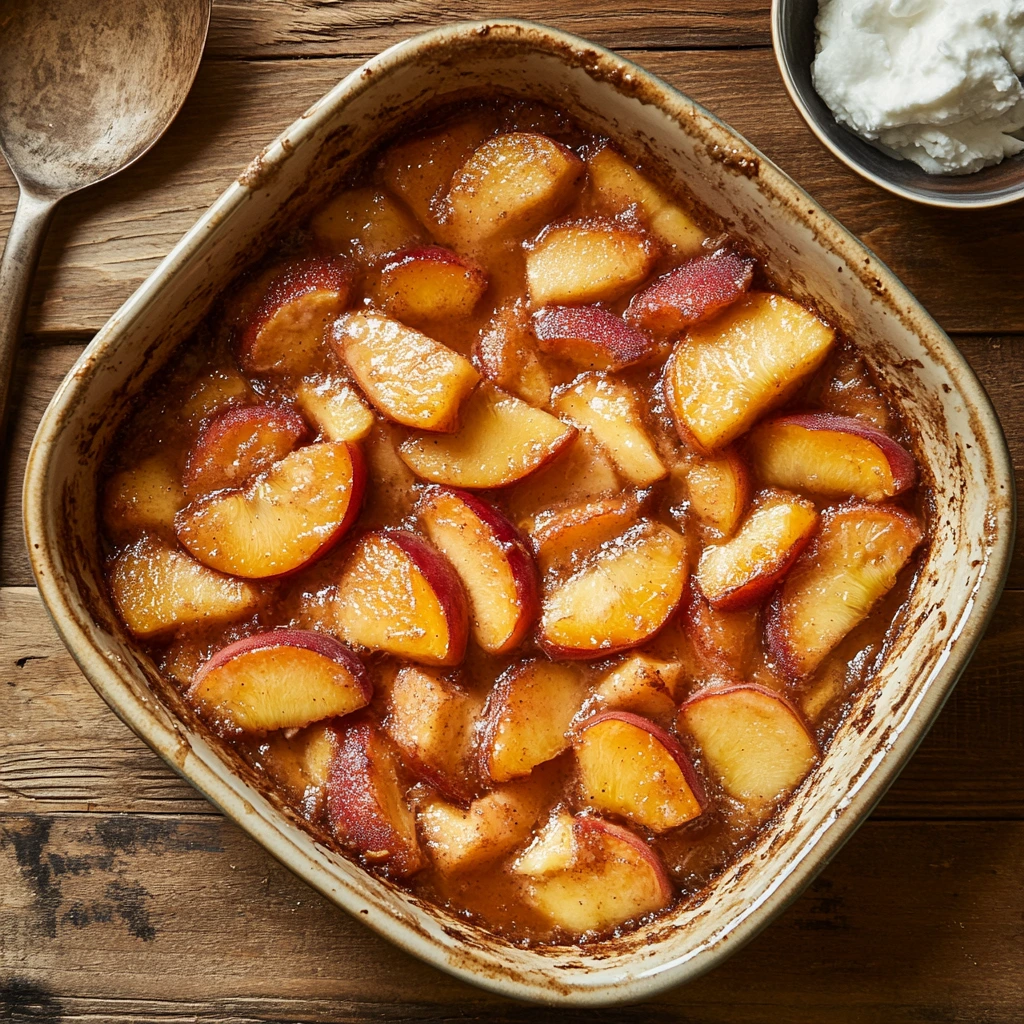
STEP 5: Assemble the Peach Crisp
Grab your prepared baking dish and pour the peach filling right in. Use a spatula to spread the fruit out evenly across the bottom of the dish, making sure it’s not piled too high in the center.
Next, take your chilled topping out of the fridge and sprinkle it generously over the peaches. Make sure to cover as much of the surface as possible—don’t be shy here! The topping should be evenly distributed, with little bits of butter and oats peeking through.
STEP 6: Bake Until Golden and Bubbling
Place the baking dish into your preheated 350°F oven and bake for 40 to 50 minutes. You’re looking for a topping that’s golden brown and crisp, with the fruit filling bubbling up around the edges.
If your topping starts to brown too quickly (especially if your oven runs hot), you can loosely tent the crisp with a piece of foil during the last 10–15 minutes of baking. This will help keep it from getting too dark while still allowing the filling to finish bubbling.
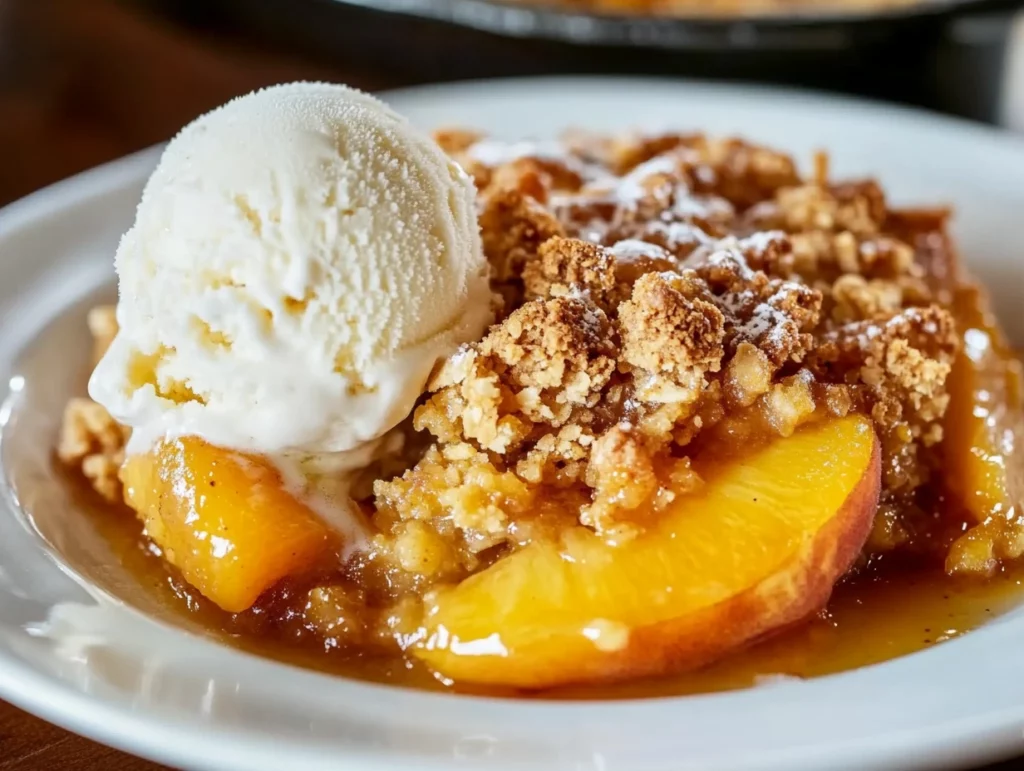
When it’s ready, the kitchen will smell absolutely amazing—and you’ll know you’re just minutes away from digging in.
STEP 7: Let It Cool (Just a Bit!)
Resist the temptation to scoop into the crisp immediately! Once it’s out of the oven, let it rest for at least 15 minutes. This gives the filling time to thicken slightly so it’s not too runny when served.
Plus, serving it too hot can overwhelm the delicate flavor of the peaches and may even burn your mouth. That short cooling period also helps the topping stay nice and crisp.
Serving Suggestions
There’s no wrong way to enjoy peach crisp, but here are a few of my favorite ways to take it to the next level:
-
Classic style: With a big scoop of vanilla ice cream slowly melting over the top.
-
Old-fashioned: Add a dollop of homemade whipped cream for an extra touch of indulgence.
-
For breakfast (yes, really!): Reheat a small portion and top it with Greek yogurt and a drizzle of honey.
Trust me—leftover crisp makes a surprisingly delightful breakfast!
Tips for the Best Peach Crisp Every Time
Making a good peach crisp is easy, but making an amazing peach crisp comes down to a few helpful tricks:
-
Use ripe but firm peaches: You want peaches that are juicy and flavorful, but not overly soft or mushy. They’ll hold up better during baking and won’t turn into peach soup.
-
Grate your butter: Cold butter is key for that crumbly topping. I love using a box grater—it helps distribute the butter evenly and makes the mixing process quicker.
-
Chill the topping: Don’t skip this step! Keeping the topping cold helps it bake up crispy and golden without melting too fast in the oven.
-
Adjust for juiciness: If your peaches are extra juicy (you’ll know once they’re sugared and sitting in the bowl), consider increasing the cornstarch to 2½ tablespoons for a thicker filling.
-
Don’t forget the salt: A tiny bit of salt in both the filling and the topping helps bring out the natural sweetness of the peaches and makes the flavor pop.
Easy Variations to Try
Want to switch things up a bit? This peach crisp is super flexible. Here are a few tasty twists:
-
Add a handful of chopped nuts (like pecans or almonds) to the topping for some crunch and a nutty flavor.
-
Mix in other fruits like raspberries or blueberries with the peaches for a colorful berry-peach crisp.
-
Spice it up by adding a pinch of ground ginger or cardamom to the filling for a warm, aromatic kick.
-
Make it gluten-free by using a gluten-free flour blend and certified gluten-free oats.
Your Questions Answered + Final Thoughts
You’ve prepped your peaches, made that buttery oat topping, and baked it all into bubbling golden perfection. But before we wrap up, let’s go over some of the most common questions readers have about making peach crisp. Whether you’re new to fruit crisps or just looking to tweak the recipe to fit your needs, this section is packed with helpful answers.
And at the end, I’ll share a few final thoughts on why this recipe is one you’ll want to come back to again and again.
Frequently Asked Questions
1. Do I have to peel the peaches?
Peeling the peaches is recommended for the best texture in the filling, but it’s not absolutely necessary. If you’re short on time or don’t mind a bit of extra texture, you can leave the skins on. They’ll soften as they bake, though you may notice a slight chewiness.
2. Can I use frozen or canned peaches instead of fresh?
Yes, you can use frozen or canned peaches if fresh aren’t available. For frozen, thaw them completely and drain off any excess liquid. For canned, drain them well and reduce the added sugar slightly since canned peaches tend to be sweetened already.
3. How do I store leftovers, and how long will they last?
Cover any leftover crisp and store it in the refrigerator for up to 3 days. To reheat, use the oven (at 350°F for 10–15 minutes) for best texture, or microwave individual servings for about 30–60 seconds.
4. Can I make this peach crisp ahead of time?
Absolutely! You can prepare both the filling and the topping in advance. Store them separately in the fridge and assemble just before baking. Or, you can assemble the entire crisp, cover it tightly, and refrigerate for up to 24 hours before baking.
5. What’s the best way to reheat peach crisp without making it soggy?
The oven is your best friend here. Reheat the crisp at 350°F, uncovered, until warmed through and the topping has crisped up again. This helps it stay crunchy instead of turning soft or mushy like it can in the microwave.
6. Can I freeze peach crisp?
Yes, you can freeze it before or after baking. If freezing before baking, assemble the crisp in a freezer-safe dish, wrap tightly, and freeze for up to 3 months. Bake straight from frozen, adding an extra 10–15 minutes to the baking time. If freezing after baking, cool completely, wrap well, and thaw before reheating.
7. How can I make this dessert dairy-free or vegan?
Swap the butter for a plant-based butter or solid coconut oil. Make sure your sugar and oats are also certified vegan (some brands aren’t). That’s all it takes—no eggs or milk needed in this recipe.
Final Thoughts: Why This Peach Crisp Deserves a Spot in Your Recipe Box
There’s a reason this Fresh Peach Crisp is such a summer staple—it’s everything you want in a dessert: simple, satisfying, and loaded with flavor. It’s one of those back-pocket recipes that works whether you’re feeding a crowd or just craving something cozy on a quiet evening.
What I love most about this recipe is how versatile it is. It’s easy enough for a weeknight treat but pretty enough for a dinner party. You can customize it with what you have on hand, and no matter how you serve it—warm from the oven with ice cream, or cold from the fridge with yogurt—it hits the spot every single time.
PrintFresh Peach Crisp

Crispy Parmesan asparagus sticks are a quick and flavorful way to enjoy this vibrant spring vegetable. Coated in a savory mix of Parmesan and panko breadcrumbs, they bake up golden and crunchy on the outside while staying tender on the inside. Perfect as a side dish, appetizer, or healthy snack.
- Author: Mark's Recipe
Ingredients
500 g fresh asparagus spears, trimmed
60 g all-purpose flour
2 large eggs, beaten
100 g panko breadcrumbs
60 g grated Parmesan cheese
1 teaspoon garlic powder
1/2 teaspoon salt
1/4 teaspoon freshly ground black pepper
Cooking spray or 2 tablespoons olive oil
Instructions
Preheat your oven to 220°C and line a baking sheet with parchment paper. This ensures even baking and easy cleanup.
Set up your breading station with three shallow dishes. Place the all-purpose flour in one dish. In the second, pour the beaten eggs. In the third, mix the panko breadcrumbs, grated Parmesan, garlic powder, salt, and black pepper until well combined.
Dredge each asparagus spear first in the flour, shaking off any excess. Then dip it into the beaten eggs, and finally roll it in the breadcrumb-Parmesan mixture. Press gently to ensure the coating sticks well to each spear.
Arrange the coated asparagus spears in a single layer on the prepared baking sheet. Avoid overlapping for maximum crispiness.
Lightly spray the spears with cooking spray or drizzle with olive oil. This helps them achieve a golden, crispy finish during baking.
Place the baking sheet in the preheated oven and bake for 10 to 12 minutes, or until the asparagus is tender and the coating is crisp and golden.
Remove from the oven and serve immediately. These crispy asparagus sticks are best enjoyed warm and can be served with a dipping sauce of your choice or simply on their own.
Notes
For an extra kick, add a pinch of cayenne pepper or smoked paprika to the breadcrumb mixture. These sticks are also delicious with a side of garlic aioli, ranch, or marinara sauce. Leftovers can be reheated in an oven or air fryer to retain their crispiness.

")
