If you’re someone who’s ever found themselves standing in line at Wendy’s craving a Frosty, you’re not alone! There’s just something about that perfect balance between thick, creamy, and icy that makes it the ultimate treat. But what if I told you that you could recreate that luxurious, chocolatey goodness in your own kitchen—no ice cream maker required?
That’s right, this recipe is the ultimate copycat Wendy’s Frosty, and it’s so simple to make. With just a handful of ingredients and a few hours of freezing time, you can have a homemade Frosty that’s every bit as creamy and delicious as the one from the drive-thru. The best part? You get to enjoy it at your own pace, whenever the craving strikes.
In this article, we’ll walk through every step of this easy recipe, sharing some tips and tricks along the way so you can enjoy a rich, chocolatey, and frosty dessert that’s sure to become a regular in your freezer. Let’s dive right in!
What You’ll Need for This Copycat Wendy’s Frosty Recipe
Before you get started, gather the following ingredients. Trust me, you won’t need anything fancy or hard to find. These are common grocery store staples that come together to create a smooth, creamy treat. Here’s the shopping list:
-
300 milliliters of sweetened condensed milk
-
8 ounces of Cool Whip (thawed)
-
8 cups of 1% chocolate milk
-
2 tablespoons of vanilla extract
Now, if you’re aiming for an even richer Frosty flavor, feel free to swap out half of the 1% chocolate milk for whole chocolate milk or half-and-half. It’s a small change that can really elevate the taste. I also love stirring in mini chocolate chips or crushed cookies for a fun, crunchy twist!
![]()
Step-by-Step Instructions for Making Your Copycat Wendy’s Frosty
Now that we’ve got everything ready, let’s jump into the process of making this dreamy dessert. Trust me, it’s super easy and you’ll be enjoying your homemade Frosty in no time!
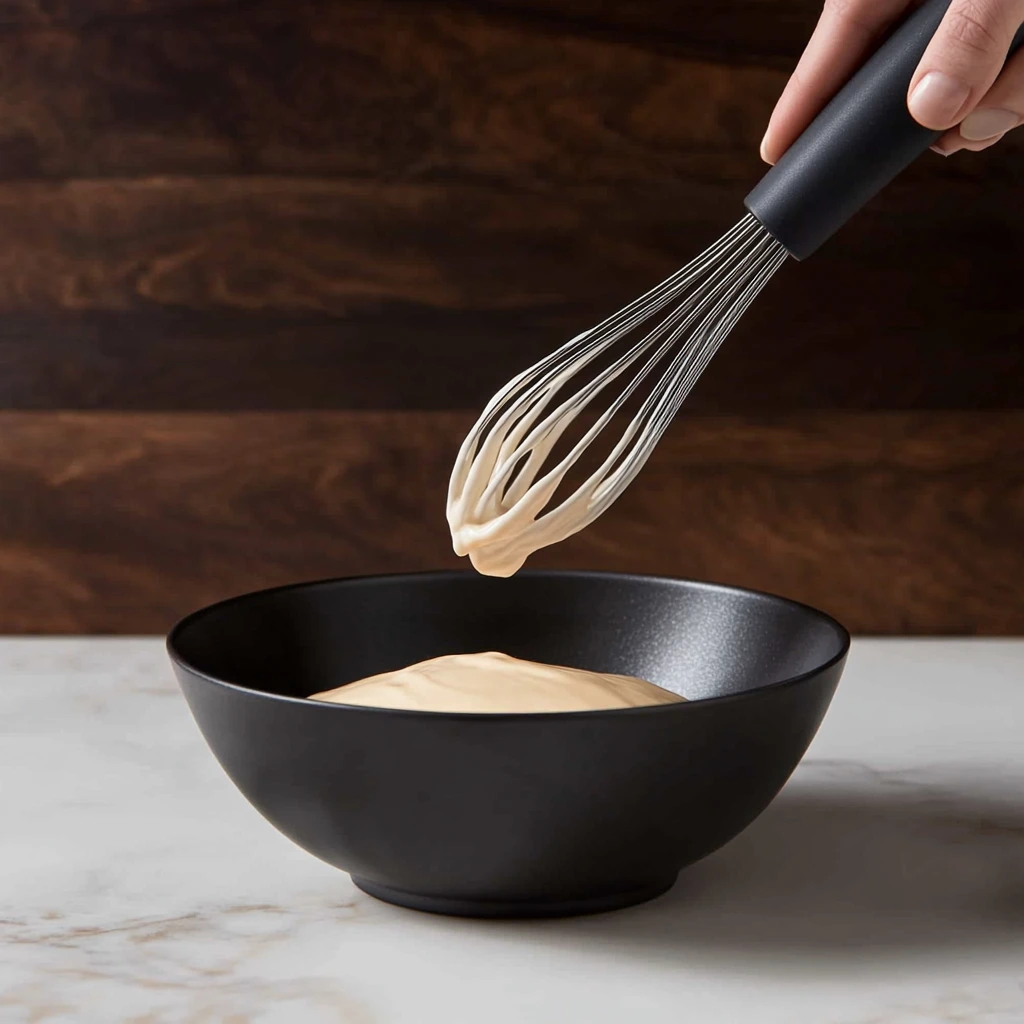
Step 1: Whisk the Condensed Milk and Cool Whip Together
Start by grabbing a large bowl. You’ll want plenty of room to mix everything without making a mess. Add your sweetened condensed milk and the thawed Cool Whip to the bowl. Using a whisk, blend them together until the mixture is smooth and uniform. This part is crucial because you want to make sure there are no lumps, and the Cool Whip and condensed milk are fully incorporated for a silky, creamy texture.
Step 2: Add the Chocolate Milk and Vanilla Extract
Once your base is smooth and creamy, it’s time to pour in the chocolate milk and vanilla extract. Slowly add the chocolate milk, whisking as you go. This will help ensure the milk is evenly mixed in. Continue whisking until the entire mixture is combined and slightly thickened. You should notice that the texture starts to resemble a thinner version of a milkshake—deliciously smooth!
Step 3: Freeze the Mixture
Next, it’s time to transfer your Frosty mixture into a freezer-safe container. Make sure the container is large enough to hold everything, and ideally, choose one that has a tight-fitting lid. If you don’t have a lid, plastic wrap works just fine to seal the container.
Place the container in the freezer, but don’t walk away just yet. Every hour for the next three hours, take the container out and give the mixture a good stir. This is key to maintaining that creamy consistency. Stirring will prevent ice crystals from forming, which means you’ll get that soft-serve texture we all love. It’s a simple step, but it’s what makes all the difference.
![]()
Step 4: Wait for the Frosty to Reach the Perfect Consistency
After about three hours, your Frosty should be ready to scoop and serve! At this point, it will have thickened into a deliciously creamy, icy treat, perfect for spooning into glasses or cups. If you prefer a firmer texture, feel free to leave it in the freezer for an extra hour, but make sure to continue stirring every 30 minutes to keep the texture smooth and avoid ice chunks.
Once your Frosty is at the right consistency, grab a spoon or a straw and dive in! You’ve officially made a homemade version of one of the most popular desserts out there—and it’s just as good as the real thing!
Making Your Copycat Wendy’s Frosty Even Better: Tips and Tricks
By now, you’ve made it through the basic steps of creating your very own copycat Wendy’s Frosty. But, as with most recipes, there are always ways to tweak things to suit your personal tastes or elevate the flavor even more. Let’s talk about a few tips and tricks that will make this recipe your new go-to frozen treat.
Tips for Perfecting Your Frosty
While the basic version of this recipe is already pretty close to perfection, there are a few fun variations and adjustments you can make to customize your Frosty experience.
1. Go for a Richer Flavor with Full-Fat Dairy
If you love a really rich, indulgent treat, consider swapping out half of the 1% chocolate milk for whole chocolate milk, or even better, half-and-half. This simple change will give your Frosty a deeper, creamier texture and a more intense chocolate flavor. While 1% milk works great for a lighter version, using whole milk or half-and-half takes the decadence to the next level.
2. Add Mix-Ins for Extra Texture
One of the best parts of eating a Frosty is the smooth, velvety texture, but that doesn’t mean you can’t have a little crunch, too. Before the final freeze, stir in a handful of mini chocolate chips, crushed Oreos, or even chopped nuts for a delightful crunch with each bite. The mini chocolate chips add a burst of chocolate in every spoonful, while crushed cookies or nuts bring a satisfying contrast to the creamy base.
3. Speed Up the Freezing Process
If you’re in a hurry and need your Frosty ASAP, consider dividing the mixture into several shallow, wide containers before freezing it. The increased surface area will allow the mixture to freeze faster, which means you can get to enjoying your Frosty sooner. Just be sure to continue stirring every hour, as the texture is crucial to getting that perfect, smooth consistency.
4. Customize the Sweetness
If you like your Frosty a little sweeter, you can always add a touch more sweetened condensed milk or even a little bit of sugar. The beauty of this recipe is that it’s completely customizable, so feel free to adjust the sweetness to your preference. Just be careful not to add too much, as the sweetened condensed milk already provides a good amount of sugar.
5. Get Creative with Flavors
Why stop at chocolate? If you’re a fan of variety, you can switch up the flavor by using different types of milk. Try making a vanilla Frosty by using regular milk (instead of chocolate milk) and adding a little extra vanilla extract for a creamy, dreamy treat. Or, you can even play around with adding a few tablespoons of flavored syrups like caramel or mocha for an exciting twist on the classic recipe.
Step-by-Step Instructions for Making Your Frosty Even Better
Now that we’ve covered the tips and variations, let’s dive back into the process and make sure you’re on track to create the most delicious homemade Frosty possible.
Step 1: Whisk the Ingredients Thoroughly
When making this recipe, the key is to ensure that each ingredient is perfectly mixed. Whether you’re adding vanilla extract, chocolate milk, or any mix-ins, take your time whisking the ingredients together until smooth and combined. The smoother the base, the smoother your final Frosty will be.
Step 2: Freezing and Stirring for the Best Texture
Remember, this is the part that makes the biggest difference in texture. While you could just freeze it and forget about it, stirring every hour helps to ensure you won’t end up with an icy, grainy texture. Stirring is the secret to getting that creamy, soft-serve consistency. Don’t skip this step, even if you’re tempted! A few minutes of stirring every hour is all it takes to make your Frosty extra smooth.
Step 3: Adjust the Freezing Time for Your Ideal Consistency
If you prefer a softer Frosty, stop freezing after about three hours. But if you like it firmer, don’t be afraid to leave it in the freezer for an extra hour. Just be sure to stir every 30 minutes if you do. Once it reaches the consistency you love, it’s time to serve! You can also scoop it into bowls or cups and enjoy it immediately, or keep it in the freezer for a later treat.
Step 4: Enjoy and Share Your Frosty Creation!
Once your Frosty is perfect, it’s time to sit back, relax, and enjoy! You’ve successfully made a homemade version of Wendy’s Frosty that tastes just as delicious, and maybe even better than the original. I highly recommend serving it up with a side of your favorite cookies or a few extra chocolate chips for that authentic Frosty experience.
FAQs About Making Your Copycat Wendy’s Frosty at Home
Before you get started on your Frosty-making adventure, let’s clear up some common questions that might be floating around in your mind. I want to make sure you have all the information you need for success. So here are some of the most frequently asked questions about making this delicious treat!
1. Can I use regular milk instead of chocolate milk?
Yes, you absolutely can! If you prefer a vanilla Frosty or just don’t have chocolate milk on hand, you can use regular milk. However, if you’re going for the classic chocolate Frosty flavor, I’d recommend adding some cocoa powder or chocolate syrup to make up for the lack of chocolate in the milk. Just remember to adjust the sweetness accordingly since regular milk is less sweet than chocolate milk.
2. Can I make this recipe without Cool Whip?
If you don’t have Cool Whip or would rather avoid it, you can substitute it with homemade whipped cream. Just whip up some heavy cream until stiff peaks form and gently fold it into the condensed milk. This will give you a similarly creamy texture, though it might be slightly less stable than using Cool Whip. If you prefer a dairy-free option, you can use non-dairy whipped topping as well.
3. How long does the Frosty stay good in the freezer?
This homemade Frosty will last for up to one week in the freezer, as long as it’s stored properly in an airtight container. After that, you might notice a slight change in texture. If you have leftovers, I recommend letting it soften for 10-15 minutes at room temperature before serving again to make scooping easier.
4. Can I make this recipe in advance for a party?
Absolutely! This is a great recipe to prepare ahead of time. Since it only requires a few hours of freezing time, you can make it the day before a party or event. Just make sure to give it a good stir every hour while it freezes to ensure it stays smooth. You can also store it in smaller containers for individual servings, so guests can scoop and enjoy as they please.
5. How can I make this recipe even more indulgent?
If you’re looking to make this treat even richer, try replacing half of the chocolate milk with half-and-half or whole chocolate milk. You can also drizzle in some chocolate syrup or fudge sauce right before freezing for a swirl of extra chocolate goodness. Stirring in some crushed cookies, mini marshmallows, or even caramel bits will add extra texture and make each bite more decadent.
6. Why do I need to stir the mixture every hour while it freezes?
The stirring process is essential to achieving that creamy, smooth Frosty texture. If you just let the mixture freeze without stirring, you’ll end up with ice crystals forming, which can lead to a grainy or icy texture instead of the rich, soft-serve consistency you’re aiming for. Stirring every hour helps prevent that and keeps everything nice and smooth.
7. Can I use a blender to mix everything together?
While a blender can be used to combine the ingredients, I recommend using a whisk instead for the best results. A whisk helps you incorporate the Cool Whip and condensed milk more gently and effectively. If you decide to use a blender, be careful not to overblend, as it can cause the mixture to become too thin.
Wrapping It Up: Enjoy Your Homemade Frosty!
There you have it! Making a homemade copycat Wendy’s Frosty is simple, and now you know all the tips and tricks to make it even better. Whether you prefer it rich and indulgent or with a fun mix-in twist, this recipe is customizable to fit your cravings.
Remember, the best part of this recipe is that you don’t need fancy equipment or hard-to-find ingredients. With just a few basic items from your kitchen, you can create a treat that’s perfect for any time of day. So go ahead and whip up a batch, and don’t forget to experiment with some of the variations to make it your own.
Feel free to share your thoughts, variations, or experiences with the recipe in the comments below—I’d love to hear what creative spins you’ve put on it. And as always, enjoy your Frosty, straight from your own freezer!
PrintWendy’s Frosty
This copycat Wendy’s Frosty delivers a luxuriously creamy, chocolatey frozen treat you can make at home in just a few hours—no ice cream maker required. Silky and smooth, it strikes the perfect balance between shake and soft-serve, making it ideal for dessert cravings or an afternoon pick-me-up.
- Author: Mark's Recipe
Ingredients
300 milliliters sweetened condensed milk
8 ounces Cool Whip, thawed
8 cups 1% chocolate milk
2 tablespoons vanilla extract
Instructions
1️⃣ In a large bowl, whisk together the condensed milk and Cool Whip until the mixture is smooth and uniform.
2️⃣ Pour in the chocolate milk and vanilla extract, continuing to whisk until fully combined and slightly thickened.
3️⃣ Transfer the Frosty mixture to a freezer-safe container. Seal tightly with a lid or plastic wrap to prevent ice crystals.
4️⃣ Place the container in the freezer. Every hour for the next three hours, remove it and give the mixture a thorough stir to maintain its creamy texture.
5️⃣ After about three hours—or once it’s reached your desired consistency—spoon the Frosty into glasses or cups and serve immediately.
Notes
For a richer flavor, swap half of the 1% chocolate milk for whole chocolate milk or half-and-half.
To speed up chilling, divide the mixture into shallow, wide containers so it freezes more quickly.
If you prefer a firmer texture, freeze for an additional hour, stirring every 30 minutes.
Stir in a handful of mini chocolate chips or crushed cookies before the final freeze for added texture.
Store any leftovers covered in the freezer for up to one week; let soften for 10–15 minutes at room temperature before serving.

")
