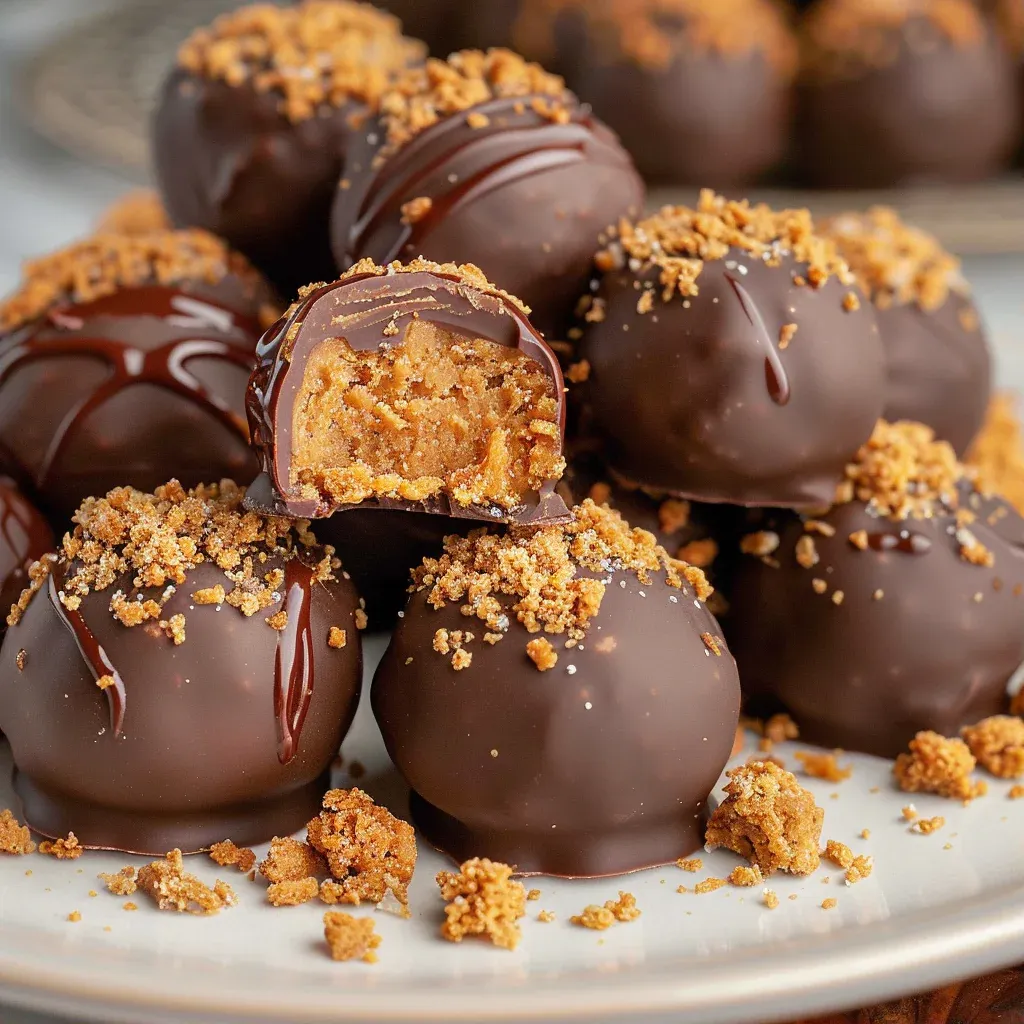
Butterfinger Balls are an irresistible treat that combine the rich flavors of creamy peanut butter, buttery sweetness, and a delightful crunch from crushed Butterfinger candy. Imagine a family gathering where the aroma of melting chocolate fills the air, and everyone is eagerly anticipating a sweet bite of these indulgent delights. With their creamy texture and deliciously crunchy coating, these no-bake truffles are perfect for any occasion, whether it’s a cozy Sunday dinner or a festive holiday party. The best part? They are incredibly easy to make, requiring no baking and minimal cleanup, making them a go-to recipe for busy home cooks and dessert lovers alike.
- Why This Recipe Is Worth Your Time
- Main Ingredients
- Tools Needed
- Step-by-Step Instructions
- Pro Tips
- Serving Ideas and Pairings
- Variations and Swaps
- Leftovers and Storage Tips
- Nutrition Notes
- Frequently Asked Questions About Butterfinger Balls
Why This Recipe Is Worth Your Time
Creating Butterfinger Balls is not just about satisfying a sweet tooth; it’s about embracing the artistry of dessert making with a balance of flavors and textures that captivate the senses. The creamy peanut butter pairs beautifully with the crunchy sweetness of Butterfinger candy, while the smooth, chocolatey coating adds a rich finish. This recipe highlights the importance of quality ingredients, using creamy peanut butter and real butter to ensure a luxurious mouthfeel. The technique is straightforward, making it accessible for all skill levels, yet the results are nothing short of artisan quality. Each bite melts in your mouth, offering a delightful combination of sweetness and texture that is sure to impress your guests.
Main Ingredients for Butterfinger Balls
To create the perfect Butterfinger Balls, selecting high-quality ingredients is essential. Here’s a breakdown of what you’ll need and why each component matters:
- 1 cup creamy peanut butter: Choose your favorite brand for the best flavor and texture. Creamy peanut butter provides richness and binds the ingredients together.
- ¼ cup salted butter (softened): Softened butter adds a rich, buttery flavor that elevates the overall taste of the truffles.
- 1 teaspoon pure vanilla extract: Pure vanilla extract enhances the sweetness and adds a fragrant note that rounds out the flavors.
- 1 cup powdered sugar: This sweetens the mixture while providing a smooth texture, making it easy to roll into balls.
- ¾ cup graham cracker crumbs: The crumbs add a slight crunch and a hint of sweetness, mimicking the texture of traditional Butterfinger candy.
- ½ cup crushed Butterfinger candy: This is the star ingredient, adding a delightful crunch and signature flavor. Use 6 fun-size bars for the right amount.
- 10 ounces chocolate flavored almond bark: Divided into 8 ounces for coating the balls and 2 ounces for drizzling. Almond bark melts smoothly and creates a beautiful finish.
Tools Needed for Butterfinger Balls
ToolPurpose / what it helps withMixing bowl (2-3 quarts)For combining ingredients smoothly and easily.Handheld mixerTo blend the peanut butter, butter, and vanilla extract seamlessly.Cookie scoop (1-tablespoon)For evenly portioning the mixture into balls.Baking sheetTo hold the Butterfinger balls while they chill and set.Parchment paperTo line the baking sheet, preventing sticking and ensuring easy cleanup.Microwave-safe bowlsFor melting the almond bark without burning.Candy dipping scoop or forkFor easy handling of the Butterfinger balls when coating them in chocolate.Candy drizzling spoon or piping bagFor drizzling the melted almond bark over the coated balls.
Step-by-Step Instructions for Butterfinger Balls
Follow these simple steps to create your own batch of Butterfinger Balls, and enjoy the process of crafting a delightful dessert that will leave everyone wanting more. Remember to pay attention to the textures and aromas as you go along.
- In a medium-sized mixing bowl (2-3 quarts), combine the creamy peanut butter, softened butter, and vanilla extract. Using a handheld mixer on medium-high speed, blend the ingredients until smooth, which should take about 1 minute. The mixture should be creamy and well combined.
- Reduce the mixer speed to medium-low and gradually add the powdered sugar, graham cracker crumbs, and ½ cup of crushed Butterfinger candies. Mix for 1½-2 minutes or until the mixture is thoroughly combined. It should form a thick, dough-like consistency.
- Line a baking sheet with parchment paper to prepare for the Butterfinger balls. This will prevent sticking and allow for easy removal later.
- Using a 1-tablespoon cookie scoop, portion out the Butterfinger mixture (I recommend a heaping tablespoon). Roll each scoop into a round ball shape and place it on the lined baking sheet. Repeat this process until all the mixture is scooped. Chill the baking sheet in the refrigerator for at least 30 minutes to firm up the balls; they should be slightly firm to the touch.
- In a microwave-safe shallow bowl, add 8 ounces of almond bark. Heat in the microwave at full power for 45 seconds, then stir. Continue heating in 30-second intervals until the almond bark is completely melted and smooth. The texture should be glossy and fluid.
- Take the baking sheet from the refrigerator and one by one, roll each Butterfinger ball in the melted almond bark until fully coated. Use a small spoon or fork to gently lift the coated balls from the chocolate and place them back on the baking sheet. Consider using a candy dipping scoop for easier handling.
- In a separate small microwave-safe bowl, place the remaining 2 ounces of almond bark. Heat in 30-second intervals, stirring after each interval until the almond bark is melted and smooth. Drizzle this melted almond bark over the tops of each Butterfinger ball using a candy-drizzling spoon, fork, or a piping bag with a tiny slit. Finish by sprinkling a bit of the extra crushed Butterfinger candy over the drizzle. Keep refrigerated until you’re ready to serve.
Pro Tips for Perfect Butterfinger Balls
- Use room temperature butter to ensure it blends smoothly with the peanut butter.
- Don’t skip chilling the Butterfinger balls before coating them; it helps them hold their shape better.
- For a more intense Butterfinger flavor, adjust the amount of crushed candy to taste.
- When melting the almond bark, stir frequently to avoid overheating, which can cause it to seize.
- Experiment with different types of chocolate for coating, such as dark or milk chocolate, to suit your preference.
- Consider using a piping bag for drizzling to create beautiful designs with the almond bark.
- Make sure to crush the Butterfinger candies into small pieces for an even distribution in the filling and for garnish.
Serving Ideas and Pairings
- Serve Butterfinger Balls on a decorative platter for special occasions.
- Pair with a glass of cold milk or hot chocolate for a comforting treat.
- For added texture, serve alongside fresh fruit or cookies.
- Sprinkle sea salt on top of the chocolate coating for a sweet and salty contrast.
- Consider offering a variety of dipping sauces for guests to customize their experience.
Variations and Swaps for Butterfinger Balls
Restaurant-Style Version
Add a touch of sea salt to the chocolate coating for a gourmet touch, and serve with artisanal chocolate sauces for dipping.
Rustic Home-Cook Version
Use crunchy peanut butter instead of creamy for added texture and a more rustic feel.
Make-Ahead Version
Prepare the Butterfinger balls in advance and freeze them; simply coat them in chocolate when you are ready to serve.
Seasonal Ingredient Version
Incorporate seasonal ingredients like crushed peppermint candies during the holidays for a festive twist.
Leftovers and Storage Tips
- Store Butterfinger Balls in an airtight container in the refrigerator for up to one week.
- For longer storage, freeze them in a single layer on a baking sheet, then transfer to a container; they can last up to three months.
- When reheating, gently bring them to room temperature to maintain their texture.
- Avoid microwaving them directly, as it can cause the chocolate coating to melt and lose its shine.
Nutrition Notes
While Butterfinger Balls are a delightful treat, they are also energy-dense. Each ball contains a mix of carbohydrates, fats, and proteins from the peanut butter and butter. Adjust portion sizes according to your dietary preferences while still enjoying the artisanal quality of the dessert. For a lighter option, consider reducing the amount of powdered sugar or using a natural sweetener.
Frequently Asked Questions About Butterfinger Balls
Can I make Butterfinger Balls without almond bark?
Yes, you can substitute almond bark with melted chocolate chips or couverture chocolate for a different flavor profile.
How long do Butterfinger Balls last?
They can be stored in the refrigerator for up to one week and in the freezer for up to three months.
Are Butterfinger Balls easy to make?
Absolutely! The process is straightforward, making them a fun and easy treat to prepare, especially for beginner cooks.
Can I customize the filling for Butterfinger Balls?
Yes, feel free to add other ingredients like chopped nuts or different candies to create your unique version.
What is the best way to serve Butterfinger Balls?
Serve them chilled on a decorative platter for a visually appealing presentation, perfect for parties and gatherings.
Now that you’ve mastered the art of making Butterfinger Balls, I encourage you to give this recipe a try. These delightful treats not only satisfy your sweet cravings but also bring a touch of joy and creativity to your kitchen. The process of crafting Butterfinger Balls is a wonderful way to enjoy the joys of artisan cooking, celebrating quality ingredients and delicious flavors with every bite.

Butterfinger Bliss Balls

This delicious butterfinger bliss balls is a fantastic dish that’s sure to impress. Made with creamy peanut butter (your favorite brand, ¼ cup salted butter (softened), and pure vanilla extract, it combines great flavors and textures for a memorable meal.
- Prep Time: 15 minutes
- Cook Time: 30 minutes
- Total Time: 45 minutes
- Yield: 4 servings 1x
Ingredients
- 1 cup creamy peanut butter (your favorite brand, I used Great Value)
- ¼ cup salted butter (softened)
- 1 teaspoon pure vanilla extract
- 1 cup powdered sugar
- ¾ cup graham cracker crumbs
- ½ cup crushed Butterfinger candy (6 fun-size bars) plus 1-2 extra crushed candies for optional garnish
- 10 ounces chocolate flavored almond bark (divide 8 ounces and 2 ounces)
Instructions
- In a medium-sized mixing bowl (2-3 quarts), combine the creamy peanut butter, softened butter, and vanilla extract. Use a handheld mixer on medium-high speed to blend the ingredients until smooth, which should take about 1 minute.
- Reduce the mixer speed to medium-low and gradually add the powdered sugar, graham cracker crumbs, and ½ cup of crushed Butterfinger candies. Mix for 1½-2 minutes or until the mixture is thoroughly combined.
Line a baking sheet with parchment paper to prepare for the Butterfinger balls.
- Using a 1-tablespoon cookie scoop, portion out the Butterfinger mixture (I recommend a heaping tablespoon). Roll each scoop into a round ball shape and place it on the lined baking sheet. Repeat this process until all the mixture is scooped. Chill the baking sheet in the refrigerator for at least 30 minutes to firm up the balls.
- In a microwave-safe shallow bowl, add 8 ounces of almond bark. Heat in the microwave at full power for 45 seconds, then stir. Continue heating in 30-second intervals until the almond bark is completely melted and smooth.
- Take the baking sheet from the refrigerator and one by one, roll each Butterfinger ball in the melted almond bark until fully coated. Use a small spoon or fork to gently lift the coated balls from the chocolate and place them back on the baking sheet. Consider using a candy dipping scoop for easier handling.
")
