
If there’s one thing that has the power to turn a simple dinner into a total comfort-food moment, it’s homemade bread—and this Italian Herb and Cheese Bread is hands-down one of my favorites. It’s everything you want in a loaf: soft and tender inside, golden on the outside, and filled with the kind of herby, cheesy aroma that makes your whole kitchen smell like a cozy Italian trattoria.
The first time I made this bread, I wasn’t trying to be fancy. I just wanted something to go with a basic spaghetti night. But when I pulled that golden, cheesy loaf out of the oven and sliced into its warm, melty center, I knew it was going to be more than just a side dish. It’s one of those recipes you’ll keep coming back to again and again—especially once you realize how easy it is to make from scratch.
Whether you serve it alongside pasta, dip it into tomato soup, or use it as the base for the ultimate grilled cheese sandwich, this bread is guaranteed to steal the spotlight. Let’s get into it.
Making the Dough for Italian Herb and Cheese Bread
Homemade bread can seem intimidating if you haven’t done it before, but I promise this one is super beginner-friendly. It uses simple pantry ingredients, doesn’t require any special equipment, and gives you that soft-on-the-inside, crusty-on-the-outside texture that’s just so satisfying.
Let’s start by building the base: a beautifully soft dough that gets infused with herbs and garlic right from the beginning.
Ingredients You’ll Need:
-
3 cups all-purpose flour
-
1 tbsp sugar
-
2 ¼ tsp active dry yeast (1 packet)
-
1 tsp salt
-
1 tbsp Italian seasoning
-
1 tsp garlic powder
-
1 cup warm water (around 110°F)
-
1 tbsp olive oil
-
1 ½ cups shredded mozzarella cheese
-
½ cup grated Parmesan cheese
-
2 tbsp melted butter
-
1 tsp dried parsley (or more Italian seasoning) for topping
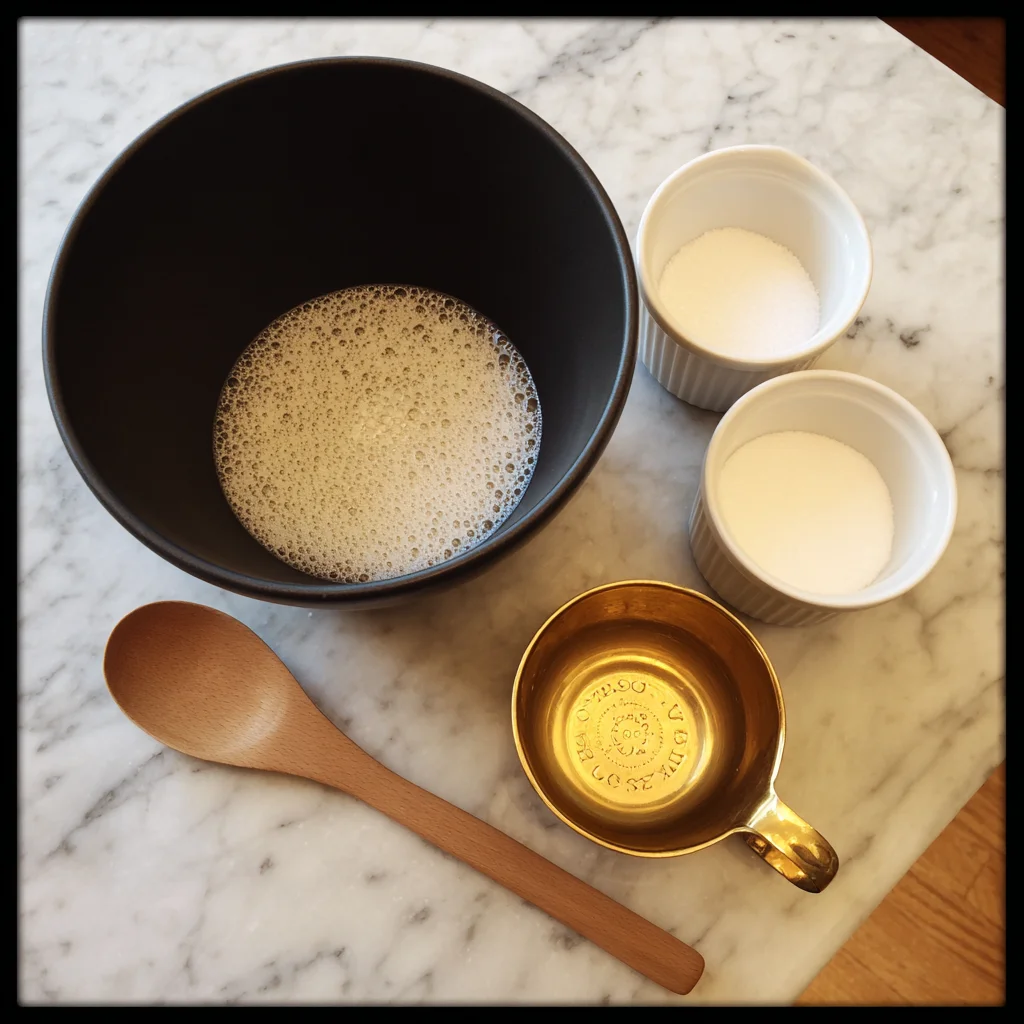
STEP 1: Activate the Yeast
In a large mixing bowl, combine the warm water, sugar, and yeast. Give it a quick stir and let it sit for 5 to 10 minutes, until it starts to look foamy. That foam means your yeast is alive and ready to do its magic—don’t skip this part!
Tip: Make sure your water isn’t too hot. It should feel like warm bath water. If it’s too hot, it can kill the yeast before it even starts.
STEP 2: Mix the Dough
Once the yeast is activated, stir in the olive oil, salt, garlic powder, Italian seasoning, and flour. Mix until everything comes together into a rough dough.
If you’re using a stand mixer with a dough hook, that’s perfect here. If not, your hands will work just fine. Either way, knead the dough for 8 to 10 minutes until it’s smooth, stretchy, and just a little tacky but not sticky.
Tip: If your dough feels too dry, add a tablespoon of water. If it’s too wet and sticking to your hands like crazy, add a bit more flour—just a tablespoon at a time.
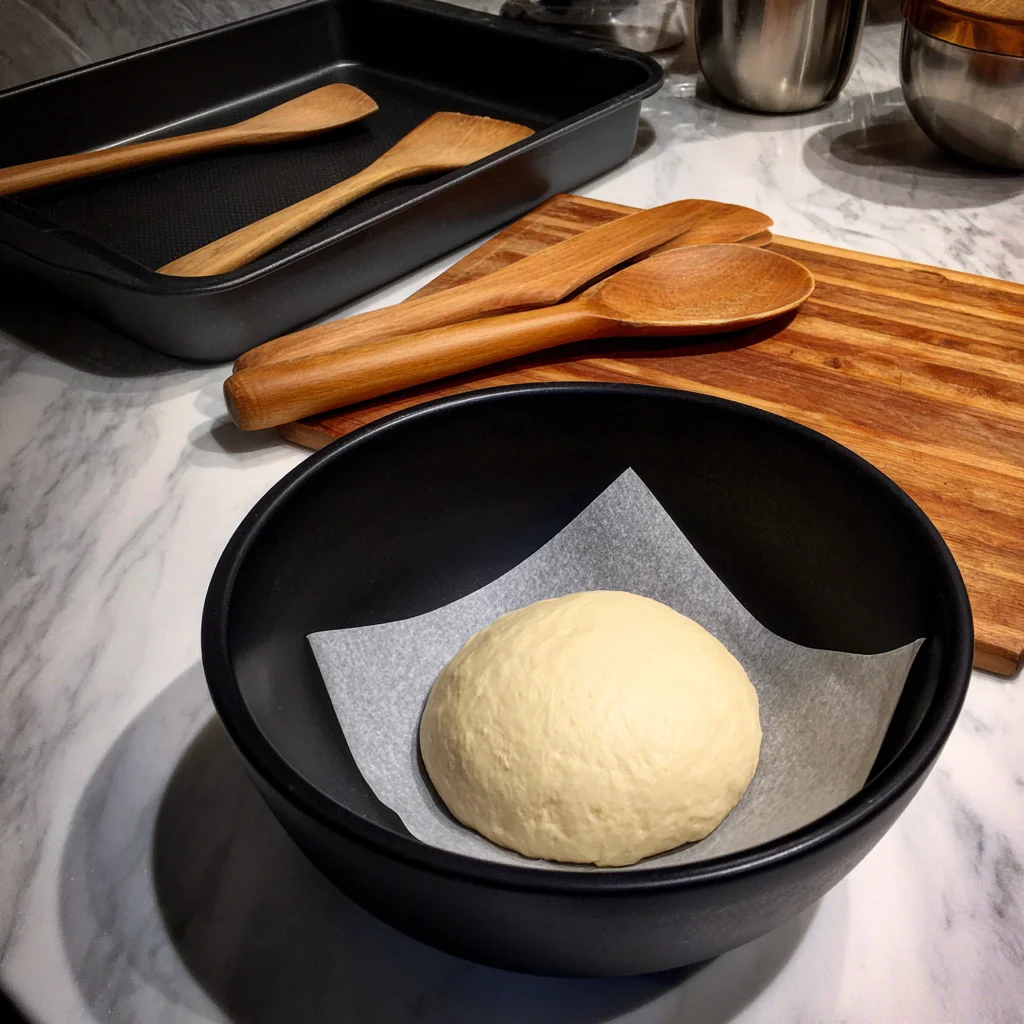
STEP 3: First Rise
Lightly grease a clean bowl with a bit of oil and place your dough inside. Cover it with plastic wrap or a clean kitchen towel and let it rise in a warm spot for about 1 hour, or until it has doubled in size.
I usually stick mine in the oven (turned off) with the light on—that little bit of warmth helps the dough rise faster.
Why This Bread Works Every Time
What I love about this recipe is how foolproof it is. The Italian seasoning and garlic powder are built right into the dough, so every bite is packed with flavor. And thanks to that rise time, the loaf ends up light and airy—no dense, heavy bread here.
If you’ve made it this far, you’re already more than halfway there. Up next, we’re going to shape, cheese, and bake this beauty into golden perfection.
Italian Herb and Cheese Bread: Cheesy, Golden, and Baked to Perfection
Welcome back! If you’ve already mixed up your dough and let it rise until doubled, then you’re just a few steps away from pulling the most delicious, golden, cheesy loaf out of your oven.
This part is where the magic happens. We’re shaping the bread, loading it with cheese, and baking it until the top is beautifully crisp and golden brown. And the best part? That buttery, herby finish at the end that takes it over the top.
So let’s dive back in and bring this Italian Herb and Cheese Bread to life.
Shaping, Baking, and Adding the Cheese Topping
After the dough has risen, it’s time to give it some shape and introduce all that cheesy goodness. You can bake this in a loaf pan for a more traditional look, or go freeform for a rustic, bakery-style bread. Either way, you’re going to end up with a crusty, flavorful loaf that’s perfect for slicing, tearing, or dipping.
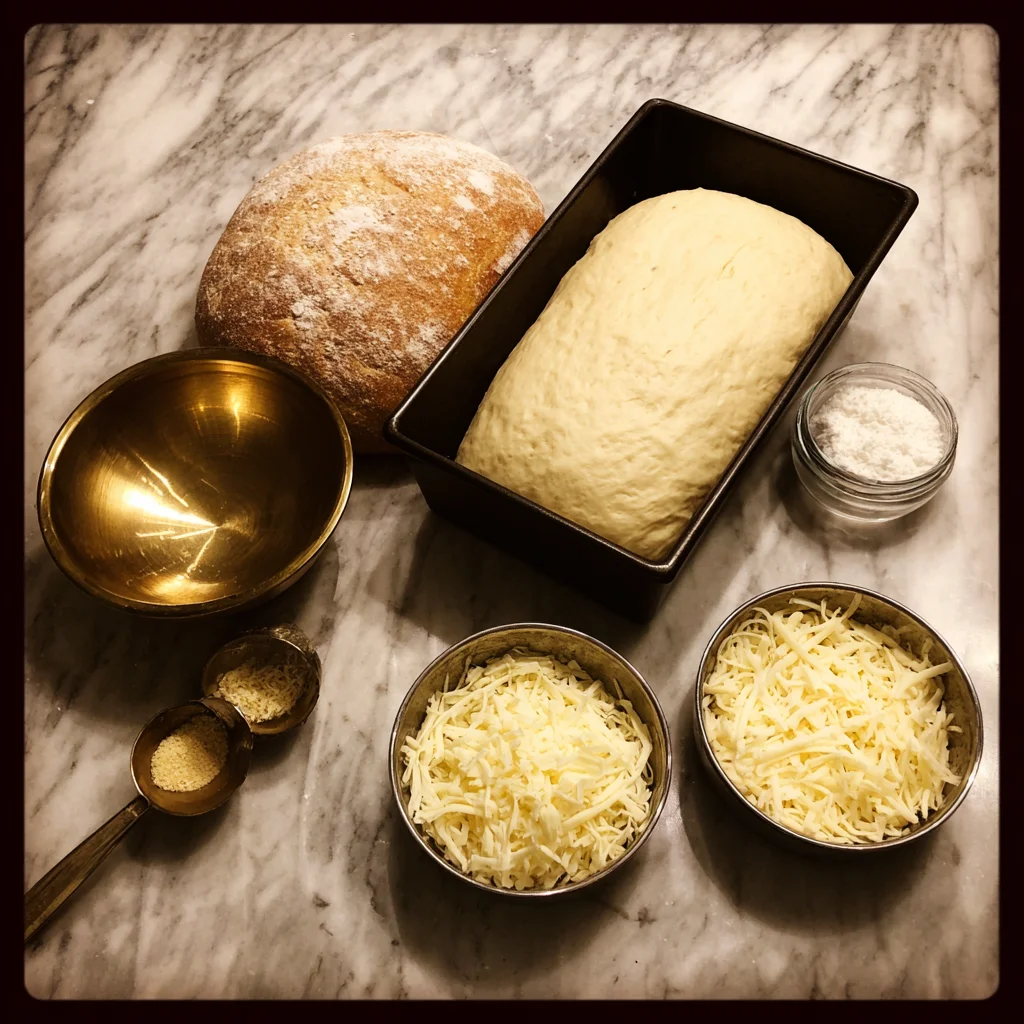
STEP 4: Punch Down and Shape the Dough
Once your dough has risen for about an hour and doubled in size, gently punch it down to release the air. Turn it out onto a lightly floured surface.
Now, shape it into a loaf. You can keep it simple and just tuck the dough into a greased 9×5-inch loaf pan, or shape it freeform into a round or oval loaf and place it on a parchment-lined baking sheet. Both work great—it’s just a matter of how you want it to look.
Tip: If you’re going with the freeform method, make sure to shape it tightly so it holds together while baking.
STEP 5: Add the Cheese Topping
Now for the fun part—cheese time.
Take your shredded mozzarella and grated Parmesan, and sprinkle them evenly over the top of the shaped dough. Press the cheese gently into the surface so it sticks while baking.
If you want an extra cheesy crust (who doesn’t?), you can even add a little more on top right before baking.
Cheese Variations to Try:
-
Provolone for a slightly smoky flavor
-
Asiago for a sharp, nutty edge
-
Cheddar if you want a bolder, melty topping
Mix and match if you’re feeling creative—this recipe is super flexible.
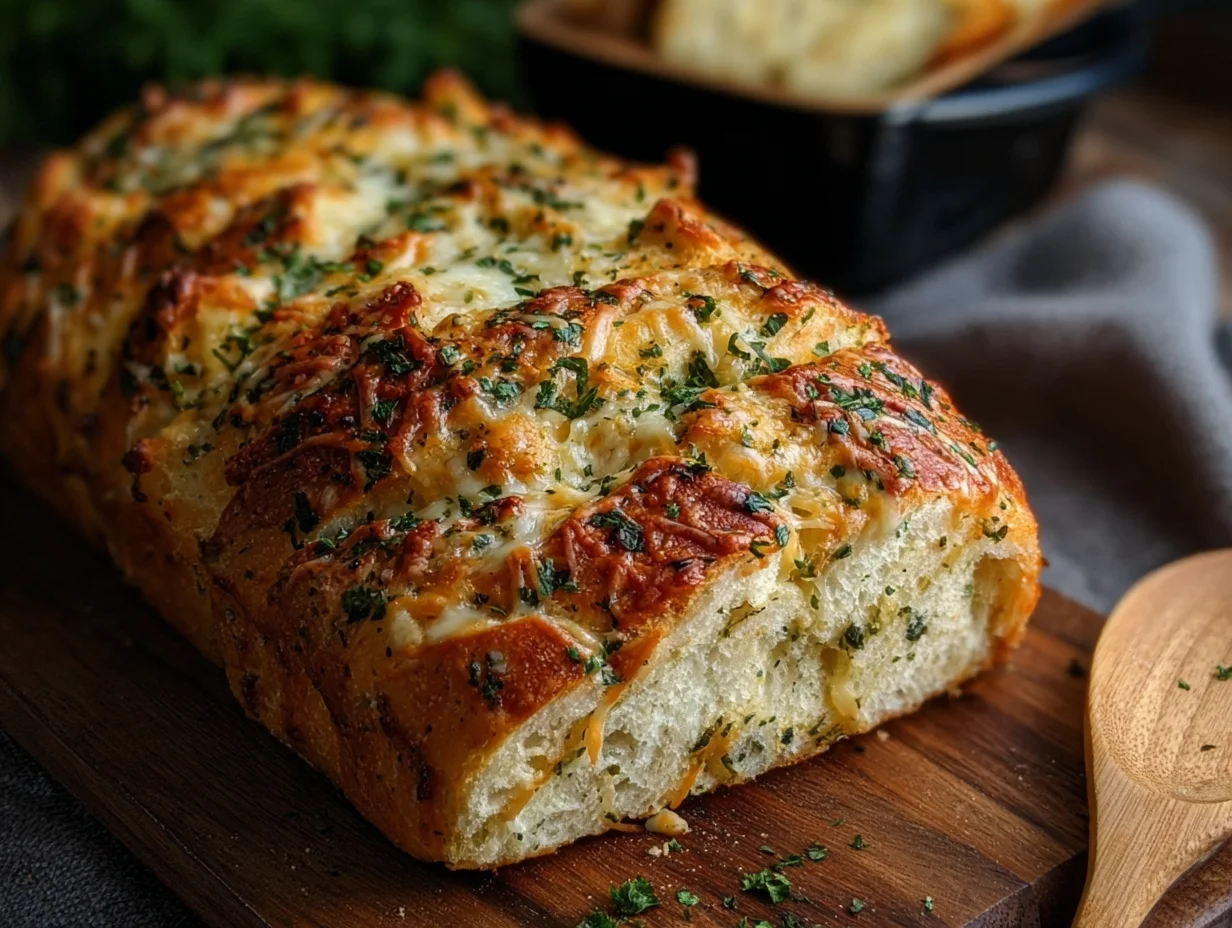
STEP 6: Bake the Bread
Preheat your oven to 375°F. Once it’s hot and your dough is shaped and topped, slide the loaf into the oven and bake for 25 to 30 minutes.
You’ll know it’s ready when the crust is a deep golden brown and the loaf sounds hollow when tapped on the bottom.
Tip: If the top is browning too quickly before the center is done, you can loosely cover it with foil for the last 5-10 minutes of baking.
STEP 7: Finish with Butter and Herbs
As soon as the bread comes out of the oven, brush the top with melted butter. This not only adds flavor but also gives it that shiny, bakery-style finish.
Sprinkle with a little dried parsley or a pinch of Italian seasoning for that final herb kick.
Then let it cool slightly before slicing—you want the cheese to set just a bit so it doesn’t all melt out when you cut into it.
Serving Tips and Pairing Ideas
This bread is incredibly versatile, and once you try it, you’ll probably find yourself reaching for it as a side for all kinds of meals. Here are a few of my favorite ways to serve it:
-
With pasta: This is a must. Especially with marinara, Alfredo, or baked pasta dishes. It’s perfect for soaking up every last bit of sauce.
-
As sandwich bread: Slice it thick and use it for grilled cheese or Italian-style subs.
-
Alongside soup or salad: It adds just the right amount of substance to lighter meals.
-
Warm with butter: Keep it simple and just enjoy a warm slice with a generous spread of butter. You won’t regret it.
How to Store and Reheat Leftovers
This bread is at its absolute best warm out of the oven, but it still holds up well for a few days.
-
To store: Wrap the cooled loaf in foil or place it in an airtight container at room temperature for up to 3 days.
-
To reheat: Wrap slices in foil and warm them in the oven at 350°F for 10-12 minutes. You can also reheat in a toaster oven for a bit of extra crispiness.
-
Freezing option: Slice and freeze individual pieces. Reheat directly from frozen in the oven or toaster oven.
Bonus Tip: Make It Ahead
Want to prep ahead for a dinner party or busy weeknight? You can make the dough ahead of time and let it rise in the fridge overnight. Just bring it to room temperature the next day, shape, top, and bake as usual.
Italian Herb and Cheese Bread: FAQ and Final Thoughts
You’ve made it to the final part of our delicious journey, and if your kitchen isn’t already smelling like an Italian bakery, it will be soon. We’ve mixed, kneaded, shaped, and baked a cheesy, herb-packed loaf that’s as comforting as it is versatile.
Now that you’ve got the full recipe in hand, let’s cover some common questions that pop up when making this bread. Whether you’re a first-time baker or just looking to perfect your loaf, these quick answers should help you along the way.
Frequently Asked Questions
Can I use instant yeast instead of active dry yeast?
Yes! Instant yeast can be used in equal amounts (2¼ tsp). You can skip the activation step and mix it directly with the dry ingredients. However, I still recommend activating it if you’re unsure how fresh your yeast is.
What can I use if I don’t have Italian seasoning?
You can easily make your own blend using 1 tsp each of dried basil, oregano, thyme, and a pinch of rosemary or marjoram. Adjust to your taste!
Can I use bread flour instead of all-purpose flour?
Absolutely. Bread flour will give the loaf a chewier texture and a bit more structure. If you like a more bakery-style finish, go for bread flour. Just be aware that it might absorb slightly more water, so adjust as needed.
How do I know when the bread is done baking?
Besides the golden color and the hollow sound when tapped, you can also use a thermometer—bread is fully baked when the internal temperature reaches 190°F to 200°F.
Can I make this recipe gluten-free?
This particular recipe hasn’t been tested with gluten-free flour, but you could try a 1:1 gluten-free flour blend designed for yeast breads. Keep in mind that texture and rise may vary, and you might need to tweak the liquid ratio.
Can I freeze this bread?
Yes, and it freezes well. Let the loaf cool completely, then wrap it tightly in plastic wrap and foil. You can freeze the whole loaf or individual slices. To reheat, thaw at room temp or warm in a 350°F oven wrapped in foil until heated through.
What’s the best way to store leftovers?
Store the cooled bread in an airtight container or wrap it in foil and keep it at room temperature for up to 3 days. Avoid refrigerating—it tends to dry bread out faster. For longer storage, freezing is your best bet.
Final Thoughts: Why You’ll Keep Coming Back to This Bread
This Italian Herb and Cheese Bread checks every box: soft, flavorful, cheesy, and seriously easy to make from scratch. Whether you’re new to baking or just want a reliable go-to side for your favorite meals, this recipe delivers every time.
I love how customizable it is—you can swap the cheese, shape it your way, or even add in extras like sun-dried tomatoes, chopped olives, or roasted garlic if you’re feeling adventurous. And let’s not forget how incredible it smells while baking. That alone makes it worth the effort.
If you try this recipe, I’d love to hear how it turns out for you. Did you stick with the mozzarella and Parmesan, or did you try your own twist? Let me know in the comments, and feel free to share your favorite ways to serve it!
And if you’re anything like me, this loaf won’t last long once it hits the table—especially with a little butter melted on a warm slice. Pure comfort.
PrintDelicious Italian Herb and Cheese Bread Recipe

This Italian Herb and Cheese Bread is soft, flavorful, and filled with the irresistible aroma of garlic, herbs, and melty cheese. It’s the perfect side to pasta, soup, or salad and can also be used for sandwiches or served warm with butter. The golden crust and tender, cheesy crumb make this a comforting, crowd-pleasing bread that’s easy to make from scratch.
- Author: Mark's Recipe
Ingredients
3 cups all-purpose flour
1 tbsp sugar
2 ¼ tsp active dry yeast
1 tsp salt
1 tbsp Italian seasoning
1 tsp garlic powder
1 cup warm water (about 110°F)
1 tbsp olive oil
1 ½ cups shredded mozzarella cheese
½ cup grated Parmesan cheese
2 tbsp melted butter
1 tsp dried parsley or more Italian seasoning for topping
Instructions
In a large mixing bowl, combine warm water, sugar, and yeast. Let sit for 5 to 10 minutes until foamy and activated.
Add olive oil, salt, garlic powder, Italian seasoning, and flour. Mix until a soft dough forms. Knead the dough on a floured surface or in a mixer for 8 to 10 minutes until smooth and elastic.
Place the dough in a greased bowl, cover, and let it rise in a warm area for about 1 hour or until doubled in size.
Preheat oven to 375°F. Punch down the risen dough and place it onto a lightly floured surface. Shape into a loaf or press into a greased 9×5-inch loaf pan.
Sprinkle mozzarella and Parmesan cheese evenly over the top, pressing the cheese gently into the dough.
Bake for 25 to 30 minutes or until the crust is golden and the loaf sounds hollow when tapped.
Remove from the oven and immediately brush the top with melted butter. Sprinkle with dried parsley or more Italian seasoning if desired. Let cool slightly before slicing.
Notes
You can swap the mozzarella for provolone, asiago, or cheddar for different flavor profiles. This bread is best served warm but can be stored at room temperature in an airtight container for up to three days. To reheat, wrap in foil and warm in the oven to maintain its texture. For a more rustic version, shape the dough freeform and bake on a baking stone or sheet.


")
