
There’s just something about the smell of sausage cooking on a weekend morning that makes me feel instantly cozy—and these Sausage Biscuit Bites bring all those comforting vibes wrapped in a flaky, golden crust. Whether you’re planning a casual brunch with friends or need a grab-and-go breakfast that still feels a little special, these bite-sized bundles deliver big-time flavor with minimal fuss.
This recipe has quickly become one of my go-tos. It’s quick to prep, makes use of simple, everyday ingredients, and the results? Absolutely crave-worthy. The combination of buttery biscuit dough, savory sausage, and gooey cheddar cheese is always a hit in my house (especially when served warm straight from the oven). They’ve even earned a permanent spot on our game-day snack table!
Now, I’ve tested these enough times to know a few tricks that make them extra delicious, and I’ll be sharing those throughout the post. But first, let’s get started on the basics. Trust me, these come together faster than you think.
Ingredients You’ll Need
-
1 can (16.3 ounces) refrigerated buttermilk biscuit dough
-
8 ounces bulk breakfast sausage
-
½ cup finely shredded sharp cheddar cheese
-
2 tablespoons finely chopped green onions (optional, but so good)
-
1 tablespoon melted butter
-
Freshly ground black pepper
I usually use a classic breakfast sausage for this recipe, but you could totally switch it up with a maple or spicy version if you want to add a twist. And if you’re not into green onions, feel free to leave them out—they add a little pop of freshness, but the bites are still amazing without them.
STEP 1: PREP YOUR DOUGH AND PAN
Start by preheating your oven to 375°F (190°C). Line a baking sheet with parchment paper so nothing sticks—and for easier cleanup later.
Next, pop open that can of biscuit dough (always a little jump-scare moment, right?). Separate the biscuits and, using your fingers, gently flatten each one into a circle about 3 to 4 inches wide. You don’t need a rolling pin for this; just press them out with your hands. The idea is to make a little dough blanket that will fold around your filling.
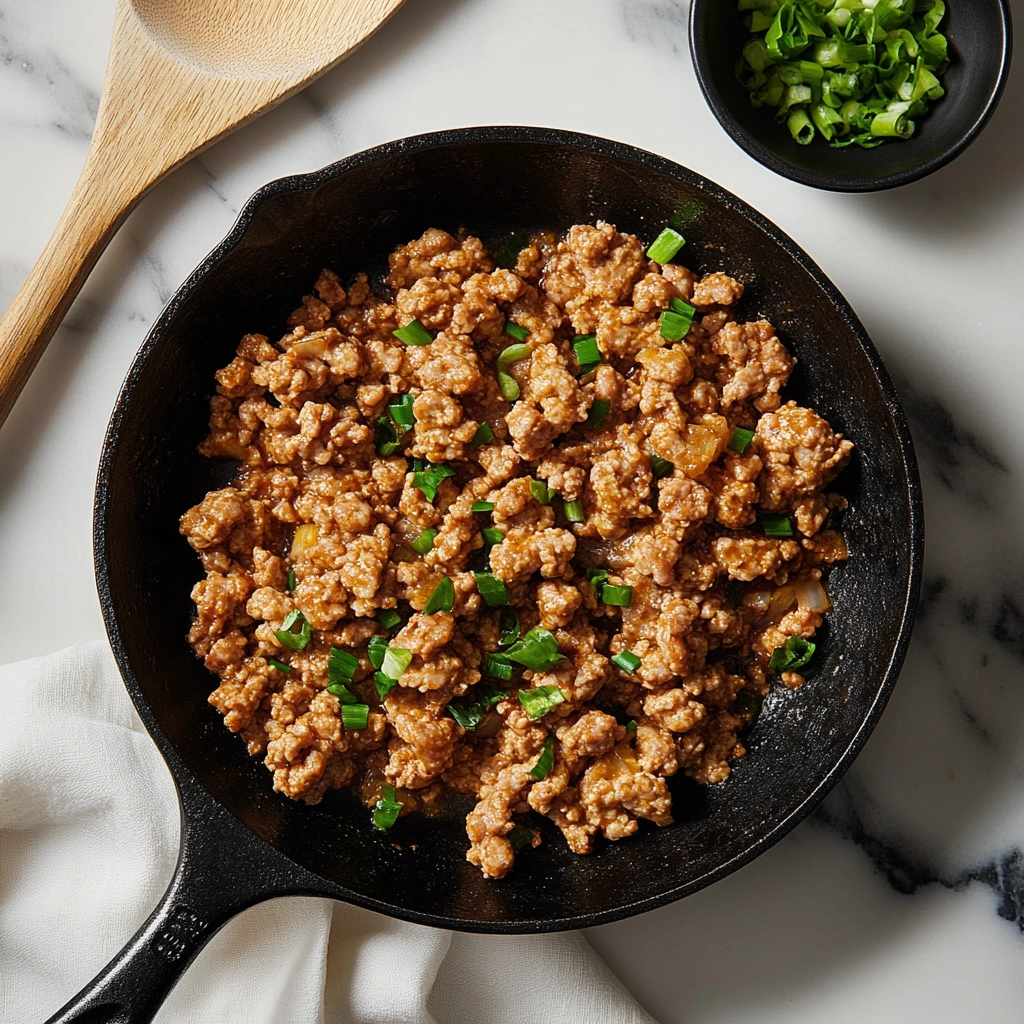
STEP 2: COOK THE SAUSAGE FILLING
In a medium skillet, cook your sausage over medium heat. Use a spatula to break it up into small crumbles as it browns. You’ll want to cook it until there’s no pink left and you start getting some golden, crispy bits—that’s where the flavor lives.
Once it’s fully cooked, drain off any extra fat. Stir in the chopped green onions at this point (if you’re using them) and take the skillet off the heat. Let the mixture cool for a few minutes—this makes it easier to handle and keeps the cheese from melting too soon in the next step.
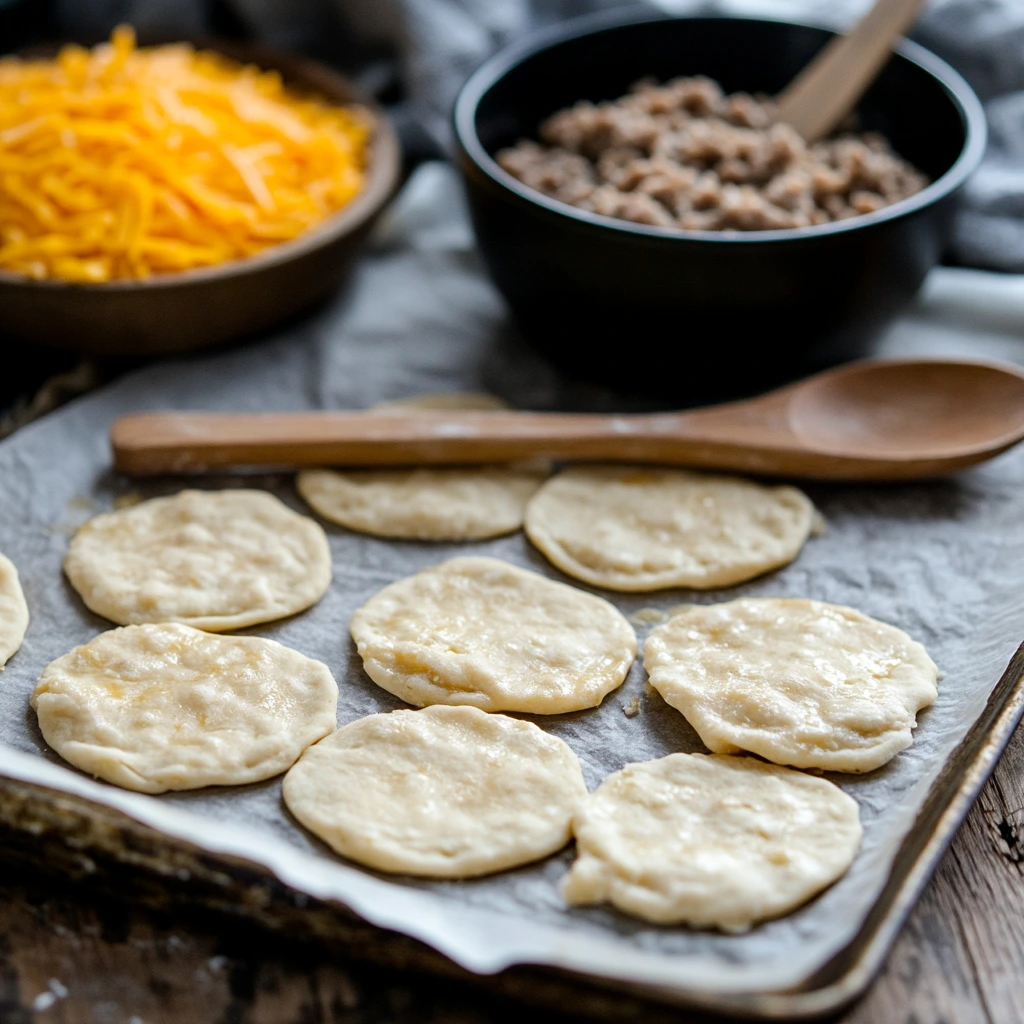
STEP 3: ASSEMBLE THE BITES
Now comes the fun part! Take a tablespoon of the cooled sausage mixture and place it right in the center of each flattened biscuit. Add a small pinch of shredded cheddar cheese on top of the sausage and give it a quick twist of freshly ground black pepper.
To seal, pull the edges of the dough up over the filling and pinch them together at the top. Then roll gently between your hands to form a smooth ball. This doesn’t have to be perfect—just make sure the dough is sealed so none of that cheesy goodness leaks out during baking.
Place the formed bites seam-side down on your prepared baking sheet, leaving a little space between each one.
Sausage Biscuit Bites – Finishing Touches and Flavorful Tips
Now that your sausage-stuffed dough balls are lined up and ready on the baking sheet, we’re getting close to the best part—baking them into golden, buttery perfection. If you’re anything like me, this is where the anticipation really kicks in because your kitchen will start smelling absolutely amazing.
Whether you’re whipping up a quick weekday breakfast or serving a crowd on the weekend, these little bites check all the boxes: crispy edges, gooey cheese inside, and a warm sausage center that’s full of flavor. And the best part? You can customize them with just a few simple tweaks. But first—let’s finish baking!

STEP 4: BRUSH AND BAKE
Right before these go into the oven, brush the tops with melted butter. It helps the biscuit dough get that perfect golden brown color and adds a little extra richness to every bite. If you want to go the extra mile flavor-wise (and I always do), stir a pinch of dried Italian seasoning or a dash of garlic powder into the melted butter before brushing. It adds a subtle boost without overpowering the rest of the flavors.
Now bake the bites in your preheated 375°F (190°C) oven for 12 to 15 minutes. They’re done when the biscuits are puffed and beautifully golden on top. Depending on your oven and the brand of dough you’re using, you might want to check them around the 12-minute mark just to be safe. You want them nicely browned, not overdone.
Once they’re out of the oven, let them sit for about 2 minutes. That rest time helps the cheese inside settle a bit, so it doesn’t spill out when you bite in. But honestly—good luck waiting. They smell so good it’s nearly impossible not to sneak one right away.
STEP 5: SERVE ‘EM UP OR STORE FOR LATER
These biscuit bites are at their absolute best when served warm, right out of the oven. That said, if you’re hosting a brunch or tailgate and need to prep ahead, you’re in luck—this recipe is totally freezer-friendly.
Make-Ahead Option:
Assemble the biscuit bites as directed (up through the sealing step), and then place them on a baking sheet lined with parchment. Freeze them for about an hour or until firm, then transfer to a freezer-safe zip-top bag. When you’re ready to bake, just pop them straight from the freezer into a 375°F oven. Add a few extra minutes to the bake time, and you’re good to go. No thawing required.
Storing Leftovers:
If you have leftovers (rare in my house!), store them in an airtight container in the fridge for up to two days. To reheat, place them in a 350°F (175°C) oven for about five minutes. This keeps the outside crisp and the inside melty—way better than using the microwave, which tends to make the biscuit a little rubbery.

WAYS TO SWITCH IT UP
Want to get a little creative? Here are a few fun variations and flavor ideas I’ve tested that totally work:
-
Cheese Options: Swap the cheddar for pepper jack for a little heat, or try mozzarella for a super melty version.
-
Add Veggies: A few finely diced bell peppers or sautéed mushrooms mixed into the sausage can make these feel even more hearty.
-
Different Meats: Breakfast sausage is classic, but crumbled bacon or even diced ham works beautifully too.
-
Dipping Sauces: These are amazing on their own, but even better with a dipping sauce. Honey mustard, ranch, or a spicy ketchup all work great depending on your vibe.
And if you’ve got kids, these are super lunchbox-friendly. Just pack a few with a little container of dipping sauce and they’ll come home with nothing left.
Sausage Biscuit Bites – FAQ and Final Thoughts
We’ve covered the prep, assembly, and baking—so now let’s wrap up with some helpful answers to the most common questions I get about these Sausage Biscuit Bites. Whether you’re making them for the first time or just looking to troubleshoot a specific step, these tips will help make sure your bites turn out just right every single time.
Frequently Asked Questions
1. Why is my biscuit dough opening up while baking?
This usually happens when the seams weren’t sealed tightly enough during assembly. Make sure to pinch the dough edges firmly and roll the ball gently between your palms to smooth it out. Placing the seam side down on the baking sheet also helps it stay sealed.
2. Can I use homemade biscuit dough instead of the canned version?
Absolutely! If you have a favorite homemade buttermilk biscuit dough, feel free to use it. Just be sure to portion it into rounds that can be flattened and filled, similar to the canned biscuits. The bake time may vary slightly, so keep an eye on them in the oven.
3. Can I freeze these after baking?
Yes, baked bites can be frozen, though they’re best fresh. Let them cool completely, then freeze in a single layer before transferring to a freezer bag. Reheat in a 350°F (175°C) oven for 8–10 minutes. They’ll still taste great, but the texture is just a bit softer than when freshly baked.
4. How can I make these spicier?
Try using spicy breakfast sausage or add a pinch of crushed red pepper flakes to the cooked sausage mixture. You can also use a sharper or spicier cheese like pepper jack to give them an extra kick.
5. Can I make these vegetarian?
Yes! Substitute the sausage with a meat-free alternative like plant-based breakfast crumbles. Just cook and season them the same way you would with regular sausage. Keep in mind that some veggie crumbles may need less cooking time.
6. Do I need to grease the baking sheet if I’m not using parchment paper?
If you’re not using parchment, lightly greasing the baking sheet with butter or cooking spray will prevent sticking. Parchment paper just makes cleanup a breeze, which is why I always recommend it.
7. What’s the best way to serve these at a party or potluck?
Keep them warm in a slow cooker set to the “warm” setting, or wrap them in foil and store them in an insulated food carrier. Serve with a couple of dipping sauces on the side to keep things fun and customizable for your guests.
Final Thoughts
There’s something about these Sausage Biscuit Bites that makes them feel like a little breakfast gift in every bite—flaky, buttery, savory, and just the right size to keep popping until they’re all gone. Whether you’re serving them at a weekend brunch, prepping a batch for busy weekday mornings, or putting them out as a party snack, they always seem to disappear fast.
I love how customizable they are, and the fact that they’re freezer-friendly makes them even more practical for busy schedules. You can prep a double batch, freeze half, and thank yourself later when you need a quick and satisfying bite.
PrintSausage Biscuit Bites

Flaky, golden-brown biscuit dough envelopes savory breakfast sausage and melted cheese in perfectly portable, bite-sized morsels. These savory treats are ideal for brunch gatherings, game-day snacks or an easy grab-and-go breakfast.
- Author: Mark's Recipe
Ingredients
1 can (16.3 ounces) refrigerated buttermilk biscuit dough
8 ounces bulk breakfast sausage
½ cup finely shredded sharp cheddar cheese
2 tablespoons finely chopped green onions (optional)
1 tablespoon melted butter
Freshly ground black pepper
Instructions
Preheat the oven to 375°F (190°C) and line a baking sheet with parchment paper. Separate each biscuit from the can and, using your fingers, gently stretch and flatten each round into a 3- to 4-inch circle.
In a skillet over medium heat, cook the sausage, breaking it into small pieces with a spatula, until no pink remains and it begins to brown lightly. Drain off any excess fat, then stir in the green onions and remove from heat. Allow the sausage to cool slightly.
Spoon approximately one tablespoon of the cooked sausage into the center of each flattened biscuit. Top each with a pinch of cheddar cheese and a crack of black pepper. Fold the edges of the dough up and over the filling, pinching to seal and then rolling gently between your palms to form a smooth ball. Place each sealed bite seam-side down on the prepared baking sheet.
Brush the tops of the biscuit bites with melted butter. Bake for 12 to 15 minutes, or until the biscuits are puffed and golden brown. Remove from the oven and let rest for two minutes before serving warm.
Notes
For extra flavor, stir a pinch of dried Italian seasoning or a dash of garlic powder into the melted butter before brushing.
To make ahead, assemble the bites and freeze on the baking sheet until firm, then transfer to a freezer bag. Bake from frozen, adding a few extra minutes to the cooking time.
These bites pair beautifully with honey mustard, spicy ketchup or a creamy ranch dip for serving variety.
Leftover bites keep in an airtight container in the refrigerator for up to two days and can be reheated in a 350°F (175°C) oven for about five minutes to restore crispness.


")
