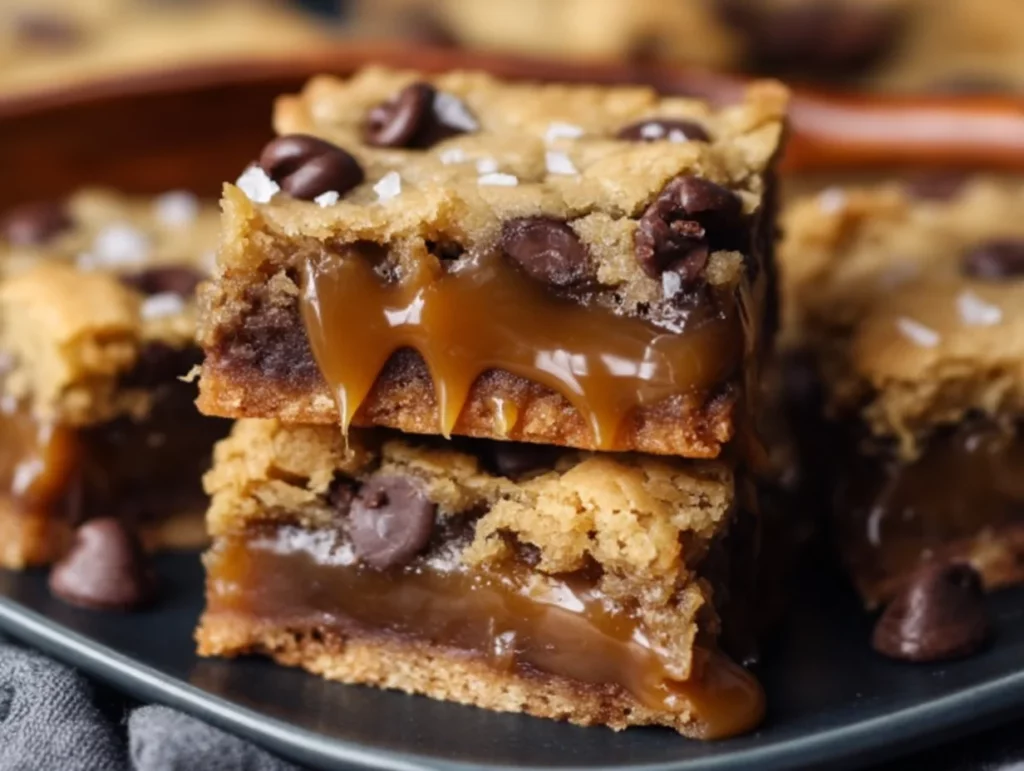
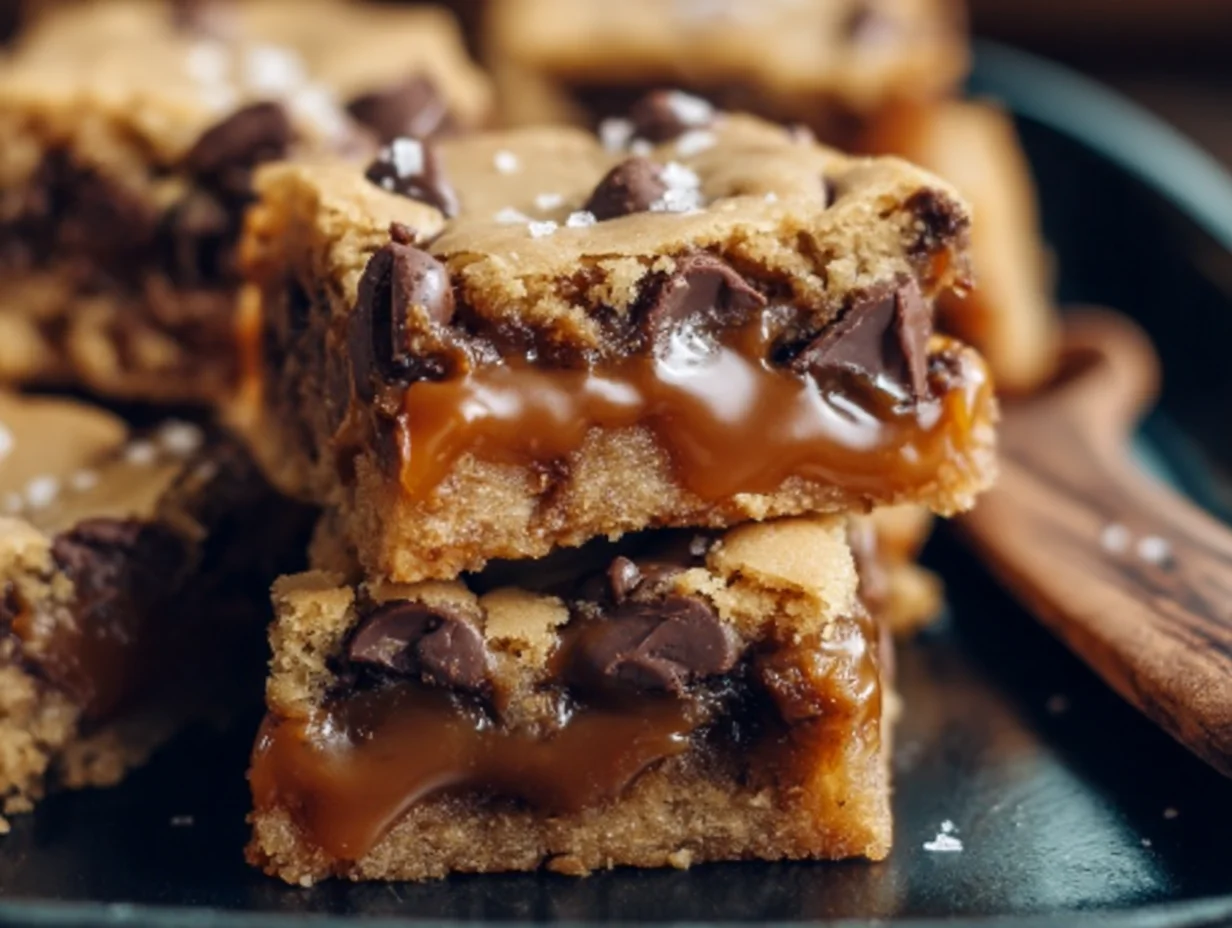
There’s just something magical about the combination of sweet and salty—especially when chocolate and caramel are involved. If you’re anything like me, you might already have a favorite chocolate chip cookie recipe. But trust me, once you try these Salted Caramel Chocolate Chip Cookie Bars, they might just become your new go-to treat.
I first made these bars for a neighborhood potluck. I was in a rush and needed something simple but impressive—something that would hold up well on the dessert table without needing a fork or a plate. Enter: this genius mash-up of chocolate chip cookies and gooey caramel, baked into sliceable squares and sprinkled with flaky sea salt for that little extra sparkle (and flavor punch).
These cookie bars have it all: a soft, buttery cookie base, a thick layer of rich caramel, melty chocolate chips throughout, and that crave-worthy salty finish on top. They’re the kind of dessert that gets requested again and again—whether it’s for a bake sale, a family dinner, or just because you’re in the mood for something indulgent. Let’s get started!
Ingredients You’ll Need:
-
2¼ cups all-purpose flour
-
1 teaspoon baking soda
-
½ teaspoon salt
-
1 cup unsalted butter, softened
-
¾ cup brown sugar
-
½ cup granulated sugar
-
2 large eggs
-
2 teaspoons vanilla extract
-
2 cups semisweet chocolate chips
-
1 cup soft caramel candies or caramel sauce
-
2 tablespoons heavy cream
-
Flaky sea salt for topping
You probably already have most of these pantry staples on hand, and if not, they’re easy to find. The only real decision here is whether you’re going to unwrap and melt down caramel candies or go for a shortcut with a high-quality jarred caramel sauce. Either way, it’s going to taste amazing.
STEPS: Prepping the Dough & Laying the Foundation
1. Preheat and Prep
Start by preheating your oven to 350°F. Line a 9×13-inch baking dish with parchment paper (I like to let a little hang over the sides so I can lift the bars out easily later). Alternatively, lightly grease the dish—whatever works best for you.
2. Mix the Dry Ingredients
In a medium-sized bowl, whisk together the flour, baking soda, and salt. Set this aside for now—we’ll come back to it soon.
3. Cream the Butter and Sugars
In a large mixing bowl (or stand mixer), cream together 1 cup of softened butter, ¾ cup brown sugar, and ½ cup granulated sugar. This should take about 2-3 minutes on medium speed. The mixture should look light and fluffy, which means you’re building the perfect base for soft and chewy cookie bars.
4. Add the Eggs and Vanilla
Next, beat in the eggs, one at a time. Make sure each egg is fully mixed in before adding the next. Then add the vanilla extract. At this point, your kitchen probably already smells amazing.
5. Combine Wet and Dry
Slowly add the dry ingredients to the wet mixture, mixing until just combined. Try not to overmix—you want that tender, melt-in-your-mouth texture. Once the dough is together, fold in the chocolate chips.
How to Make Salted Caramel Chocolate Chip Cookie Bars
Alright, now that we’ve got our dough ready and the kitchen smells like a dream, it’s time to build those delicious layers. This is where the magic really happens—think buttery cookie dough on the bottom, gooey caramel in the middle, and another soft cookie layer on top, all finished with a sprinkle of flaky sea salt.
This part of the recipe comes together quickly, so if you’re using caramel candies, make sure you’ve already unwrapped them. And trust me, don’t skip the parchment paper—it makes lifting and slicing the bars so much easier once they’re cooled.
STEPS: Building the Layers & Baking
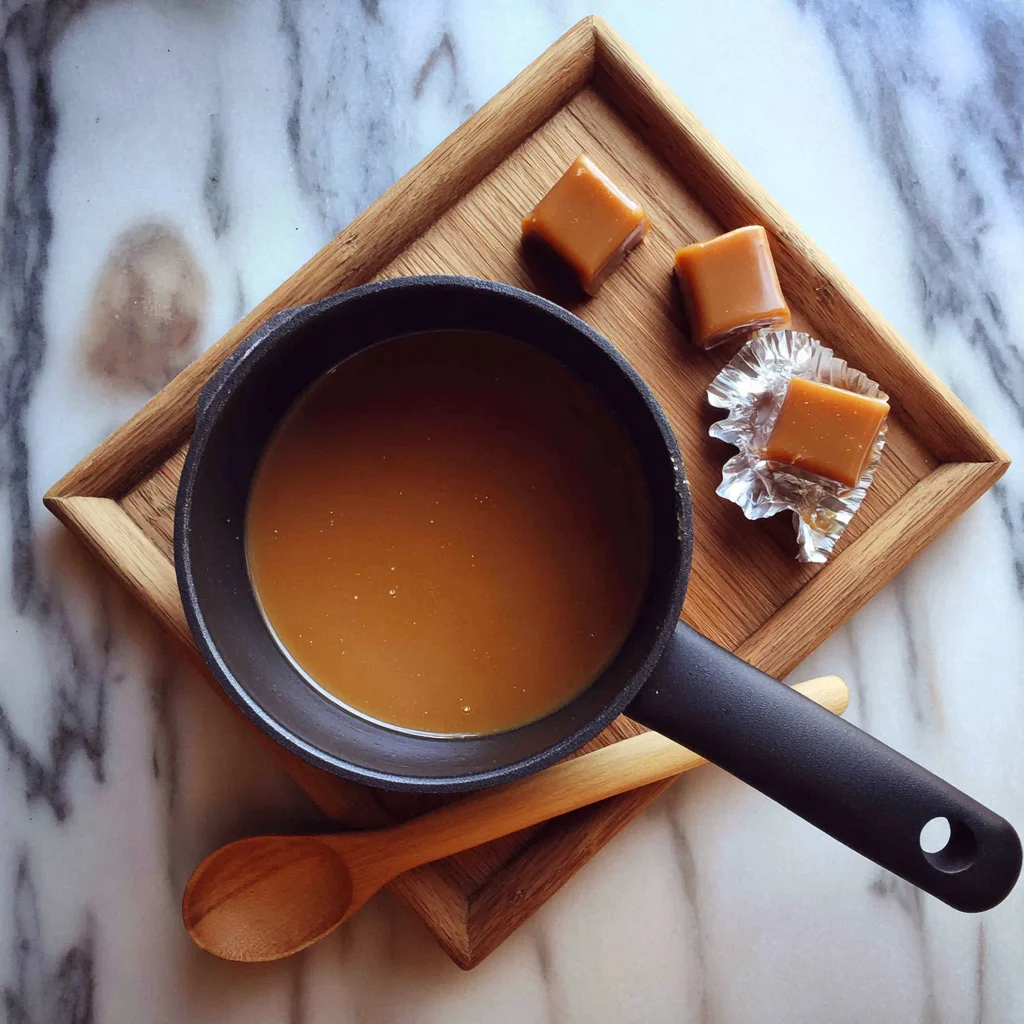
6. Melt the Caramel
If you’re using caramel candies, place 1 cup of unwrapped caramels into a small saucepan with 2 tablespoons of heavy cream. Heat over low heat, stirring often, until completely melted and smooth. It should look thick and glossy.
If you’re using a jarred caramel sauce, just warm it gently in the microwave or on the stovetop until pourable—but not piping hot. You want it warm enough to spread but not so hot that it melts the cookie dough underneath.
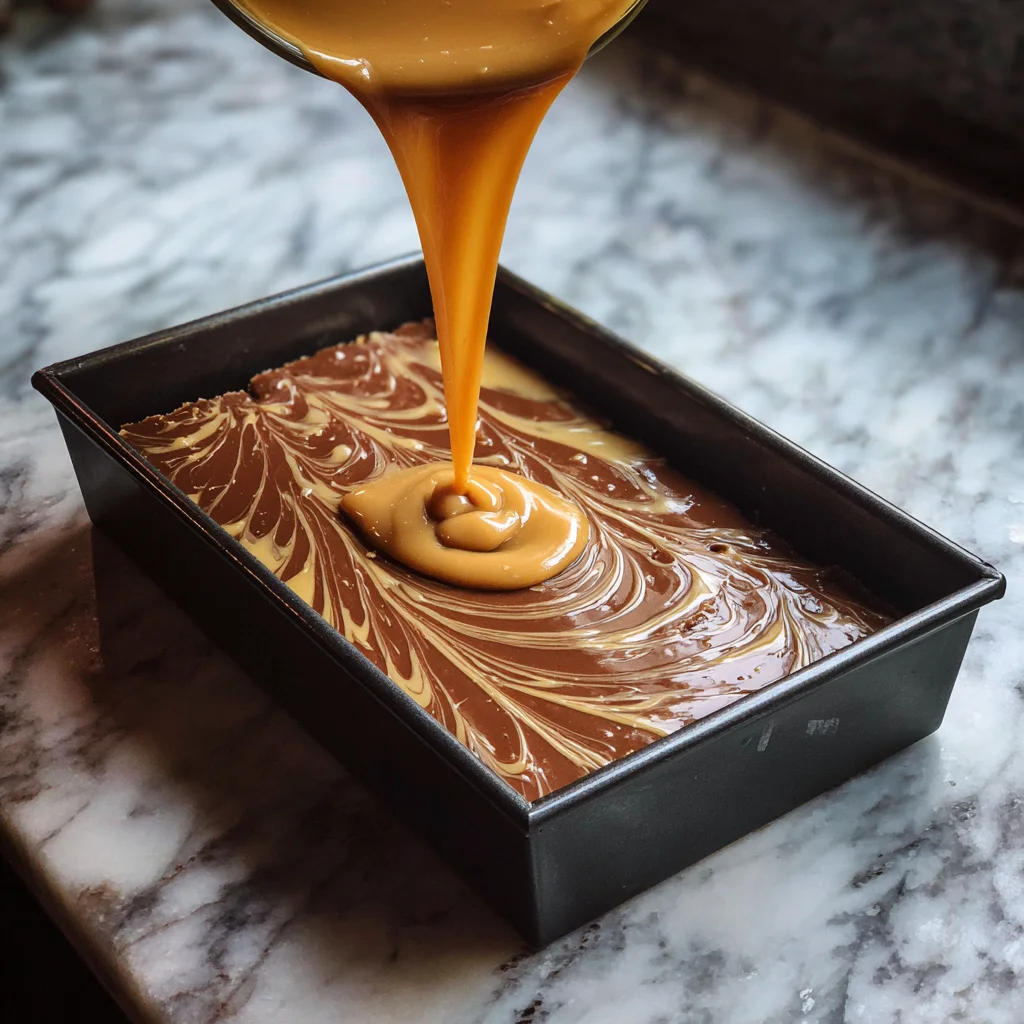
7. Press in the First Layer of Dough
Take half of your cookie dough and press it evenly into the bottom of the prepared baking dish. Use clean hands or the back of a spoon to spread it out to all the corners. This is your base, so make sure it’s nice and even.
8. Add the Caramel Layer
Now for the fun part: pour the warm caramel over the base layer of cookie dough. Use a spatula to gently spread it out, but leave a small border around the edges. This helps keep the caramel from sticking to the sides of the pan and makes cleanup easier too.
9. Top with Remaining Dough
Take the remaining cookie dough and drop it in spoonfuls over the caramel. Don’t worry about covering it completely—a few caramel swirls peeking through are part of the charm. Gently press the dough down with your fingers or a spatula to form a somewhat even top layer.
10. Bake Until Golden and Set
Place the pan in your preheated 350°F oven and bake for 25 to 30 minutes, or until the top is golden brown and the edges look set. The middle might still look a little soft—that’s totally fine. It will firm up as it cools.
STEPS: Finishing Touches & Cooling
11. Sprinkle with Flaky Sea Salt
Right after the bars come out of the oven—while they’re still warm—sprinkle a generous pinch of flaky sea salt over the top. That salt not only adds visual appeal but also perfectly balances the sweetness of the caramel and chocolate. Don’t skip this step!
12. Cool Completely
Now comes the hardest part: waiting. Let the bars cool completely in the pan. You can speed this up a little by placing the pan in the fridge after they’ve cooled down a bit on the counter.
Once they’re cool and firm, lift the bars out of the pan using the parchment paper and slice them into squares or rectangles. You can go bite-sized for parties or bigger pieces if you’re serving them as a dessert.
Tips for the Best Cookie Bars Every Time
-
Use room temperature butter for creaming—this helps create that soft, fluffy base.
-
If you like extra chocolate, feel free to add a handful of mini chocolate chips on top before baking.
-
Don’t overbake. The center should look a little soft when they come out of the oven. Overbaking leads to dry bars.
-
Want a richer flavor? Swap out some of the semisweet chocolate chips for dark chocolate.
-
If you’re prepping ahead, these bars can be frozen for up to a month. Just wrap them tightly and thaw at room temp before serving.
Salted Caramel Chocolate Chip Cookie Bars: FAQ & Final Thoughts
We’ve layered, baked, and cooled our way to cookie bar perfection—but before you cut that second slice (or third, no judgment here), let’s cover a few of the most common questions readers tend to ask about this recipe.
Whether it’s your first time making cookie bars or you’re already planning your next batch, this FAQ section should help make sure everything comes out just right.
FAQ: Your Cookie Bar Questions Answered
1. Can I use store-bought caramel sauce instead of melting caramel candies?
Yes! A good-quality, thick store-bought caramel sauce works beautifully. Just be sure to warm it slightly before layering so it spreads easily. Skip anything too runny—it might disappear into the dough during baking.
2. How do I know when the bars are done baking?
The top should be golden brown and look set, especially around the edges. The center might still look a bit soft, but that’s okay—it will firm up as it cools. Avoid overbaking to keep the bars gooey and tender.
3. Can I make these bars in advance?
Absolutely. These cookie bars store well for several days at room temperature in an airtight container. You can also refrigerate them if your kitchen is warm, or freeze them for longer storage.
4. What’s the best way to cut clean squares?
Let the bars cool completely—this is key. Then use a sharp knife and wipe the blade clean between cuts. You can even chill the bars in the fridge for an hour before slicing for the cleanest results.
5. Can I add nuts or other mix-ins?
Yes! Chopped pecans or walnuts would add a lovely crunch. You can also mix in white chocolate chips or a swirl of peanut butter for something different.
6. Do I have to use sea salt on top?
Technically, no—but I highly recommend it. The flaky sea salt really enhances the flavor and gives that delicious contrast to the sweetness. If you don’t have flaky salt, a small pinch of regular kosher salt will do in a pinch.
7. What type of chocolate chips should I use?
I used semisweet chocolate chips for that classic chocolate chip cookie flavor, but feel free to swap in dark, milk, or even chunks of chopped chocolate bars for a more gourmet touch.
Final Thoughts: Why You’ll Want to Make These Again (and Again)
There’s a reason these Salted Caramel Chocolate Chip Cookie Bars are such a hit. They’re simple enough for a casual weekend bake, but special enough to bring to parties, potlucks, or holiday gatherings. And let’s be honest—who can resist that gooey caramel center layered between soft, buttery cookie dough?
One of my favorite things about this recipe is how flexible it is. Once you master the basic version, you can have fun switching things up with different chocolates, add-ins, or even flavored caramels. And because the recipe comes together with mostly pantry staples, it’s easy to whip up whenever the craving hits.
If you try this recipe, I’d love to hear what you think! Leave a comment with your favorite twist, or tag me if you share them on social. And if you have any baking questions or need help troubleshooting, don’t hesitate to ask.
PrintSalted Caramel Chocolate Chip Cookie Bars
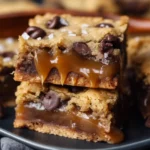
Salted Caramel Chocolate Chip Cookie Bars are rich, gooey, and deeply indulgent. These bars layer the buttery sweetness of classic chocolate chip cookie dough with a decadent ribbon of salted caramel, finished with a light sprinkle of sea salt to balance it all. They’re easy to slice and share, making them perfect for gatherings, bake sales, or when you’re craving something sweet and salty.
- Author: Mark's Recipe
Ingredients
2¼ cups all-purpose flour
1 teaspoon baking soda
½ teaspoon salt
1 cup unsalted butter, softened
¾ cup brown sugar
½ cup granulated sugar
2 large eggs
2 teaspoons vanilla extract
2 cups semisweet chocolate chips
1 cup soft caramel candies or caramel sauce
2 tablespoons heavy cream
Flaky sea salt for topping
Instructions
Preheat the oven to 350°F and line a 9×13-inch baking dish with parchment paper or lightly grease it.
In a bowl, whisk together the flour, baking soda, and salt.
In a large mixing bowl, cream the butter with both sugars until light and fluffy. Beat in the eggs one at a time, then add the vanilla extract.
Gradually mix in the dry ingredients until combined. Fold in the chocolate chips.
In a small saucepan, melt the caramel candies with the heavy cream over low heat, stirring until smooth. If using caramel sauce, simply warm it gently.
Press half of the cookie dough evenly into the bottom of the prepared pan. Pour the warm caramel over the dough, spreading it out but leaving a small border to avoid sticking to the edges.
Drop spoonfuls of the remaining dough over the caramel and gently press down to create a top layer. It’s okay if some caramel peeks through.
Bake for 25 to 30 minutes or until the top is golden brown and set. Let the bars cool in the pan.
Sprinkle with flaky sea salt while still warm for contrast and depth.
Allow the bars to cool completely before slicing into squares.
Notes
Make sure the caramel is cooled just slightly before layering to prevent it from melting the dough. Using parchment paper makes removal and slicing easier. These bars store well at room temperature for a few days and can also be frozen. The combination of melty chocolate and salted caramel offers a rich flavor with just enough bite from the sea salt to keep things balanced. Serve slightly warm for the ultimate gooey experience.


")
