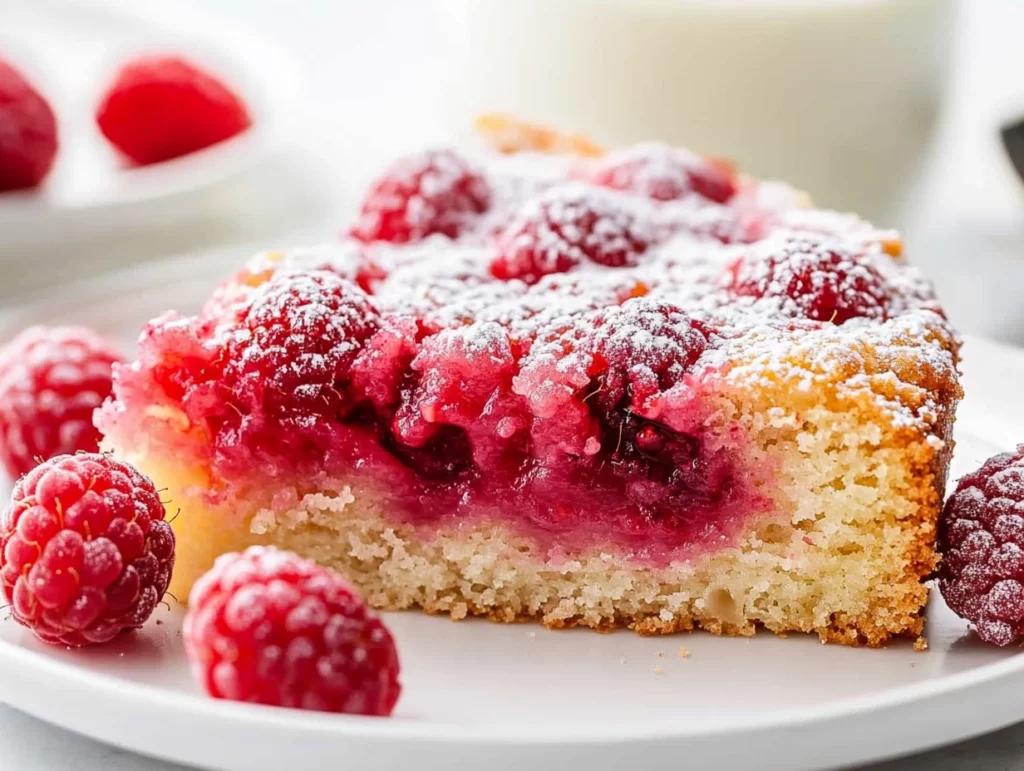
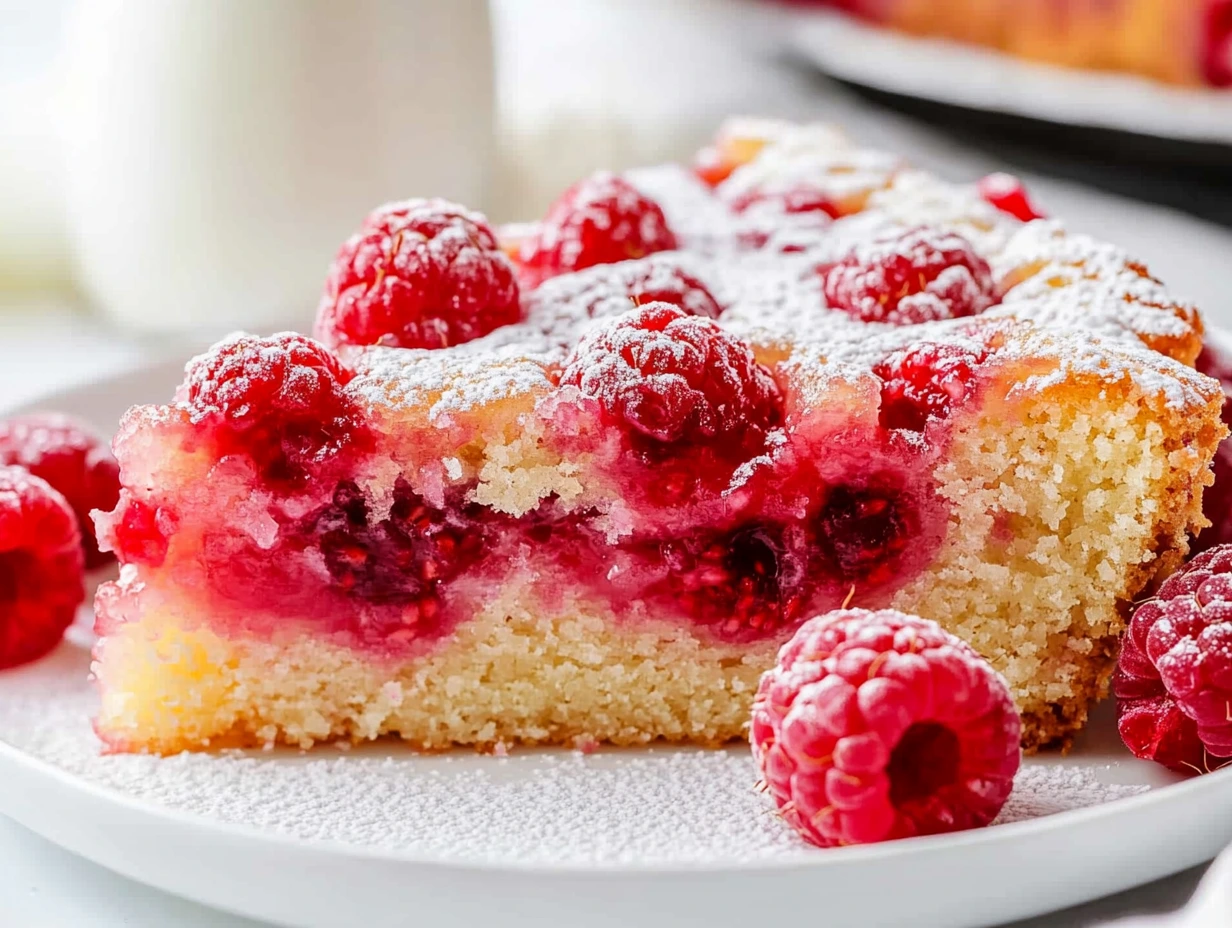
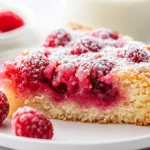
I have a confession: upside down cakes are one of my secret dessert obsessions. There’s just something magical about flipping a cake and revealing that glossy, jewel-toned topping underneath. And when it comes to summer desserts, this Raspberry Upside Down Cake has completely stolen my heart.
It’s the perfect balance of sweet and tart, with plump raspberries swimming in a buttery, caramelized brown sugar layer, all nestled beneath a soft, moist vanilla cake. Every bite is bursting with fresh berry flavor, and the presentation? Absolutely stunning. Honestly, it looks like you spent hours in the kitchen, but it’s surprisingly simple to pull together.
I first whipped this up for a family BBQ last summer. The moment I inverted the cake and revealed those glistening raspberries, my guests were already reaching for their plates. It didn’t last long on the table, and I’ve been asked for the recipe more times than I can count. That’s when you know you’ve got a winner!
Let’s dive into the recipe together — I’ll walk you through each step so you can recreate this beauty at home, stress-free.
INGREDIENTS YOU’LL NEED
For the Topping:
-
¼ cup unsalted butter, melted
-
½ cup brown sugar
-
2 heaping cups raspberries (or enough to cover the bottom of the pan)
For the Cake:
-
1 ⅓ cups all-purpose flour
-
1 teaspoon baking powder
-
¼ teaspoon salt
-
¼ cup unsalted butter, softened to room temperature
-
¾ cup granulated sugar
-
1 large egg
-
1 ½ teaspoons vanilla extract
-
½ cup milk
-
Powdered sugar (optional, for dusting)
STEPS TO MAKE THE PERFECT RASPBERRY UPSIDE DOWN CAKE
STEP 1: PREHEAT AND PREP YOUR PAN
Start by preheating your oven to 350°F (175°C). Spray a 9-inch high-sided pan or springform pan with nonstick cooking spray. If you’re using a springform pan, I highly recommend placing a piece of foil underneath or setting it on a baking sheet to catch any potential drips. Trust me, nothing ruins a baking mood like having to scrub caramelized sugar off the bottom of your oven!
STEP 2: MAKE THE CARAMELIZED TOPPING
In a medium bowl, whisk together the melted butter and brown sugar until well combined. This creates that gorgeous, sticky base that’s going to caramelize as the cake bakes. Spread this mixture evenly across the bottom of your prepared pan.
Now, take your fresh raspberries and arrange them in a single, even layer over the brown sugar mixture. I like to pack them in just enough to fully cover the bottom — about 2 heaping cups usually does the trick. Set the pan aside for now.
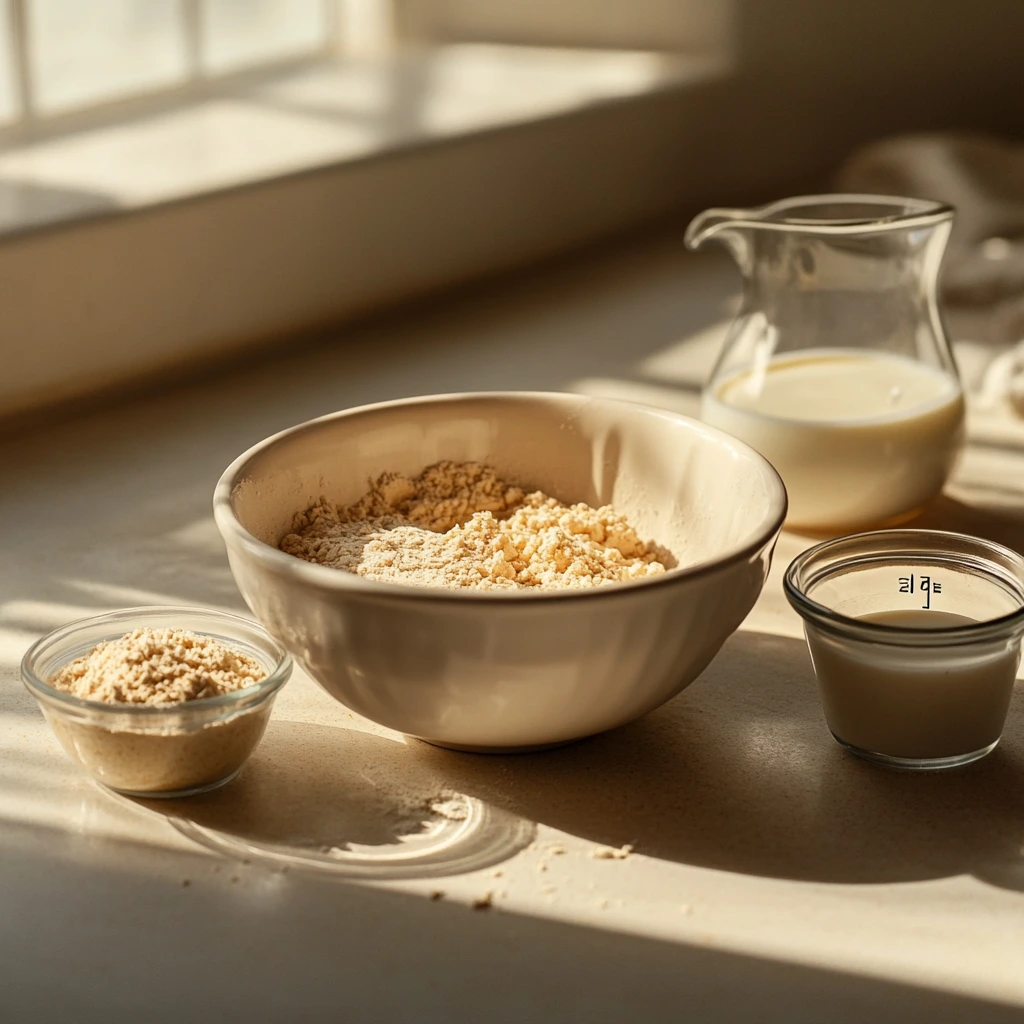
STEP 3: PREPARE THE DRY INGREDIENTS
In a large bowl, whisk together the flour, baking powder, and salt. This dry mixture is the foundation of your vanilla cake, giving it structure and lift. Set it aside while you work on the wet ingredients.
STEP 4: MIX THE WET INGREDIENTS
In a separate mixing bowl, beat together the softened butter, granulated sugar, egg, and vanilla extract until everything is fully combined and creamy. This step is key for incorporating air into the batter, ensuring your cake turns out light and fluffy.
FINISHING THE RASPBERRY UPSIDE DOWN CAKE: MIXING, BAKING & TIPS
Now that we’ve got our raspberries all snuggled into their brown sugar bed and our dry and wet ingredients prepped, it’s time to bring everything together. This part is where the magic starts to happen — you’ll see the batter come together and get ready for its transformation in the oven.
STEPS TO COMPLETE THE CAKE
STEP 5: COMBINE DRY AND WET INGREDIENTS
Gradually add the dry flour mixture into the bowl with your creamed butter mixture. Don’t worry if the batter seems a bit crumbly at first — that’s completely normal at this stage. This crumbly texture is just the dry ingredients starting to absorb the wet ones.
STEP 6: ADD THE MILK
Now, pour in the milk and beat the batter until it’s smooth and fully incorporated. You’ll notice the texture transforms into a thick, creamy batter that’s easy to spread. It’s important not to overmix here — once it’s smooth and combined, you’re good to go.
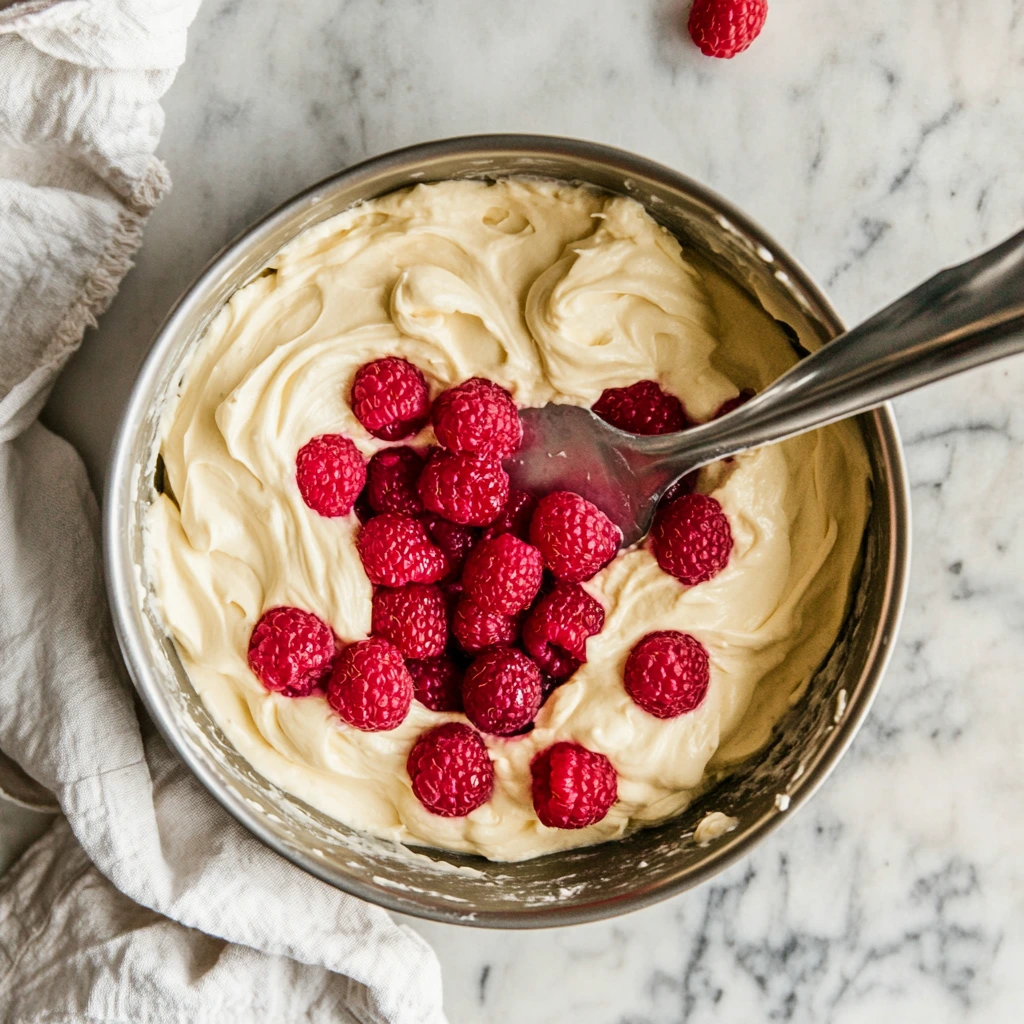
STEP 7: SPOON BATTER OVER THE RASPBERRIES
Carefully spoon the batter over your prepared raspberry layer. Because the batter is on the thicker side, I like to use an offset spatula to gently spread it out evenly across the top. Take your time here to avoid disturbing the raspberries underneath — they’re happily settled in place, ready to bake.
STEP 8: BAKE TO PERFECTION
Slide your pan into the preheated oven and bake for 35 to 40 minutes. You’re looking for a golden-brown top and a toothpick that comes out clean when inserted into the center. Keep in mind that oven times can vary a bit, so start checking around the 35-minute mark just to be safe.
STEP 9: COOL BEFORE INVERTING
Once your cake is baked to golden perfection, remove it from the oven and let it cool in the pan for about 10 minutes. This short wait allows the cake to firm up just enough so it doesn’t fall apart when you flip it.
STEP 10: INVERT THE CAKE
Now for the fun (and slightly nerve-wracking) part — inverting the cake! Run a knife along the edges of the pan to loosen the cake. Then, place your serving platter over the pan and carefully flip everything over. Gently lift off the pan to reveal that stunning raspberry top. It’s always a little moment of triumph when the cake releases cleanly!
STEP 11: LET IT COOL COMPLETELY
Allow the cake to cool completely before serving. This gives the caramelized topping time to set and ensures the best texture when slicing.
STEP 12: OPTIONAL POWDERED SUGAR FINISH
Just before serving, feel free to dust the top with powdered sugar for an elegant touch. It adds a lovely contrast to the vibrant raspberries and makes the cake look even more inviting.
MY FAVORITE TIPS FOR A PERFECT RASPBERRY UPSIDE DOWN CAKE
Use Fresh Raspberries When Possible
Fresh raspberries give the best texture and flavor, but you can use frozen in a pinch. If using frozen, don’t thaw them first — just arrange them straight from the freezer to prevent excess liquid.
Don’t Rush the Cooling Time
It can be tempting to invert the cake right away, but giving it those 10 minutes helps prevent the cake from breaking apart. Patience pays off here!
Watch for Oven Variations
Every oven runs a bit differently. Use visual cues (golden top, clean toothpick) to judge doneness rather than relying solely on the timer.
Try Other Berries
This recipe is wonderfully versatile. If raspberries aren’t in season, feel free to substitute blackberries, blueberries, or a mix of your favorite berries.
Serve the Same Day for Best Results
While the cake stays delicious for a couple of days, it’s truly at its peak the day you bake it — that’s when the texture is the most tender and the flavors are at their brightest.
RASPBERRY UPSIDE DOWN CAKE: FAQ AND FINAL THOUGHTS
Before you grab your mixing bowl and get baking, let’s go over some of the most common questions I get about this Raspberry Upside Down Cake. Hopefully, these answers will give you even more confidence as you create your own beautiful version at home.
FREQUENTLY ASKED QUESTIONS
1. Can I use frozen raspberries instead of fresh?
Yes, absolutely! If you’re using frozen raspberries, don’t thaw them before arranging them in the pan. Thawing can release extra moisture, which may affect the consistency of the topping. Using them straight from the freezer works perfectly.
2. What if I don’t have a springform pan?
A regular 9-inch high-sided cake pan works just as well. The springform pan simply makes releasing the cake a little easier, but if you grease your regular pan thoroughly and run a knife around the edges after baking, you’ll have no trouble inverting the cake.
3. Can I make this cake ahead of time?
While the cake is at its very best the same day it’s made, you can prepare it a day in advance. Just store it covered at room temperature for up to two days. Avoid refrigerating, as that can make the cake a bit dense and the topping less glossy.
4. How do I prevent the cake from sticking to the pan?
Greasing the pan well with nonstick spray or butter is key. Also, running a knife gently along the edges before inverting helps release any areas that might be sticking.
5. Can I substitute other fruits for raspberries?
Definitely! This recipe works beautifully with blackberries, blueberries, or a combination of berries. You can also experiment with sliced peaches, plums, or even pineapple for different seasonal variations.
6. Why is my cake crumbly before I add the milk?
That’s completely normal. When you first combine the flour mixture with the butter mixture, the batter will look a bit dry and crumbly. Once you add the milk and mix, it will smooth out into a thick, spreadable batter.
7. Is powdered sugar necessary on top?
Not at all! The powdered sugar is optional, but it does add a lovely finishing touch. The cake looks beautiful either way, so feel free to skip it if you prefer a more rustic look.
FINAL THOUGHTS: DON’T BE AFRAID TO FLIP
There’s something a little thrilling about making an upside down cake. The moment of truth when you flip it over and reveal that glossy, berry-studded top is always a small baking victory. And the best part? This Raspberry Upside Down Cake is as easy as it is impressive.
Whether you’re making it for a summer gathering, a holiday table, or simply because fresh raspberries called your name at the market, this cake delivers every time. I truly hope you give it a try and experience the joy of watching your friends and family light up with that first bite.
If you do make it, I’d love to hear how it turned out! Share your variations, tips, or even those funny near-miss kitchen moments — after all, that’s part of the baking adventure too.
PrintRaspberry Upside Down Cake
This Raspberry Upside Down Cake is a beautiful and delicious dessert that combines the tart sweetness of raspberries with a soft, moist vanilla cake. The caramelized brown sugar topping perfectly complements the fruit, creating a stunning presentation once inverted. It’s a great choice for any special occasion or a simple summer treat.
- Author: Mark's Recipe
Ingredients
Topping:
¼ cup unsalted butter, melted
½ cup brown sugar
2 heaping cups raspberries (or enough to cover the bottom of the pan)
Cake:
1 ⅓ cups all-purpose flour
1 teaspoon baking powder
¼ teaspoon salt
¼ cup unsalted butter, softened to room temperature
¾ cup granulated sugar
1 large egg
1 ½ teaspoons vanilla extract
½ cup milk
powdered sugar (optional)
Instructions
Preheat the oven to 350°F. Spray a 9-inch high-sided pan or springform pan with nonstick cooking spray. If using a springform pan, place a piece of foil underneath or set the pan on a sheet tray to catch any potential drips.
In a medium bowl, whisk together the melted butter and brown sugar. Spread this mixture evenly into the bottom of the prepared pan.
Arrange the raspberries in an even layer over the brown sugar mixture, using enough to fully cover the bottom of the pan. Set aside.
In a large bowl, whisk together the flour, baking powder, and salt. Set aside.
In another bowl, beat together the softened butter, granulated sugar, egg, and vanilla extract until fully combined.
Gradually add the flour mixture to the butter mixture and beat until combined. The batter will appear crumbly at this stage, which is normal.
Add the milk to the batter and beat until smooth and fully incorporated.
Spoon the batter over the raspberries, spreading gently and evenly with an offset spatula as the batter will be thick.
Bake for 35 to 40 minutes or until golden brown and a toothpick inserted into the center comes out clean. Oven times may vary, so check for doneness.
Remove the cake from the oven and allow it to cool in the pan for 10 minutes. Run a knife along the edges of the pan to loosen the cake before inverting it onto a serving platter.
Allow the cake to cool completely. Dust with powdered sugar if desired before serving.
Notes
Be sure to let the cake cool for at least 10 minutes before inverting to prevent it from breaking apart. The raspberries can be substituted with other berries depending on the season. The cake is best served the same day but can be stored covered at room temperature for up to two days. Dusting with powdered sugar adds a lovely finishing touch.


")
