
There’s something magical about citrus desserts that just screams spring and summer, don’t you think? Whether it’s the burst of juicy mandarin or the bright pop of pineapple, these flavors have a way of lifting your mood instantly. And this Orange Pickin’ Cake? It’s like sunshine on a plate. I’ve been making this for years, especially when we’re heading to a potluck or having a casual weekend get-together, and I can’t tell you how often it gets requested.
I love how incredibly easy it is to throw together—no fancy techniques or complicated steps, just a few pantry staples and a couple of canned fruits. But don’t let the simplicity fool you. The cake comes out tender and moist, with chunks of mandarin tucked inside, and the frosting is a dreamy blend of pineapple, vanilla pudding, and whipped topping. You chill it before serving, so every bite is cool, creamy, and bursting with tropical flavor.
Let’s dive in and get started!
Prepping and Baking the Cake
We’ll begin with the cake base, which starts with a yellow cake mix but gets dressed up with fresh ingredients that make it taste completely homemade. Here’s what you’ll need:
Ingredients for the Cake:
-
1 (15-ounce) can mandarin oranges, drained (reserve ½ cup of the juice)
-
1 box yellow cake mix
-
½ cup unsalted butter, softened
-
½ cup reserved mandarin orange juice
-
4 large eggs
-
1 teaspoon vanilla extract
STEPS: Making the Cake Batter
-
Preheat your oven to 350°F.
Go ahead and grab a 9×13-inch baking dish and give it a good coat of nonstick cooking spray. This cake doesn’t tend to stick much, but better safe than sorry. -
Drain the mandarin oranges.
Be sure to reserve ½ cup of the juice—it adds a really nice citrus flavor to the batter. I like to place the oranges in a colander over a bowl and let them sit while I prep everything else. It gives them time to really drain well, which is important later. -
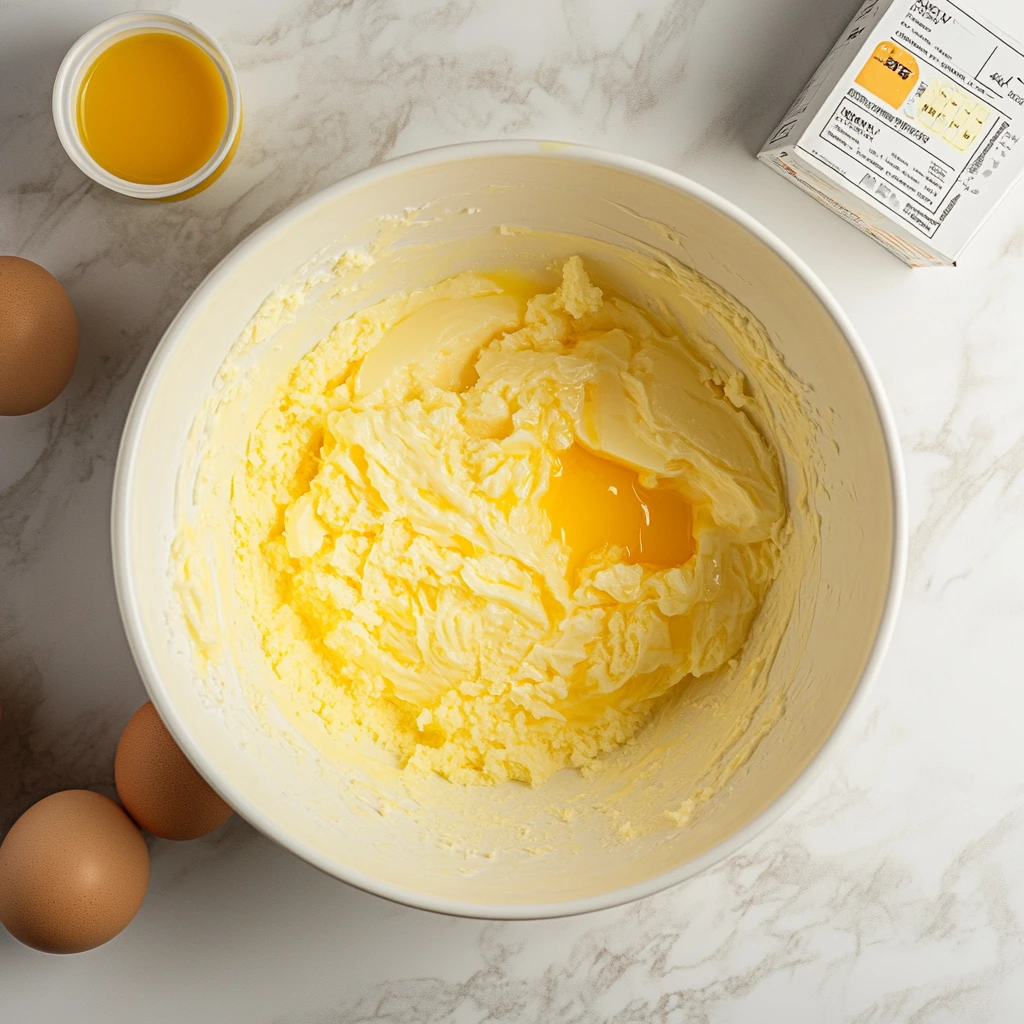
Mix up the batter.
In a large mixing bowl, add the yellow cake mix, softened butter, reserved mandarin juice, eggs, and vanilla extract. Using a hand mixer or a stand mixer, beat everything together on medium-high speed for about 3 to 4 minutes. You want the batter to be smooth, fluffy, and pale yellow in color. -
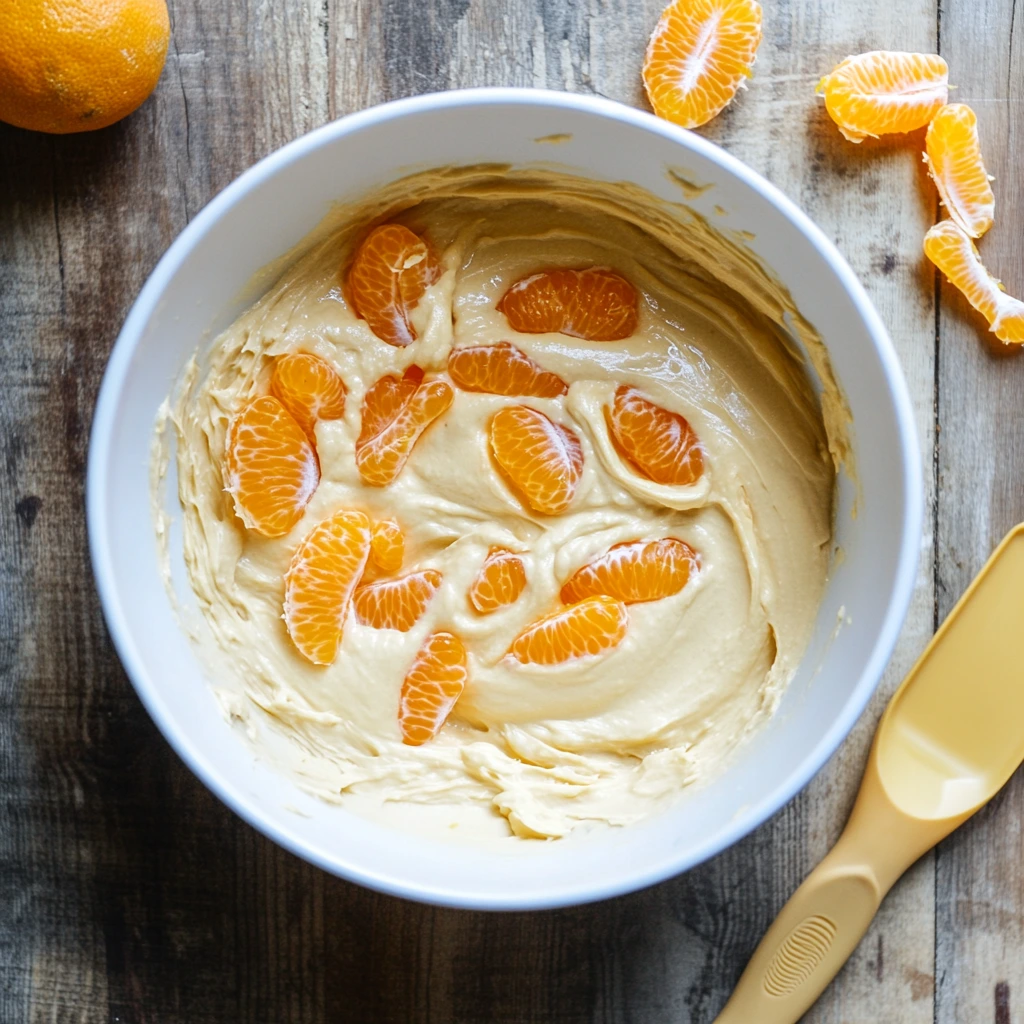
Add the mandarin oranges.
Gently stir them in by hand. Don’t worry if a few break up—that’s part of the charm! Leaving a few chunks gives the cake little bursts of orange flavor in every bite.
STEPS: Baking the Cake
-
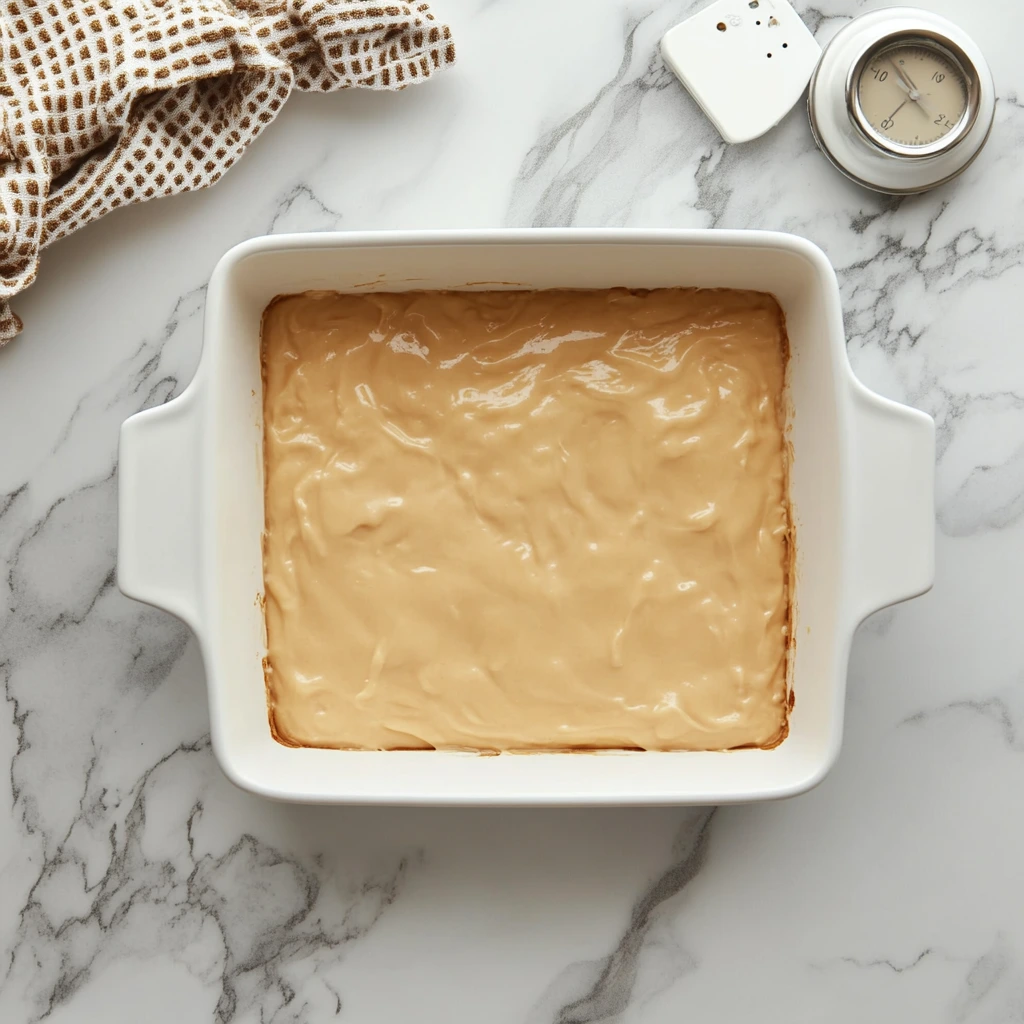
Pour the batter into your prepared pan.
Use a spatula to spread it out evenly so it bakes up nice and level. -
Bake for 25 to 30 minutes.
You’ll know it’s done when a toothpick inserted in the center comes out clean. The top should be lightly golden and spring back when you touch it. -
Let the cake cool completely.
This is key before you frost it, or the topping will melt and slide right off. I usually bake the cake in the morning and let it cool on the counter while I prep the frosting later in the day.
The Dreamy Frosting & Pro Tips
Now that your cake base is cooling on the counter, let’s talk about what truly takes this dessert from good to unforgettable: that tropical whipped frosting. This topping is creamy, light, and just sweet enough to balance the fruity cake underneath. The combination of crushed pineapple, vanilla pudding, and whipped topping makes it taste like a tropical vacation in every bite.
And here’s the best part—it’s super simple to make. No stovetop, no chilling bowls, no fuss. Just mix, fold, and spread.
Before we dive into the steps, let’s round up everything you’ll need for this frosting.
Ingredients for the Topping:
-
1 (20-ounce) can crushed pineapple, drained well (reserve ¾ cup of the juice)
-
¾ cup reserved pineapple juice
-
1 (3.4-ounce) box vanilla instant pudding mix
-
½ cup powdered sugar
-
4 ounces Cool Whip (or any whipped topping)
-
Extra mandarin orange slices for garnish (optional, but they really make it pop)
STEPS: Making the Frosting
-
Drain your crushed pineapple thoroughly.
This step is just as important as draining the mandarins earlier. You want the pineapple to be moist, not dripping wet. I usually press it lightly with a spoon in the strainer to get out any excess liquid. Don’t forget to save ¾ cup of the juice! -
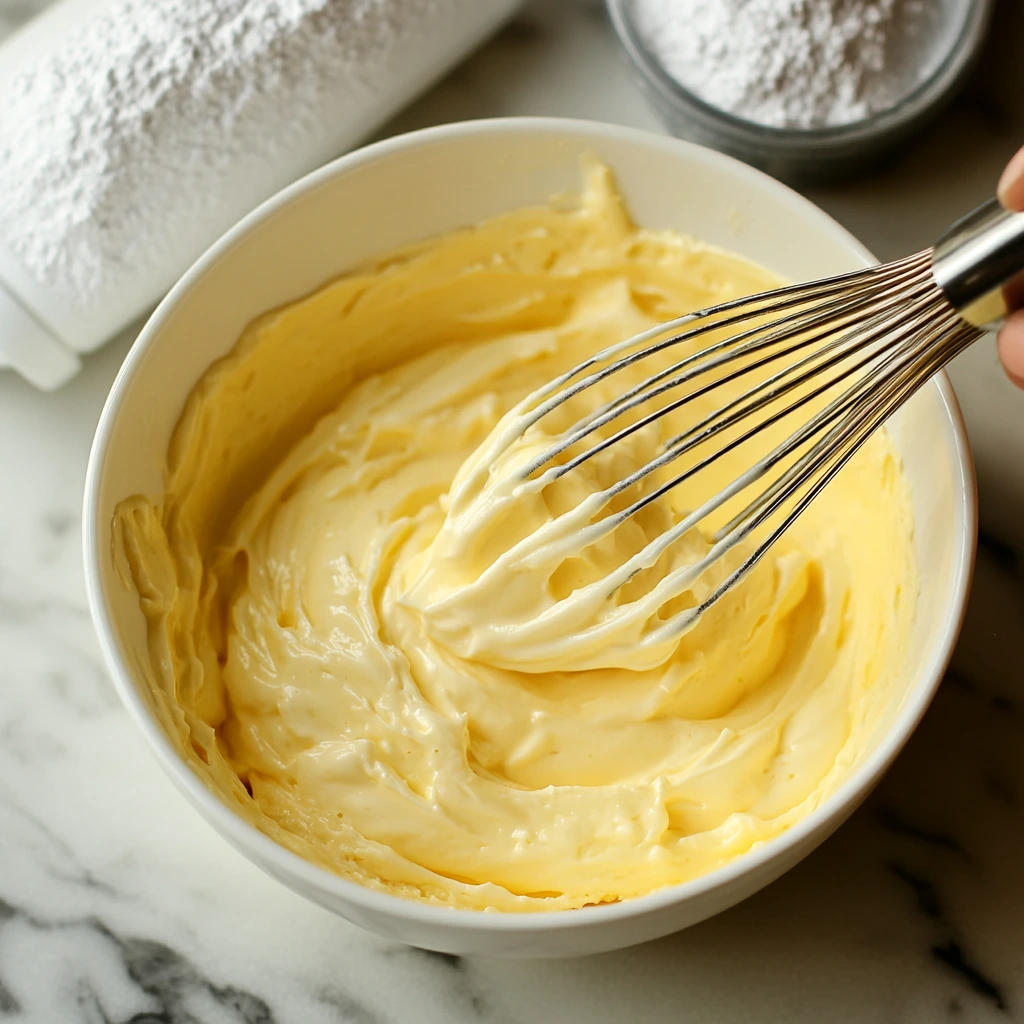
Mix the pudding base.
In a medium mixing bowl, combine the reserved pineapple juice and the vanilla pudding mix. Stir until the powder is completely dissolved and the mixture starts to thicken just a bit. It should look smooth, with no lumps. -
Add the powdered sugar.
This gives the frosting just the right amount of extra sweetness. Mix it in well to avoid any grittiness. -
Fold in the whipped topping.
Use a spatula to gently fold the Cool Whip into the pudding mixture. You don’t want to stir aggressively—just fold it in until the texture is uniform and fluffy. -
Add the pineapple.
Gently stir in the well-drained crushed pineapple. At this point, the frosting should be creamy and light but still spreadable. If it feels a little too thin (pineapple can vary a bit in moisture), just add a bit more Cool Whip until you get the consistency you like.
STEPS: Frosting and Chilling the Cake
-
Frost the completely cooled cake.
Once your cake is cool to the touch, spread the frosting evenly over the top using an offset spatula or the back of a spoon. The texture will be soft and light, but it will firm up once it chills. -
Refrigerate for at least 2 to 3 hours.
This step is essential for the topping to set properly and for the flavors to meld. I usually make this cake a few hours before serving, or even the night before if I’m planning ahead. It actually tastes even better the next day! -
Slice and garnish.
Right before serving, cut the cake into 12 squares and top each slice with a few mandarin orange segments if you want that extra pop of color and fruitiness. It’s not just pretty—it also gives people a little hint of what’s inside.
TIPS FOR SUCCESS
-
Drain everything thoroughly. This really can’t be said enough. Extra liquid from the canned fruit can water down both the cake and the frosting, so take the time to drain well.
-
Don’t skip the chilling time. The texture of this cake transforms once it’s been refrigerated. The frosting firms up just enough, and the flavors really come together.
-
Use a light hand when folding. Folding in the Cool Whip gently keeps the topping airy and prevents it from getting soupy.
-
Make it ahead. This cake is a dream for entertaining because it holds up beautifully in the fridge for a day or two. Just wait to garnish until you’re ready to serve.
-
Optional: Try different pudding flavors. While vanilla is classic and pairs perfectly with the pineapple, you could experiment with coconut or cheesecake instant pudding for a fun twist.
FAQs & Final Thoughts
We’ve mixed, baked, frosted, and chilled—and now you’ve got a beautiful, sunny Orange Pickin’ Cake ready to steal the spotlight at your next gathering. But before we wrap up, I wanted to answer some of the most common questions I get whenever I share this recipe. Whether it’s your first time making it or you’re planning to tweak it for the second or third round, these tips will help you get the best results every time.

FREQUENTLY ASKED QUESTIONS
1. Can I use fresh oranges or pineapple instead of canned?
Technically yes, but I don’t recommend it for this recipe. The canned fruit is softer and releases the right amount of juice, which is key for both flavor and texture. Fresh fruit has a different moisture level and might throw off the consistency of the cake and frosting.
2. Can I make this ahead of time?
Absolutely! In fact, it tastes even better after chilling for several hours or overnight. It’s a great make-ahead dessert for holidays, family dinners, or potlucks.
3. Can I freeze Orange Pickin’ Cake?
You can freeze the unfrosted cake layer once it has cooled completely. Wrap it tightly in plastic wrap and then foil. However, I don’t recommend freezing it after frosting—the whipped topping doesn’t hold up well after being frozen and thawed.
4. What can I use instead of Cool Whip?
If you prefer not to use store-bought whipped topping, you can substitute it with homemade stabilized whipped cream. Just make sure it’s thick enough to hold up in the frosting without weeping.
5. Why is my frosting runny?
This usually happens when the crushed pineapple isn’t drained well enough, or the pudding mix didn’t have enough time to set. Try adding a little more Cool Whip or refrigerating the frosting for 20–30 minutes before spreading it on the cake.
6. Can I use a different flavor of cake mix?
Yes! A white or orange-flavored cake mix would work beautifully here. Even a pineapple cake mix (if you can find one) would enhance the tropical flavors.
7. How should I store leftovers?
Keep any leftover cake covered and refrigerated. It stays fresh and delicious for up to 4 days. Just be sure it’s in an airtight container to prevent it from drying out or absorbing other fridge smells.
FINAL THOUGHTS: A Perfect Crowd-Pleaser
This Orange Pickin’ Cake really is one of those no-fuss recipes that delivers every single time. It’s bright, fresh, easy to make, and guaranteed to get people coming back for seconds. I love how it fits any occasion—from a spring brunch to a summer cookout, or even just a weekend when you want something sweet but not too heavy.
It also travels well and holds up beautifully when made ahead, making it my go-to when I need a reliable dessert that feels homemade without spending hours in the kitchen. And let’s be honest—there’s something about that whipped pineapple topping that just keeps people guessing what makes it so good.
PrintOrange Pickin’ Cake

Orange Pickin’ Cake is a delightfully light and fruity dessert, combining the sunny flavors of mandarin oranges and pineapple in a moist yellow cake. Finished with a fluffy, tropical frosting made with pineapple, pudding, and whipped topping, this cake is perfect for spring and summer gatherings. It’s easy to make, beautifully bright, and sure to be a hit at any table.
- Author: Mark's Recipe
Ingredients
For the cake:
15 ounce can mandarin oranges, ½ cup juice reserved, drained
1 box yellow cake mix
½ cup unsalted butter, softened
½ cup reserved mandarin orange juice
4 large eggs
1 teaspoon vanilla extract
For the topping:
20 ounce can crushed pineapple, ¾ cup juice reserved, drained well
¾ cup reserved pineapple juice
3.4 ounce box vanilla instant pudding mix
½ cup powdered sugar
4 ounces Cool Whip (whipped topping)
Extra mandarin orange slices for garnish
Instructions
Preheat the oven to 350°F. Spray a 9×13-inch baking dish with nonstick cooking spray.
Drain the mandarin oranges, reserving ½ cup of the juice. Discard any remaining juice.
In a large mixing bowl, combine the yellow cake mix, softened butter, reserved mandarin orange juice, eggs, and vanilla extract. Beat on medium-high speed for 3 to 4 minutes until well blended.
Gently stir in the drained mandarin oranges, leaving some pieces slightly chunky for texture.
Pour the batter into the prepared baking dish and spread evenly. Bake for 25 to 30 minutes, or until a toothpick inserted in the center comes out clean. Let the cake cool completely before frosting.
For the frosting, drain the crushed pineapple thoroughly, reserving ¾ cup of the juice.
In a mixing bowl, combine the reserved pineapple juice with the instant pudding mix and stir until fully dissolved.
Add the powdered sugar and mix well. Fold in the Cool Whip, then gently stir in the drained crushed pineapple.
If the frosting is too runny, add a bit more Cool Whip until it reaches the desired consistency.
Spread the frosting evenly over the cooled cake. Refrigerate the cake for at least 2 to 3 hours to allow the topping to set properly.
Once chilled, slice the cake into 12 pieces and top each slice with a few mandarin orange segments for garnish.
Notes
Be sure to drain the fruit thoroughly to prevent a watery cake or frosting. This cake is best served cold and stored in the refrigerator. It makes an excellent make-ahead dessert for potlucks and picnics.


")
