Good Old-Fashioned Mac and Cheese – The Ultimate Comfort Food
There are some dishes that just never go out of style, and homemade mac and cheese is one of them. It’s the kind of recipe that instantly transports you back to childhood—sitting at the dinner table with a steaming, cheesy bowl of pasta, digging in before it even has a chance to cool down. This Good Old-Fashioned Mac and Cheese is exactly that: rich, creamy, buttery, and baked to golden perfection with a crispy breadcrumb topping that takes it to the next level.
This isn’t your average boxed mac and cheese (although we all have nostalgic love for that, too). This version is made from scratch, with a silky homemade cheese sauce, tender pasta, and a crunchy Parmesan breadcrumb topping. And the best part? It’s super easy to make, comes together in about 40 minutes, and is perfect for a cozy weeknight dinner or a side dish for the holidays.
Let’s get started!
What You’ll Need for the Best Homemade Mac and Cheese
For the Creamy Mac and Cheese:
- Elbow macaroni – The classic choice, but feel free to use shells, cavatappi, or any short pasta.
- Butter & flour – These create a roux, which thickens the cheese sauce.
- Milk & heavy cream – For that rich, creamy texture.
- Cheddar cheese – Sharp cheddar gives the best classic mac and cheese flavor.
- Mozzarella or Colby Jack cheese – Adds melty, gooey goodness.
- Seasonings – A little salt, black pepper, garlic powder, and mustard powder for depth of flavor.
For the Crispy Topping (Optional but Highly Recommended!):
- Breadcrumbs – Panko for extra crunch, or regular for a classic feel.
- Melted butter – Helps the topping brown beautifully.
- Parmesan cheese – Adds a nutty, salty kick to the crispy topping.
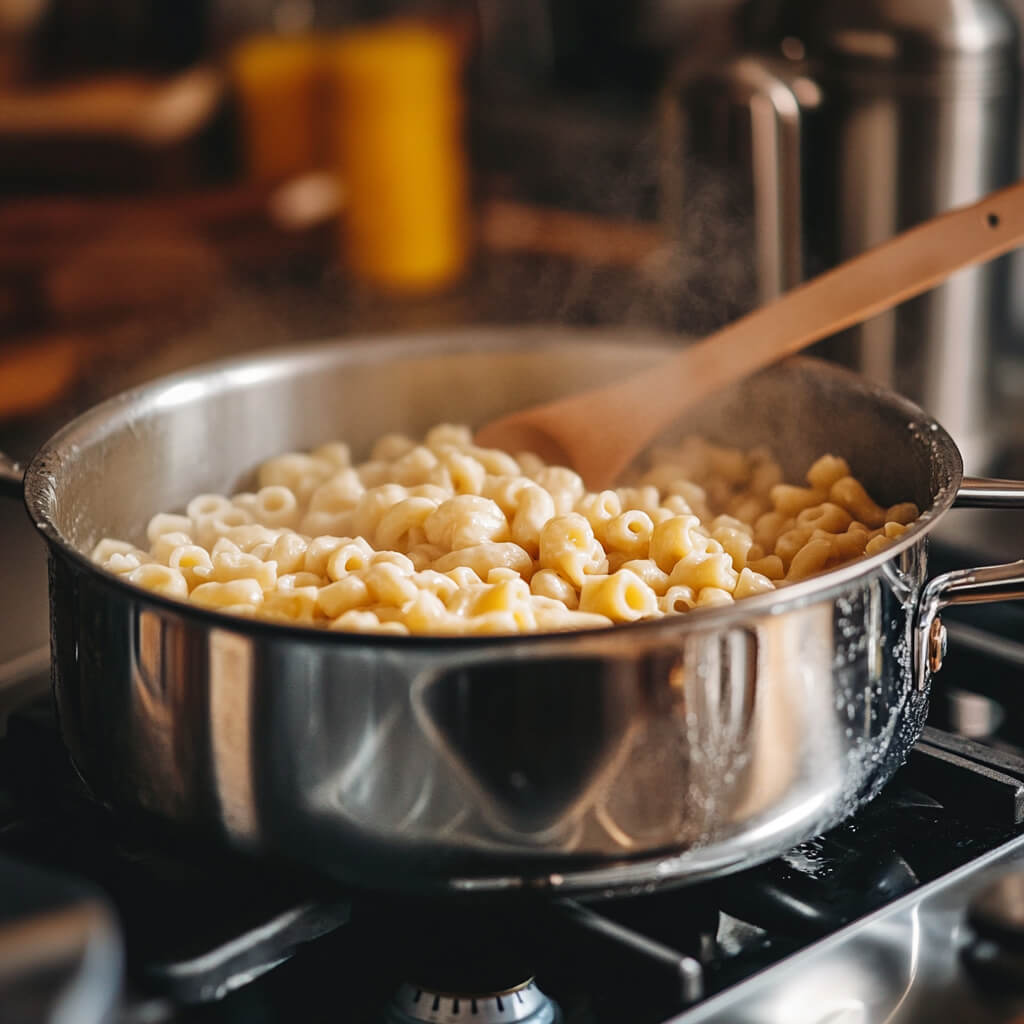
Step 1: Cook the Pasta
The foundation of any great mac and cheese starts with perfectly cooked pasta.
- Bring a large pot of salted water to a boil. The salt adds flavor to the pasta from the inside out.
- Cook 12 oz of elbow macaroni according to the package instructions until al dente—meaning it’s tender but still has a little bite. You don’t want it to be too soft, as it will continue to cook in the oven.
- Drain and set aside. If you’re worried about the pasta sticking together while you make the cheese sauce, you can toss it with a little butter or oil.
💡 Pro Tip: If you want a creamier mac and cheese, slightly undercook the pasta by about a minute so it doesn’t get too soft after baking.
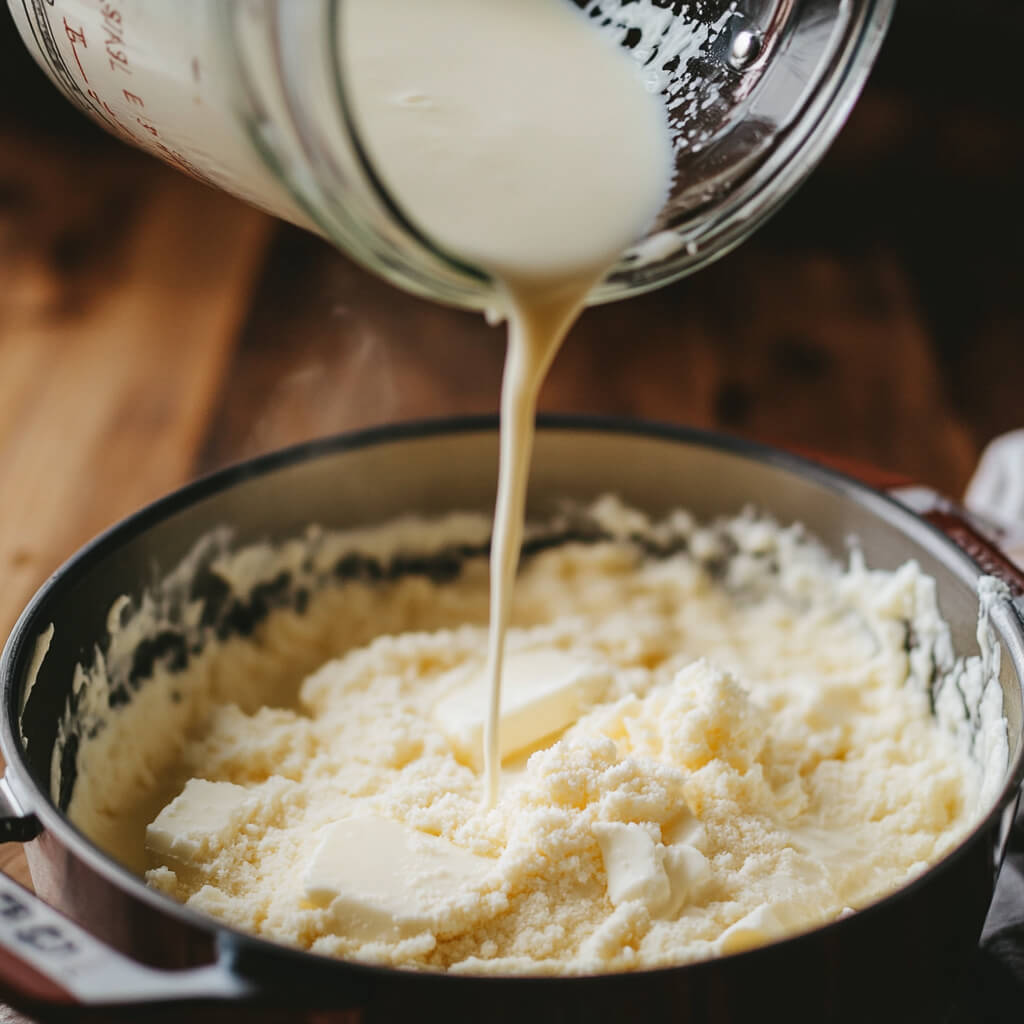
Step 2: Make the Creamy Cheese Sauce
Now, it’s time to make that rich, cheesy, velvety sauce that makes mac and cheese so irresistible.
- Melt 4 tablespoons of butter in a large pot over medium heat.
- Whisk in 4 tablespoons of flour and cook for about 1-2 minutes, stirring constantly. This step creates a roux, which thickens the sauce and gives it that smooth, creamy texture.
- Slowly pour in 3 cups of whole milk and 1 cup of heavy cream, whisking continuously to avoid lumps.
- Add the seasonings:
- 1 teaspoon salt
- ½ teaspoon black pepper
- ½ teaspoon garlic powder (optional, but adds a great flavor boost!)
- ½ teaspoon mustard powder (optional, but enhances the cheese flavor!)
- Let the sauce simmer for 3-4 minutes, stirring occasionally, until it starts to thicken.
💡 Pro Tip: If the sauce gets too thick, just add a splash of milk to loosen it up!
- Reduce the heat to low and slowly stir in the cheese:
- 3 cups shredded sharp cheddar cheese
- 1 cup shredded mozzarella or Colby Jack cheese
- Stir until everything is melted and smooth. At this point, the sauce is so creamy and delicious, you might be tempted to eat it with a spoon (and honestly, no one would blame you!).
Part 2: Assembling and Baking the Ultimate Homemade Mac and Cheese
Now that we have our perfectly cooked pasta and a luxuriously creamy cheese sauce, it’s time to put everything together. While stovetop mac and cheese is delicious on its own, baking it takes it to a whole new level. The combination of a crunchy, golden-brown topping and that gooey, melty interior is what makes this dish a true classic.
Let’s finish assembling this mac and cheese and get it into the oven!
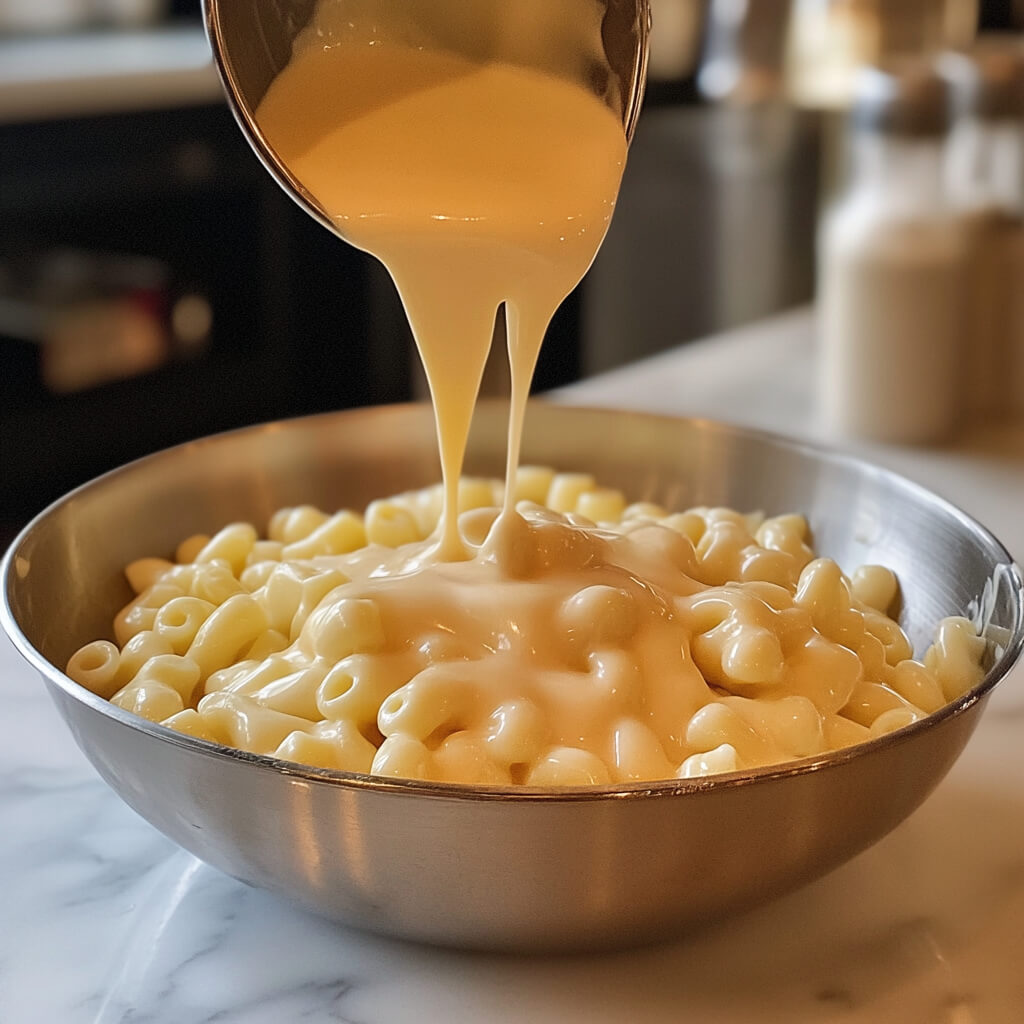
Step 3: Combine the Pasta and Cheese Sauce
- Add the cooked pasta to the cheese sauce – Pour the drained pasta into the pot with the creamy cheese sauce and gently stir until every piece is fully coated. You want each bite to be rich, cheesy, and delicious.
- Taste-test – Give it a quick taste to check if it needs more seasoning. If you like a bit more salt, pepper, or even a dash of hot sauce for a kick, now is the time to adjust!
💡 Pro Tip: If you love extra saucy mac and cheese, reserve about ½ cup of the cheese sauce before mixing. You can drizzle it over the top just before serving!
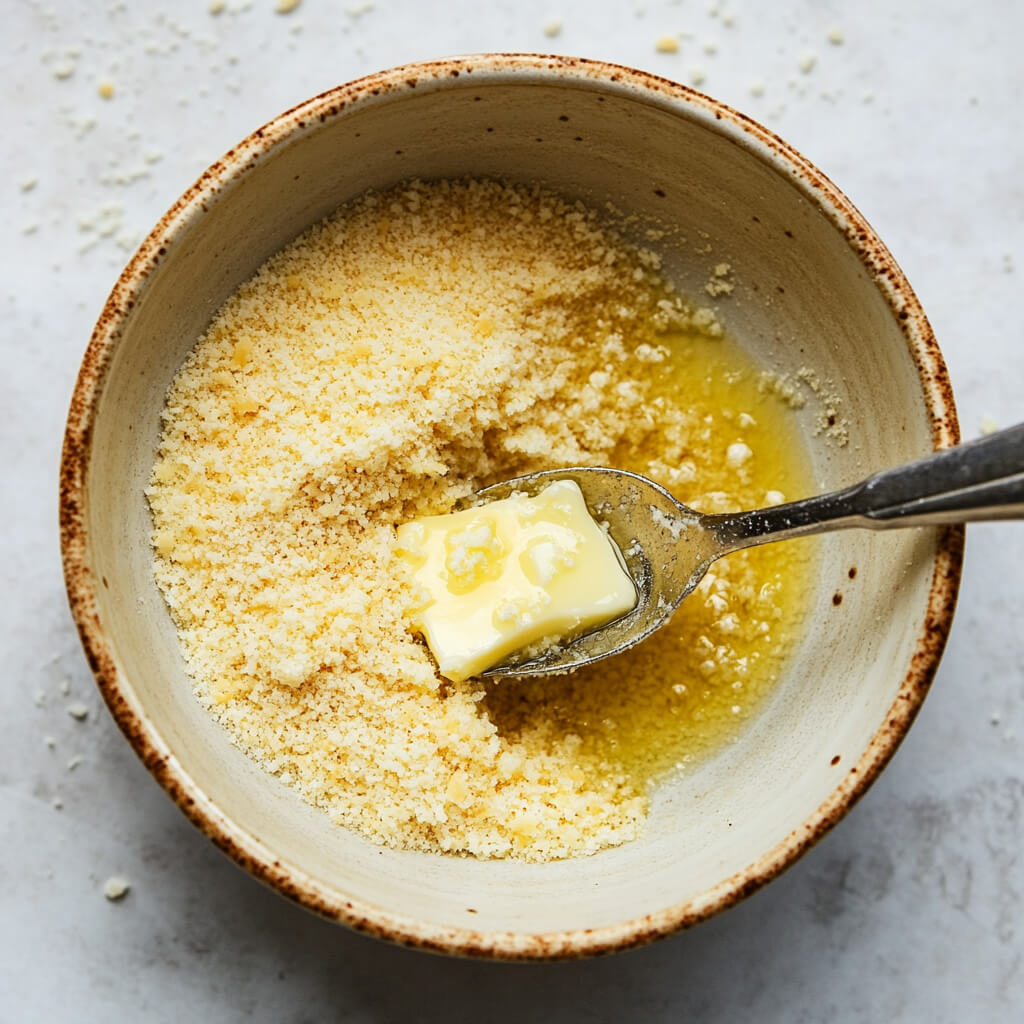
Step 4: Prepare the Crispy Topping (Optional, but Highly Recommended!)
If you’re a fan of that golden, crunchy crust on top of baked mac and cheese, you’re going to love this buttery breadcrumb topping.
- In a small bowl, mix together:
- ½ cup breadcrumbs (panko for extra crunch or regular for a classic feel)
- 2 tablespoons melted butter (this helps the topping get beautifully golden brown)
- ¼ cup grated Parmesan cheese (adds a slightly salty, nutty flavor)
- Stir until the breadcrumbs are evenly coated in butter. This helps them crisp up nicely in the oven!
Step 5: Assemble the Mac and Cheese for Baking
- Preheat your oven to 375°F (190°C).
- Transfer the mac and cheese to a greased 9×13-inch baking dish. Spread it out evenly so it bakes uniformly.
- Sprinkle the buttery breadcrumb topping evenly over the top.
- For extra cheesiness, you can also sprinkle a little more shredded cheddar or mozzarella over the breadcrumbs before baking.
💡 Pro Tip: If you like a creamier mac and cheese, bake it for less time or skip the baking step altogether!
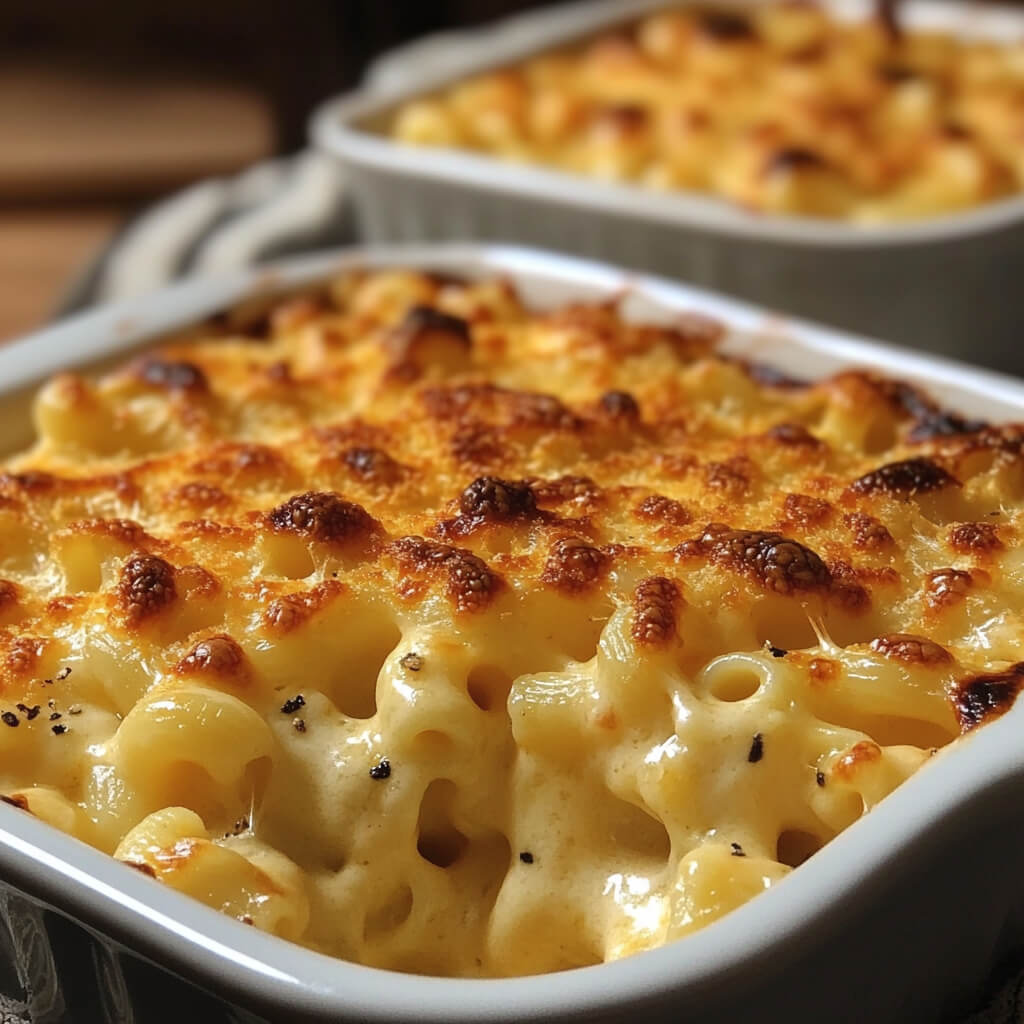
Step 6: Bake to Golden Perfection
- Bake uncovered for 20-25 minutes, or until the top is golden brown and bubbly around the edges.
- Broil for the last 2-3 minutes if you want an extra crispy topping—just keep a close eye on it to prevent burning!
Once the mac and cheese is golden and irresistible, take it out of the oven and let it rest for about 5 minutes before serving. This helps the sauce thicken slightly and makes serving easier.
Step 7: Serve and Enjoy!
Scoop out a big, cheesy portion and serve it warm and fresh. This dish is pure comfort food at its finest—rich, creamy, buttery, and oh-so-cheesy.
By now, your golden, bubbling mac and cheese is fresh out of the oven, and if you’re anything like me, you’re probably counting down the minutes until you can dig in. This dish is everything comfort food should be—creamy, cheesy, buttery, and downright irresistible.
Before we wrap things up, let’s go over some frequently asked questions to help you perfect this classic recipe every time.
Frequently Asked Questions
1. Can I make mac and cheese ahead of time?
Yes! If you want to prepare it in advance, follow these steps:
- Assemble the mac and cheese up to the baking step but don’t add the breadcrumb topping yet.
- Cover tightly and refrigerate for up to 2 days.
- When ready to bake, let it sit at room temperature for 20-30 minutes, then add the breadcrumb topping and bake as directed. You may need to add an extra 5-10 minutes to the baking time.
2. Can I freeze mac and cheese?
Absolutely! Here’s how:
- Assemble the mac and cheese without the topping, then let it cool completely.
- Transfer to a freezer-safe dish, cover tightly with plastic wrap and aluminum foil, and freeze for up to 3 months.
- When ready to eat, thaw in the fridge overnight, then add the topping and bake at 375°F for about 30-35 minutes.
3. What’s the best cheese for mac and cheese?
Sharp cheddar cheese is the best base because it provides a bold, tangy flavor. However, you can mix and match cheeses to create your perfect blend! Some great options include:
- Mozzarella – For extra meltiness.
- Colby Jack – Milder, creamy flavor.
- Gouda – Adds a slightly smoky richness.
- Parmesan – For a salty, nutty bite.
- Gruyère – A fancy touch that adds depth and creaminess.
4. Can I make this without baking it?
Yes! If you prefer a stovetop mac and cheese, simply skip the baking step and serve it straight from the pot. The cheese sauce will be extra creamy and gooey this way.
5. How can I make this mac and cheese even more flavorful?
There are so many ways to customize this dish! Here are some tasty mix-in ideas:
- Bacon – Crispy crumbled bacon makes everything better.
- Jalapeños – For a spicy kick.
- Caramelized onions – Adds a touch of sweetness.
- Hot sauce or cayenne pepper – If you love a little heat.
- Shredded chicken – Turns it into a full meal!
6. How do I reheat leftovers without drying them out?
Mac and cheese is best enjoyed fresh, but if you have leftovers, here’s how to keep it creamy:
- Stovetop: Add a splash of milk or cream and reheat over low heat, stirring frequently.
- Oven: Cover with foil and bake at 350°F for 15-20 minutes.
- Microwave: Heat in 30-second intervals, stirring in between, and add a little milk if needed.
Final Thoughts: Why You’ll Love This Classic Mac and Cheese
This Good Old-Fashioned Mac and Cheese is one of those recipes you’ll come back to again and again. It’s:
✅ Creamy, cheesy, and ultra-comforting
✅ Easy to make from scratch with simple ingredients
✅ Customizable with different cheeses and mix-ins
✅ Perfect as a main dish or side for any occasion
Whether you’re making it for a cozy weeknight dinner, a holiday side dish, or just because you’re craving some serious comfort food, this recipe never disappoints.
If you try this mac and cheese, I’d love to hear how it turned out! Leave a comment below with your favorite mix-ins or variations.
Now, grab a fork and get ready for the cheesiest, most satisfying mac and cheese ever! 🍽
PrintOld Fashioned Mac and Cheese Recipe – A Classic Comfort Food

A classic, creamy, and cheesy homemade mac and cheese with a rich, buttery sauce and a crispy baked topping—perfect for any comfort food lover!
- Prep Time: 10 minutes
- Cook Time: 30 minutes
- Total Time: 40 minutes
- Yield: 6 servings 1x
Ingredients
For the Mac and Cheese:
- 12 oz elbow macaroni (or pasta of choice)
- 4 tablespoons unsalted butter
- 4 tablespoons all-purpose flour
- 3 cups whole milk
- 1 cup heavy cream (or half-and-half)
- 1 teaspoon salt
- ½ teaspoon black pepper
- ½ teaspoon garlic powder (optional)
- ½ teaspoon mustard powder (optional, for extra depth of flavor)
- 3 cups shredded sharp cheddar cheese
- 1 cup shredded mozzarella or Colby Jack cheese
For the Topping (Optional but Recommended):
- ½ cup breadcrumbs (panko or regular)
- 2 tablespoons butter, melted
- ¼ cup grated Parmesan cheese
Instructions
1️⃣ Cook the Pasta:
- Bring a large pot of salted water to a boil.
- Cook elbow macaroni according to package instructions until al dente.
- Drain and set aside.
2️⃣ Make the Cheese Sauce:
- In a large pot, melt butter over medium heat.
- Whisk in flour and cook for 1-2 minutes, stirring constantly, to create a smooth roux.
- Slowly whisk in milk and heavy cream, stirring until smooth.
- Add salt, black pepper, garlic powder, and mustard powder (if using).
- Simmer for 3-4 minutes, until slightly thickened.
- Reduce heat to low and gradually stir in cheddar and mozzarella cheese until melted and smooth.
3️⃣ Combine Pasta and Sauce:
- Add the cooked pasta to the cheese sauce and stir until well coated.
4️⃣ Prepare the Topping (Optional):
- In a small bowl, mix breadcrumbs, melted butter, and Parmesan cheese.
5️⃣ Bake (Optional but Recommended):
- Preheat oven to 375°F (190°C).
- Transfer mac and cheese to a greased 9×13-inch baking dish.
- Sprinkle breadcrumb topping evenly over the dish.
- Bake uncovered for 20-25 minutes, until golden brown and bubbly.
6️⃣ Serve & Enjoy:
- Let cool for 5 minutes before serving.
- Enjoy this creamy, cheesy, and crispy mac and cheese!
Notes
- Want extra flavor? Stir in crisp bacon, sautéed onions, or diced jalapeños for a kick!
- Extra creamy version: Add 4 oz cream cheese for an ultra-rich texture.
- Cheese swap: Use Gruyère, Gouda, or Pepper Jack for a twist on flavor.
- Storage: Store leftovers in an airtight container in the fridge for up to 3 days. Reheat with a splash of milk to restore creaminess.


")
