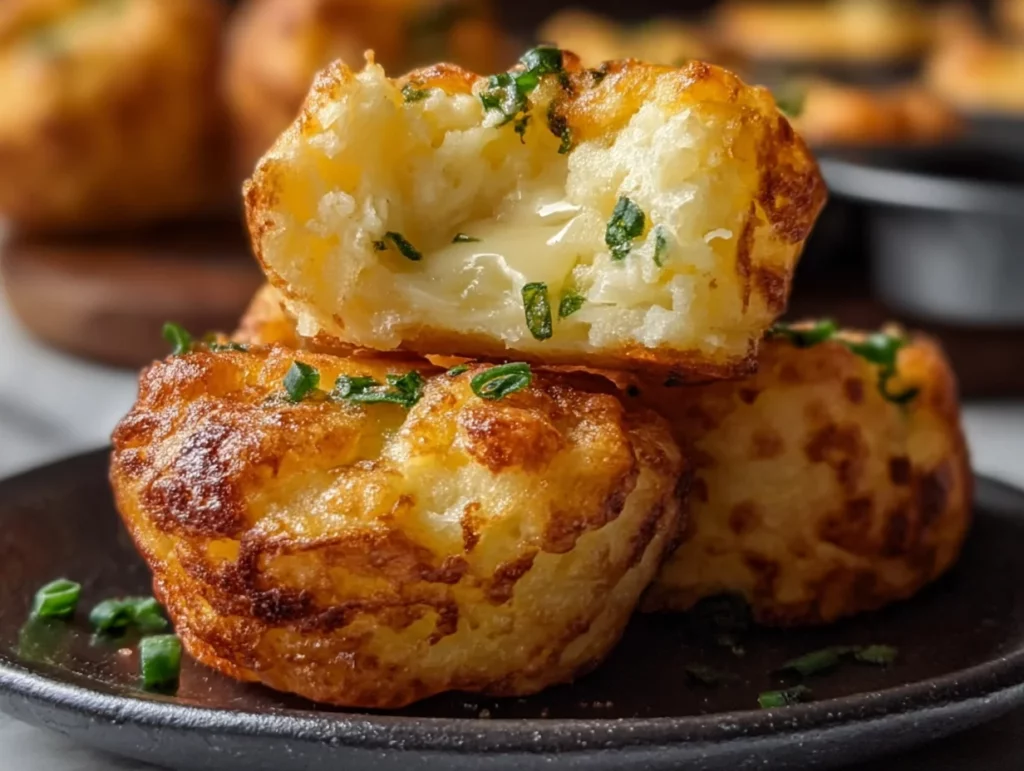
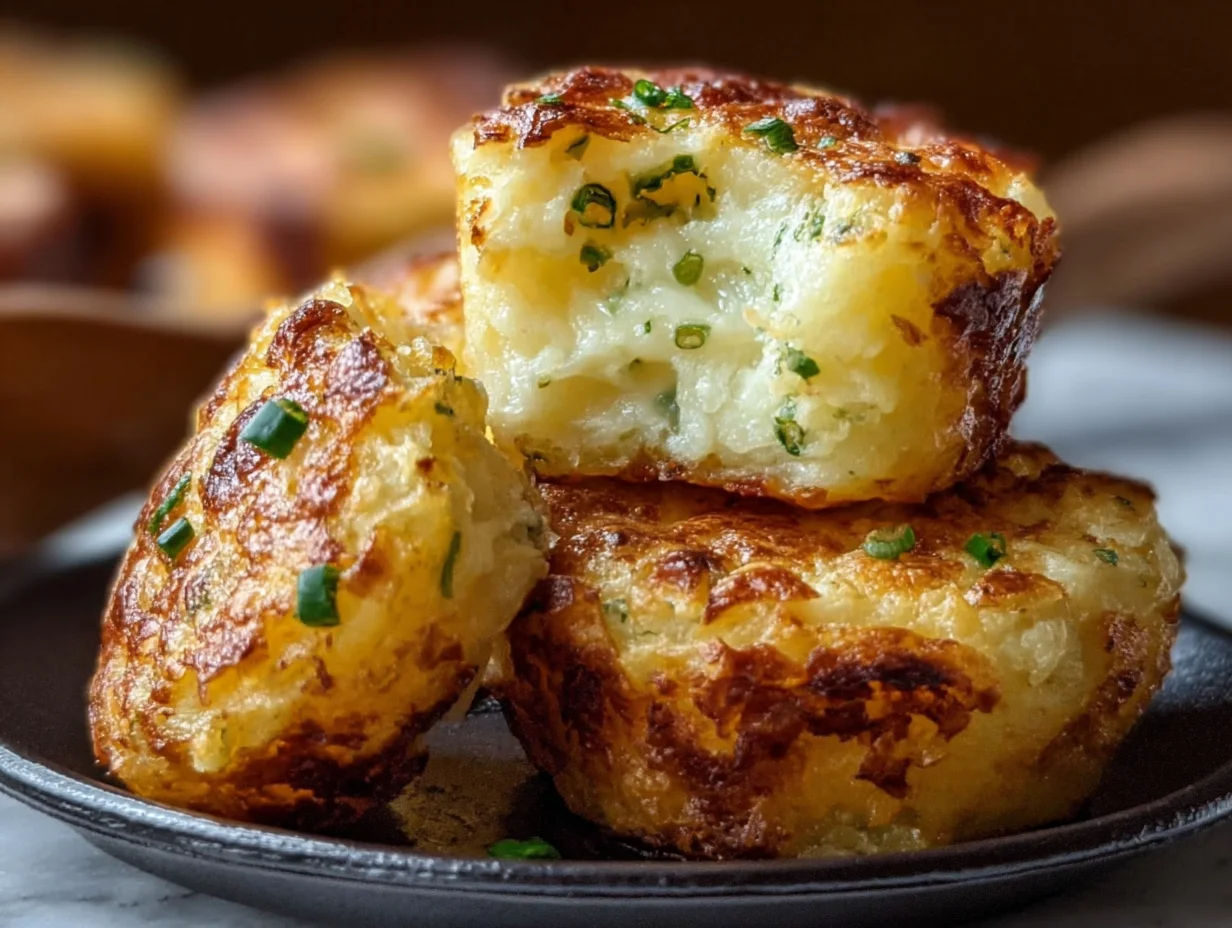
If you’re anything like me, you know the magic of mashed potatoes doesn’t have to end after one meal. I used to stare at a container of cold mashed potatoes in the fridge, wondering if I really wanted to just reheat them again. That’s when these Mashed Potato Cheese Puffs came into my life—and let me tell you, they’re a total game-changer.
These little puffs are everything you love about comfort food: crispy on the outside, soft and fluffy on the inside, with just the right amount of melty cheese in every bite. Whether you’re serving them as a snack, an appetizer at your next get-together, or a side dish to dress up dinner, they’re always a hit. And the best part? They come together in no time at all using simple ingredients you probably already have.
This is also one of those recipes that feels like you’re getting away with something. You’re taking leftovers and turning them into something completely new and exciting, and no one would ever guess it started with yesterday’s mashed potatoes.
Let’s dive right in—you’re going to love how easy these are!
Ingredients You’ll Need:
-
2 cups cold mashed potatoes – Make sure they’re firm, not too creamy.
-
1 large egg
-
1 cup shredded cheddar cheese
-
¼ cup grated Parmesan cheese
-
¼ cup chopped green onions
-
¼ teaspoon garlic powder
-
Salt and black pepper to taste
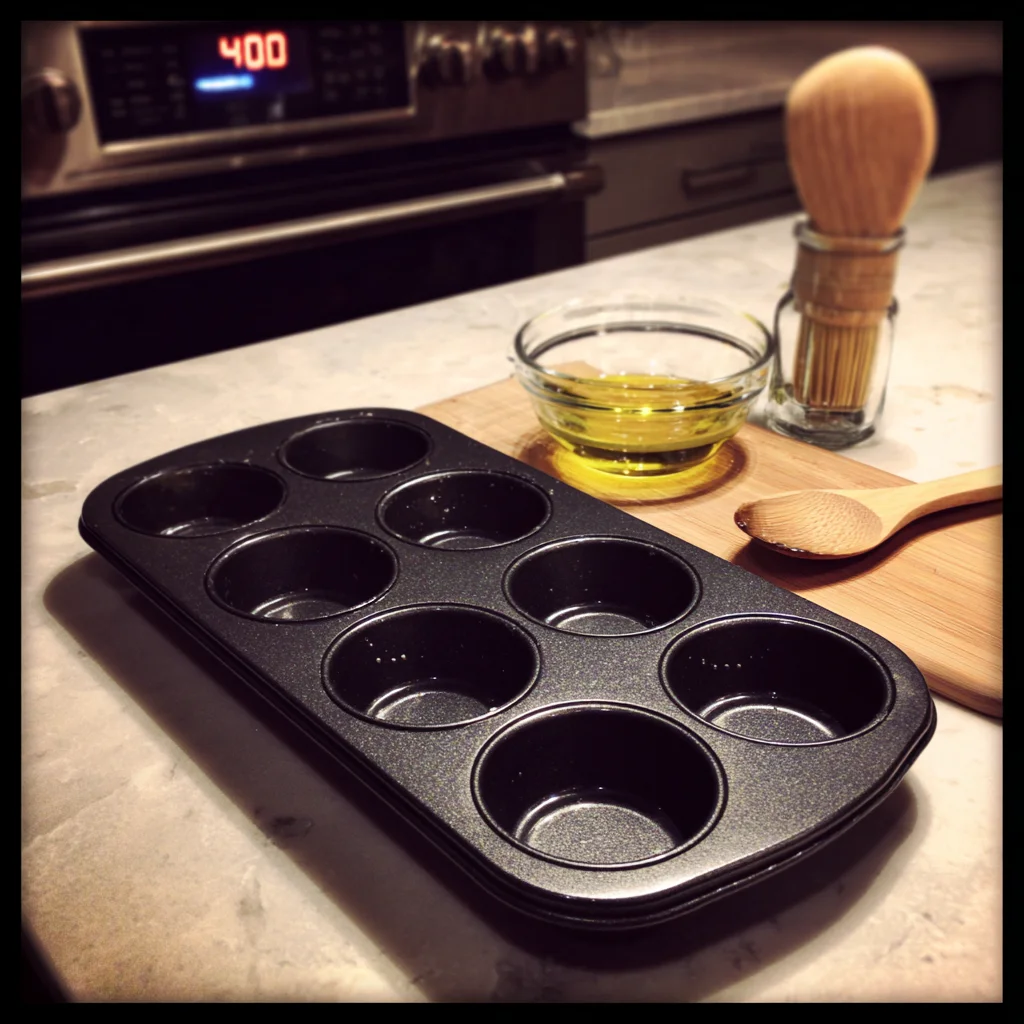
STEP 1: PREP YOUR PAN AND OVEN
Start by preheating your oven to 400°F. You’ll want your oven good and hot to get that perfect golden-brown crust on top. Lightly grease a mini muffin pan—this is key for getting the cute, puffed shape. You can also use mini paper liners if you prefer easier cleanup, but I personally like to go without so the edges get nice and crispy.
STEP 2: MIX UP THE GOOD STUFF
In a large mixing bowl, combine the cold mashed potatoes, egg, cheddar cheese, Parmesan, chopped green onions, garlic powder, and a good pinch of salt and pepper. You don’t need to overmix here—just stir until everything is well blended. The mixture will be thick, which is exactly what you want.
This is also the point where you can get creative. Toss in a little crumbled bacon or a few finely chopped jalapeños if you’re feeling adventurous. Or swap out the cheddar for pepper jack or mozzarella. The base is super flexible, so feel free to make it your own.

STEP 3: SCOOP AND PRESS
Using a spoon (or a small cookie scoop if you have one), fill each cup of your prepared mini muffin tin almost to the top. Press the mixture down gently into each cup so everything holds together nicely as it bakes.
This part is great to do with kids—they love helping press the mixture in. Plus, if you’re like me, it’s always more fun when you’ve got little hands helping out in the kitchen.
Cheesy Mashed Potato Puffs: The Ultimate Leftover Makeover
Now that your muffin pan is filled with that cheesy mashed potato goodness, it’s time to bring them to life in the oven. This next part is where the magic happens—the crispy edges, the melted cheese, the warm, savory center. Let’s keep going!
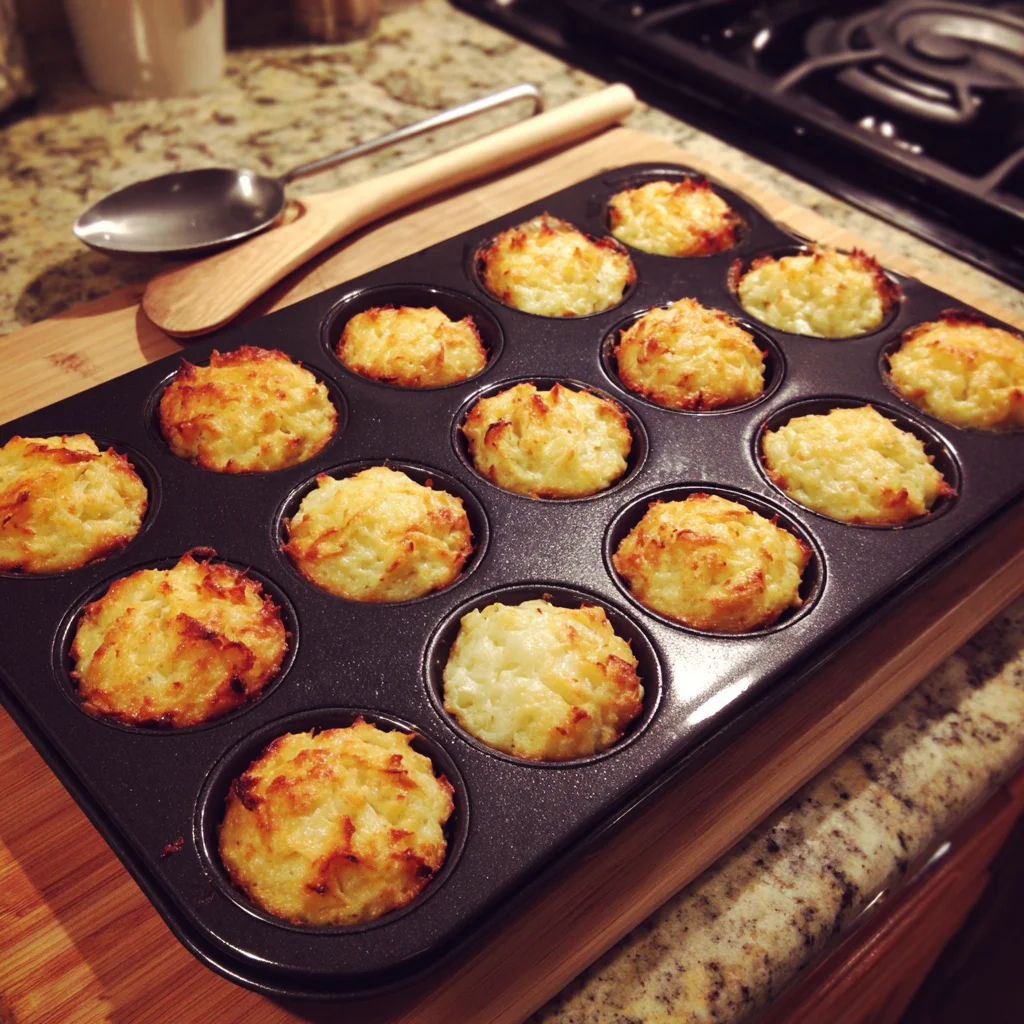
STEP 4: BAKE TO GOLDEN PERFECTION
Pop your muffin tin into the preheated 400°F oven and bake for 20 to 25 minutes. You’ll know they’re ready when the tops are golden and puffed and the edges look just a little crispy.
Every oven runs a bit differently, so I like to check on them around the 18-minute mark just to be safe. If the tops aren’t quite golden yet, let them go a few more minutes. You’re looking for that irresistible crispy texture that makes these puffs so addicting.
Once baked, remove them from the oven and let them cool in the pan for a few minutes. This gives them time to set up a bit, which makes them easier to remove without breaking apart. Then just pop them out carefully with a spoon or offset spatula.
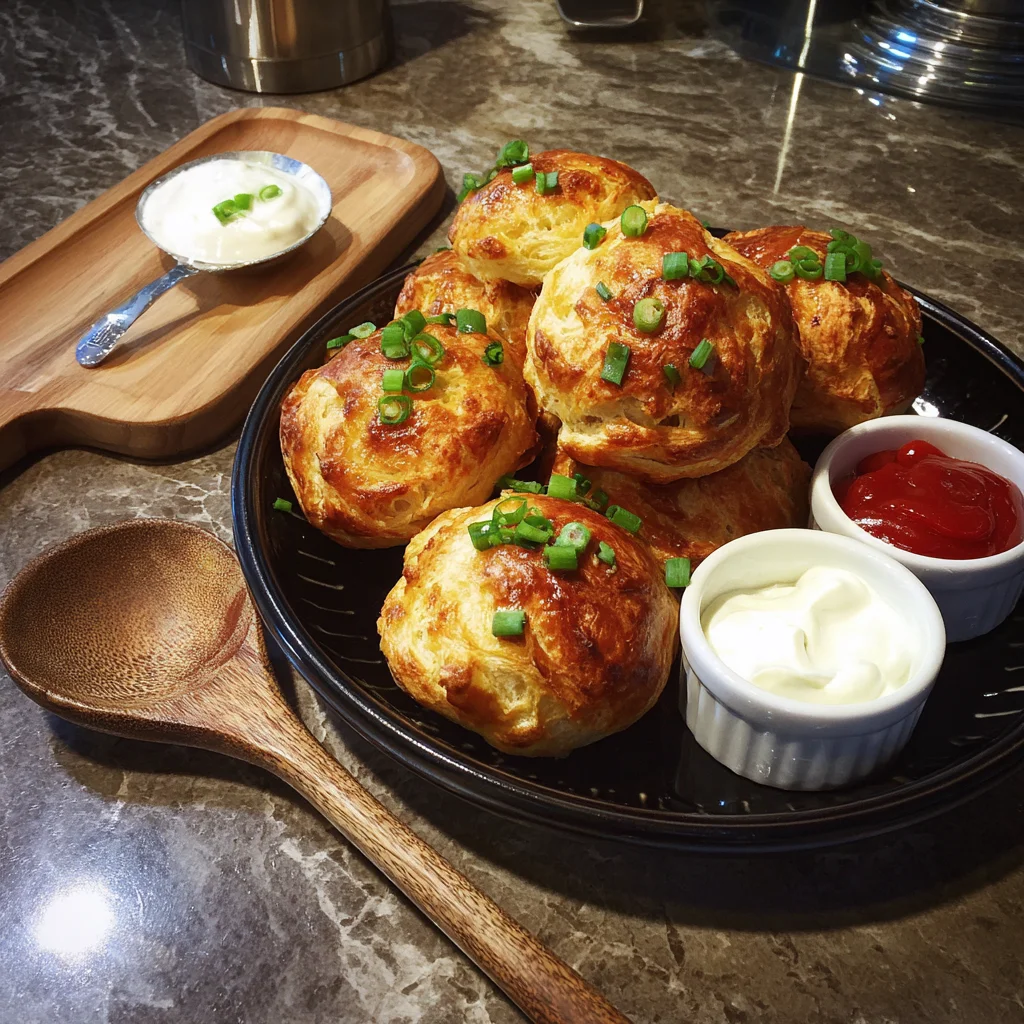
SERVING TIPS: MAKE IT A MEAL OR A SNACK
These Mashed Potato Cheese Puffs are super versatile, which is one of the reasons I love making them. You can serve them as:
-
A snack for game night or movie night
-
A fun appetizer for parties or potlucks
-
A side dish alongside grilled chicken, steak, or soup
-
A lunchbox addition for kids (they’re great at room temperature, too)
If you want to really take things up a notch, serve them with a dipping sauce. Here are a few of my favorite pairings:
-
Sour cream with a sprinkle of chives
-
Ranch dressing (classic and crowd-pleasing)
-
Spicy ketchup or Sriracha mayo for a little kick
STORAGE AND REHEATING
If you’ve got leftovers (though don’t be surprised if they disappear fast), these puffs store beautifully.
-
To store: Let them cool completely and transfer to an airtight container. Keep them in the fridge for up to 4 days.
-
To freeze: Place them in a single layer on a baking sheet and freeze for about an hour. Then transfer to a freezer-safe bag or container. They’ll keep well for up to 2 months.
To reheat, just pop them in a 350°F oven or air fryer for about 8–10 minutes until warmed through. They’ll crisp up just like they did on day one. Avoid microwaving if possible—it tends to make them soggy.
CUSTOMIZATION IDEAS: MAKE THEM YOUR OWN
These puffs are a blank canvas, which means you can tweak them depending on what you have in the fridge or who you’re feeding. Here are a few easy ways to switch things up:
-
Add bacon: Crumbled cooked bacon adds a salty, smoky flavor.
-
Spice it up: Mix in a pinch of cayenne, smoked paprika, or chopped jalapeños.
-
Try new cheeses: Swap cheddar for Gruyère, Monterey Jack, mozzarella, or pepper jack for a twist.
-
Fresh herbs: Toss in a little chopped parsley, dill, or thyme for extra freshness.
This is also a great way to use up those little odds and ends in your fridge drawer—you know, the half-empty cheese bag or that last green onion? Toss it in! These puffs are forgiving and flavorful no matter what.
Cheesy Mashed Potato Puffs: The Ultimate Leftover Makeover
You’ve made it to the final part of our delicious journey, and by now your kitchen probably smells amazing. Whether you’re already enjoying your first batch or getting ready to serve them at your next get-together, let’s cover a few last details to help make this recipe as foolproof as possible.
Below, I’ve answered some of the most frequently asked questions about Mashed Potato Cheese Puffs, plus wrapped up with a little encouragement to make these your own family favorite.
FREQUENTLY ASKED QUESTIONS
1. Can I use instant mashed potatoes for this recipe?
Yes, you can! Just make sure they’re on the firmer side and not too creamy or runny. Instant mashed potatoes can work well, especially if you don’t have leftovers but still want to make these puffs.
2. What kind of cheese works best?
Cheddar is classic, but you can absolutely mix things up. Mozzarella makes them extra melty, Gruyère adds a nutty richness, and pepper jack brings a spicy kick. Feel free to use whatever cheese you love most.
3. Can I make these ahead of time?
Yes. You can prepare the mixture ahead of time and keep it in the fridge (covered) for up to a day before baking. You can also fully bake the puffs, store them in the fridge or freezer, and reheat before serving.
4. How do I prevent the puffs from sticking to the pan?
Make sure to grease your mini muffin pan well or use paper liners. If they still stick slightly, let them cool for a few minutes in the pan—this usually helps them firm up and release more easily.
5. Can I make these gluten-free?
Absolutely! The base recipe is already gluten-free, assuming your mashed potatoes and cheese don’t contain any added gluten. Just double-check your ingredients to be sure.
6. What’s the best way to reheat leftovers?
Use an oven or air fryer at 350°F for about 8–10 minutes to bring back the crispy exterior. Microwaving works in a pinch but may soften the texture.
7. Can I add meat or vegetables to the mix?
Yes! Crumbled bacon, finely chopped cooked ham, or even sautéed mushrooms or spinach are great add-ins. Just be sure to keep the add-ins chopped small so everything bakes evenly.
A FINAL WORD: SIMPLE, SAVORY, AND SATISFYING
I love recipes like this one—recipes that are easy, unfussy, and full of possibilities. These Mashed Potato Cheese Puffs are proof that leftovers don’t have to be boring. They’re warm, cheesy, crispy, and totally customizable. Plus, they look fancy enough to serve to guests but are simple enough to whip up on a weekday afternoon.
Whether you’re making them for your family, bringing them to a potluck, or just treating yourself to something cozy and satisfying, I hope you fall in love with this recipe as much as I have. They’ve definitely become a regular in our house, especially after big holiday meals when mashed potato leftovers are practically guaranteed.
PrintMashed Potato Cheese Puffs

Mashed Potato Cheese Puffs are a delicious way to repurpose leftover mashed potatoes into golden, cheesy bites that are crisp on the outside and soft on the inside. These savory puffs are perfect as a snack, appetizer, or side dish, offering comfort food appeal with a playful twist. Quick to prep and bake, they’re an easy crowd-pleaser for any occasion.
- Author: Mark's Recipe
Ingredients
2 cups cold mashed potatoes
1 large egg
1 cup shredded cheddar cheese
¼ cup grated Parmesan cheese
¼ cup chopped green onions
¼ teaspoon garlic powder
Salt and black pepper to taste
Instructions
1️⃣ Preheat the oven to 400°F. Lightly grease a mini muffin pan or line with paper liners.
2️⃣ In a mixing bowl, combine the mashed potatoes, egg, cheddar cheese, Parmesan, green onions, garlic powder, salt, and pepper. Mix until the ingredients are fully incorporated.
3️⃣ Spoon the mixture into the prepared muffin tin, filling each cup almost to the top. Press lightly to compact.
4️⃣ Bake for 20 to 25 minutes, or until the tops are golden and puffed. Let cool for a few minutes in the pan before removing.
Notes
For best results, use mashed potatoes that are firm and not overly creamy. These puffs can be customized with crumbled bacon, jalapeños, or other cheeses for extra flavor. Serve with sour cream, ranch dressing, or ketchup for dipping. They also freeze well and can be reheated in the oven or air fryer for a quick snack.
")
