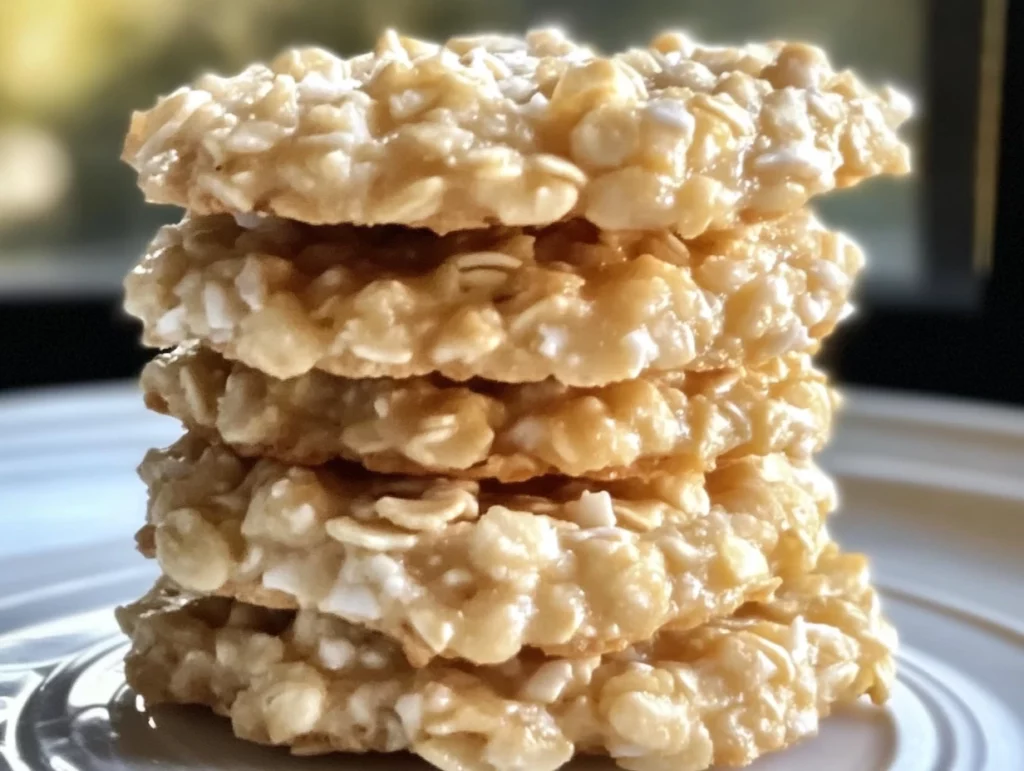
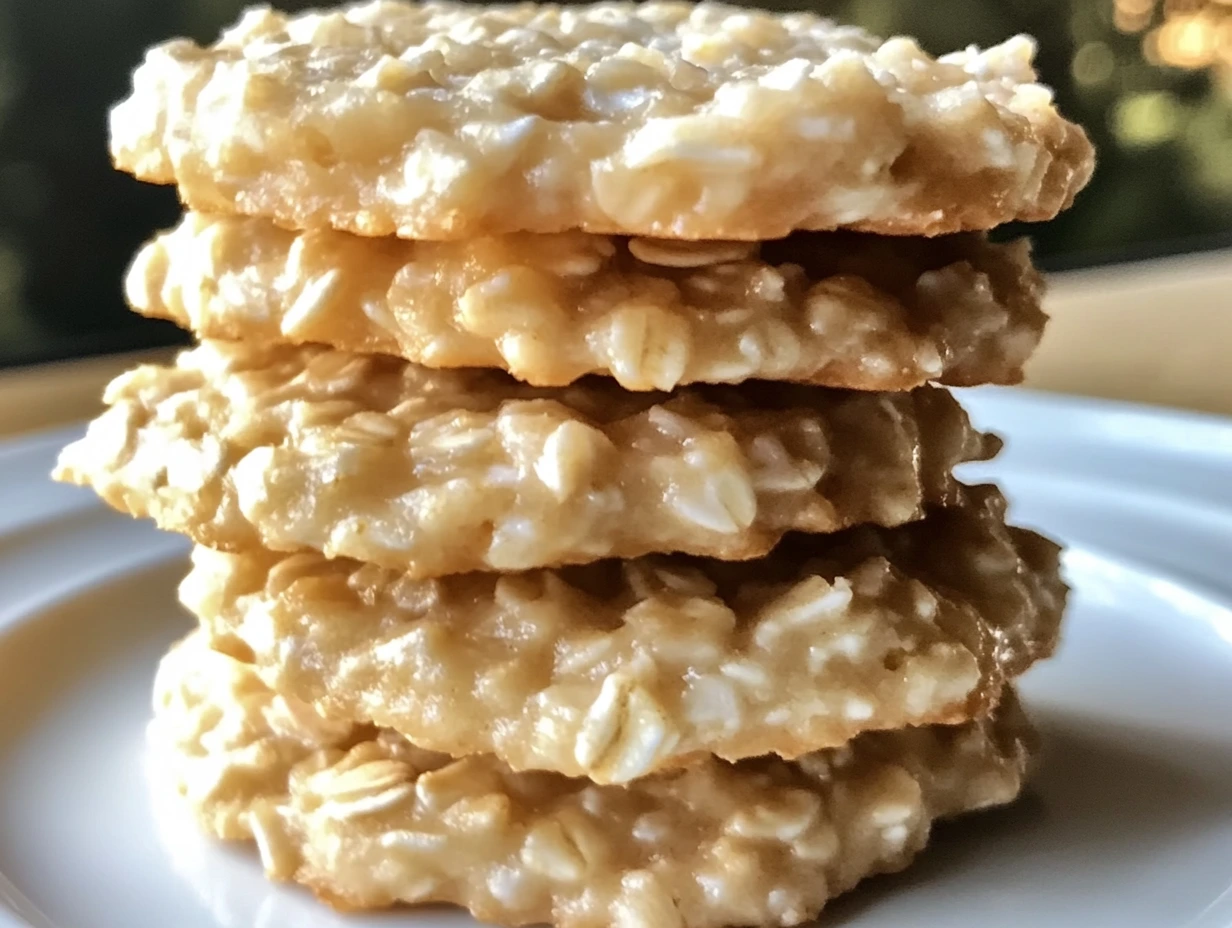
If you’re a fan of no-bake cookies, then you’re going to absolutely fall in love with these Lemon Oatmeal No-Bake Cookies! This recipe puts a delightful spin on the traditional chocolatey no-bake treat, giving it a fresh, zesty twist with lemon. The combination of bright lemon zest and juice, paired with chewy oats and a touch of coconut, creates a perfectly balanced, irresistible treat. What’s even better? These cookies come together in just a few simple steps and require no baking—just a little time in the fridge for them to set up.
I first made these cookies on a particularly warm day when the thought of turning on the oven felt like a bad idea. I had all the ingredients I needed on hand, and I was craving something light, refreshing, and, most importantly, easy. Enter these Lemon Oatmeal No-Bake Cookies. The tangy citrus flavor was exactly what I was looking for, and the chewy texture from the oats made them feel substantial yet not too heavy. Plus, no oven required! Since then, I’ve been making them whenever I need a quick, delightful treat. Whether you’re preparing them for a snack, a light dessert, or just a fun weekend baking project, I promise these will quickly become a favorite.
Ready to try them yourself? Here’s how to make them step by step!
Ingredients
Before we dive into the instructions, let’s make sure you have everything you need to make these delightful cookies.
-
½ cup (115g) unsalted butter
-
1 cup (200g) granulated sugar
-
¼ cup (60ml) milk (you can use any milk you prefer)
-
2 teaspoons lemon zest
-
2 tablespoons fresh lemon juice
-
½ teaspoon vanilla extract
-
2 cups (200g) quick oats
-
½ cup (40g) shredded coconut (optional, but a nice texture boost)
-
Pinch of salt
Once you’ve gathered your ingredients, it’s time to get started on these cookies. Don’t worry, there are just a few simple steps to follow, and you’ll be enjoying your citrusy, chewy cookies in no time!
Steps
Step 1: Prepare Your Workspace
Start by lining a baking sheet with parchment paper or wax paper. This will make it super easy to remove the cookies once they’ve set. You’ll thank yourself later for the extra effort—trust me!
Step 2: Cook the Lemon Mixture
In a medium saucepan, combine the butter, sugar, milk, lemon zest, and lemon juice. Place the pan over medium heat and stir constantly. Keep an eye on it—this mixture should come to a boil! Once it starts to bubble, continue stirring and let it boil for about 1 minute. It’s important to keep stirring to prevent any burning, so don’t walk away!
This step is crucial because it helps dissolve the sugar and blend the flavors together. The result should be a smooth, fragrant mixture with the sweet, tart aroma of lemon wafting through your kitchen. It’s like summer in a saucepan!

Step 3: Add the Dry Ingredients
Once your lemony mixture has boiled for a minute, remove the saucepan from the heat. Now it’s time to add the dry ingredients. Stir in the vanilla extract, quick oats, shredded coconut (if you’re using it), and a pinch of salt. Keep stirring until everything is evenly combined.
At this point, you’ll notice the texture starting to come together. The oats will begin absorbing some of the liquid, and the mixture will thicken up slightly. It’s almost ready to turn into cookies!
Step 4: Shape the Cookies
Now comes the fun part—shaping the cookies! Using a cookie scoop or a spoon, drop generous spoonfuls of the mixture onto your prepared baking sheet. If you want to make them look a little more uniform, gently shape the cookies with your fingers or the back of a spoon.
These cookies don’t spread out like traditional cookies, so you don’t need to worry about giving them too much space on the sheet. A little crowding won’t hurt!

Step 5: Cool and Set
Once all the cookies are scooped onto the sheet, let them cool at room temperature for about 30 minutes. If you’re in a hurry, you can pop the baking sheet in the fridge to speed up the setting process. The cookies should firm up nicely and hold their shape once they’re fully cooled.
If you’re like me, the hardest part will be waiting for them to set! But trust me, it’s worth it for that perfect no-bake texture.
Step 6: Serve and Store
Once the cookies have cooled and set, it’s time to enjoy them! You can serve them right away, or store them in an airtight container at room temperature for up to 3 days. If you want them to last a little longer, pop them in the fridge, and they’ll stay fresh for up to a week. These cookies are a great make-ahead option for a snack or dessert later in the week!

Lemon Oatmeal No-Bake Cookies: Tips, Variations, and More
Now that you’ve mastered the basics of making these Lemon Oatmeal No-Bake Cookies, it’s time to dive deeper into the recipe with some helpful tips and fun variations. The beauty of this recipe lies in its versatility. You can tweak it to suit your taste or experiment with different ingredients to make it uniquely yours. Let’s explore some ideas to elevate these cookies even further!
Helpful Tips for Perfect No-Bake Cookies
Making no-bake cookies is pretty straightforward, but there are a few little tips that can make a big difference in the final result. Let’s walk through them:
1. Get the Consistency Right
The key to perfect no-bake cookies is making sure the mixture has the right consistency before shaping the cookies. If it’s too runny, the cookies may not set properly. If it’s too thick, they can become too hard once they cool. You want the mixture to be thick enough that it holds its shape when you scoop it onto the baking sheet, but not so thick that it becomes difficult to scoop.
If you find your mixture is too thin, don’t worry—simply add a little more oats, about 1/4 cup at a time, to thicken it up. If it’s too thick, you can add a splash more milk to loosen it. It’s all about finding that sweet spot!
2. Don’t Skip the Boiling Step
You might be tempted to skip the step where the mixture boils for one minute, but trust me, it’s important! This step helps to dissolve the sugar completely and allows the butter and lemon to fully incorporate into the mixture. Skipping this could result in grainy cookies, which is definitely something you want to avoid.
Make sure to keep stirring during the boiling process so nothing burns on the bottom of the pan. A minute may feel like a long time, but it’s necessary for achieving the right texture.
3. Let Them Cool Properly
As tempting as it may be to dive into the cookies right away, giving them time to cool and set is crucial. They need at least 30 minutes at room temperature to firm up. If you need to speed up the process, refrigerating them for 15-20 minutes should do the trick. Patience pays off when it comes to no-bake cookies!
4. Use a Cookie Scoop for Even Sizes
If you want your cookies to look as beautiful as they taste, I recommend using a cookie scoop. It ensures that all the cookies are roughly the same size and that they’ll set evenly. Plus, it’s so much faster than shaping each cookie by hand. Bonus: less mess to clean up!
Variations and Fun Twists to Try
While the basic Lemon Oatmeal No-Bake Cookies are absolutely delicious as they are, you can easily mix things up by adding or swapping ingredients. Here are a few ideas to get you started:
1. Add a White Chocolate Drizzle
If you love the idea of a sweet contrast to the tart lemon, try drizzling a little melted white chocolate over the cooled cookies. The creamy sweetness of the chocolate pairs beautifully with the zesty lemon, creating a decadent yet refreshing flavor combination. To make it even fancier, you could sprinkle some chopped pistachios or a bit of sea salt on top of the drizzle.
2. Try Different Nuts or Dried Fruit
For a bit of crunch and extra flavor, feel free to add in chopped nuts like almonds, cashews, or walnuts. You could also experiment with dried fruits such as cranberries or raisins for a chewy texture that complements the oats. Just make sure to chop any larger pieces to ensure they mix in well with the other ingredients.
3. Coconut-Free Option
Not a fan of coconut? No problem! You can simply leave it out of the recipe and still end up with a fantastic cookie. The oats and lemon will still shine through beautifully. If you want to replace the texture that coconut provides, consider adding some chopped almonds or sunflower seeds for crunch.
4. Go for a Lime Twist
If lemon isn’t your thing (though I can’t imagine why!), you can swap the lemon zest and juice for lime zest and lime juice instead. The result will be just as fresh and zesty, with a slightly different citrus profile. This is a great way to mix things up if you’re craving something new but still want that same no-bake, chewy texture.
5. Make Them Gluten-Free
For a gluten-free version, simply use certified gluten-free oats in place of the regular quick oats. As long as you check the labels on the other ingredients, these cookies can easily fit into a gluten-free diet. Just be sure to double-check that your coconut and other additions are gluten-free as well!
Serving Suggestions and Pairings
These Lemon Oatmeal No-Bake Cookies are perfect on their own, but they also pair wonderfully with other treats or beverages. Try serving them alongside a cup of tea or a tall glass of iced lemonade for the ultimate citrusy refreshment. If you’re planning a get-together, these cookies would be a great addition to any dessert spread. They’re light and fresh, making them a nice contrast to heavier, richer desserts.
For a fun twist, crumble them over a bowl of vanilla ice cream for a citrusy, oat-topped sundae. Or, serve them with a dollop of whipped cream and a few fresh berries for a simple yet elegant dessert.
Lemon Oatmeal No-Bake Cookies: FAQs and Final Thoughts
Now that you know exactly how to make these Lemon Oatmeal No-Bake Cookies and have some fun variations up your sleeve, let’s take a moment to answer a few common questions. This section will clear up any doubts you might have and offer some extra tips to help you make the best batch of cookies possible.
FAQ Section
1. Can I use regular oats instead of quick oats?
For this recipe, quick oats work best because they absorb the liquid more easily and give the cookies their signature chewy texture. If you don’t have quick oats on hand, you can use regular rolled oats, but keep in mind that the cookies may turn out a bit chewier and denser. You could also pulse regular oats in a food processor a few times to make them a bit finer, which will mimic the texture of quick oats.
2. How can I make these cookies a little sweeter?
If you have a sweet tooth and want to make these cookies extra sweet, you can easily adjust the amount of sugar in the recipe. Try adding an extra tablespoon or two of granulated sugar to the mixture, or drizzle a little bit of honey or maple syrup over the top before serving. Just be sure to keep the balance of lemon and sweetness in mind so the cookies don’t become overwhelmingly sugary.
3. Can I freeze these cookies?
Yes! These cookies freeze beautifully. After the cookies have fully set, store them in an airtight container or a resealable freezer bag and place them in the freezer. They will keep well for up to 3 months. When you’re ready to enjoy them, simply let them thaw at room temperature for about 10-15 minutes before eating. This is a great option for meal prepping or if you want to have cookies on hand for a rainy day!
4. Can I make these cookies dairy-free?
Absolutely! To make these cookies dairy-free, you can swap out the unsalted butter for a dairy-free butter alternative or use coconut oil. For the milk, simply use a non-dairy milk such as almond milk, oat milk, or coconut milk. These substitutions will still give you a delicious cookie with a slightly different flavor profile but maintain that chewy, citrusy goodness.
5. How do I store these cookies?
Once the cookies are set and cooled, store them in an airtight container at room temperature for up to 3 days. If you want them to last a bit longer, you can keep them in the refrigerator for up to a week. They also freeze well, as mentioned earlier, which makes them a fantastic option to prepare in advance.
6. Can I add other flavors to these cookies?
If you’re in the mood for experimenting, feel free to add other flavorings to the dough! You could try adding a pinch of cinnamon or ginger to the mixture for a bit of spice, or even a dash of almond extract for a subtle nutty flavor. Just keep in mind that lemon is the star here, so you don’t want to overwhelm the citrusy taste with too many strong flavors.
7. Can I double or halve the recipe?
Yes, you can easily double or halve the recipe depending on how many cookies you need. If you double it, just make sure you have enough space on your baking sheet to scoop out all the cookies. You may also want to adjust the cooling time slightly if you’re making a larger batch. If you halve the recipe, everything else will stay the same—just remember that it might take less time to cool the smaller batch.
Conclusion
And there you have it! These Lemon Oatmeal No-Bake Cookies are as simple as they are delicious. With just a few ingredients and minimal effort, you can create a refreshing, citrusy treat that will satisfy any craving. Whether you stick to the original recipe or get creative with some of the variations I’ve suggested, these cookies are sure to become a favorite in your home.
Remember, the best part about no-bake cookies is that they’re incredibly versatile. From adding different mix-ins to experimenting with the flavor, there’s no end to the ways you can enjoy them. So, next time you’re looking for a sweet treat without turning on the oven, reach for this easy and fun recipe.
I hope you give these Lemon Oatmeal No-Bake Cookies a try, and I’d love to hear how they turn out for you! Feel free to leave a comment with your own variations or any questions you have. Happy baking (or should I say, no-baking)!
PrintLemon Oatmeal No-Bake Cookies

These Lemon Oatmeal No-Bake Cookies are a refreshing twist on the classic no-bake cookie. With the bright, zesty flavor of lemon combined with the chewiness of oats and the richness of coconut, these cookies are perfect for a quick and easy treat. The best part? No oven required! They come together in just a few simple steps and set up beautifully in the fridge. These cookies are perfect for a light snack or a fun, citrusy dessert.
- Author: Mark's Recipe
Ingredients
½ cup (115g) unsalted butter
1 cup (200g) granulated sugar
¼ cup (60ml) milk (any type)
2 teaspoons lemon zest
2 tablespoons fresh lemon juice
½ teaspoon vanilla extract
2 cups (200g) quick oats
½ cup (40g) shredded coconut (optional, for extra texture)
Pinch of salt
Instructions
Step 1: Prepare Your Workspace
Line a baking sheet with parchment paper or wax paper.
Step 2: Cook the Lemon Mixture
In a medium saucepan, combine the butter, sugar, milk, lemon zest, and lemon juice. Heat over medium heat, stirring constantly, until the butter melts and the mixture begins to boil.
Allow it to boil for 1 minute, stirring continuously to prevent burning.
Step 3: Add the Dry Ingredients
Remove the saucepan from heat and stir in the vanilla extract, oats, shredded coconut (if using), and a pinch of salt. Mix until everything is well combined.
Step 4: Shape the Cookies
Using a cookie scoop or spoon, drop heaping tablespoons of the mixture onto the prepared baking sheet. Shape them slightly if needed.
Step 5: Cool and Set
Let the cookies cool at room temperature for about 30 minutes or until firm. For faster setting, place the baking sheet in the refrigerator.
Step 6: Serve and Store
Enjoy the cookies immediately or store them in an airtight container at room temperature for up to 3 days or in the refrigerator for up to a week.
Notes
These Lemon Oatmeal No-Bake Cookies are a perfect balance of sweet and tangy. The bright lemon zest and juice give them a fresh, citrusy flavor that pairs wonderfully with the oats and optional coconut. If you prefer a stronger lemon flavor, you can add more zest or juice to taste. These cookies are quick to prepare and don’t require any baking, making them ideal for a last-minute treat or when you don’t want to heat up the oven. For an extra twist, you can also drizzle a little melted white chocolate on top once they’ve set, adding a bit of sweetness to the tart lemon. They store well, making them a great option for meal prep or a sweet snack throughout the week. Enjoy!


")
