There’s something about holiday baking that brings out the nostalgia in all of us, isn’t there? For me, nothing says “family gathering” quite like the smell of sweet cinnamon and warm, toasted nuts filling the kitchen. These Italian Nut Roll Cookies are one of those time-honored recipes that instantly make you feel like you’ve stepped into your grandmother’s kitchen—even if your grandmother wasn’t Italian.
These cookies have that perfect old-world charm. Imagine a buttery, tender dough lovingly rolled around a sweet, spiced nut filling, then sliced into pinwheels and baked to golden perfection. Drizzle on a simple vanilla glaze and you’ve got yourself a treat that’s just as perfect for holiday cookie trays as it is for a cozy afternoon coffee break.
I first made these with a friend’s nonna during a Christmas cookie swap, and they’ve been on my baking list ever since. The dough is soft and forgiving, the filling is nutty and rich with just the right amount of sweetness, and the glaze (though optional) adds a beautiful finish. Let’s get into how to make these delicious little rolls!
Ingredients You’ll Need
For the Dough
-
3 cups all-purpose flour
-
1/2 teaspoon baking powder
-
1/4 teaspoon salt
-
1 cup unsalted butter, softened
-
3/4 cup granulated sugar
-
3 large eggs
-
1 teaspoon vanilla extract
For the Nut Filling
-
2 cups finely chopped walnuts or pecans
-
1/2 cup brown sugar, packed
-
1/4 cup honey or maple syrup
-
1 teaspoon cinnamon (optional)
-
2 tablespoons milk
For the Glaze (Optional)
-
1 cup powdered sugar
-
2–3 tablespoons milk
-
1/2 teaspoon vanilla extract
STEP 1: Prepare the Dough
Start by whisking together the dry ingredients in a medium bowl: 3 cups of all-purpose flour, 1/2 teaspoon baking powder, and 1/4 teaspoon salt. Set this aside for a bit—we’ll come back to it shortly.
In a larger mixing bowl, cream the softened butter and granulated sugar together. This step is key because it helps create that soft, melt-in-your-mouth texture. Beat the mixture until it’s light and fluffy. Then, add in the eggs one at a time, mixing well after each addition. Finally, stir in the vanilla extract.
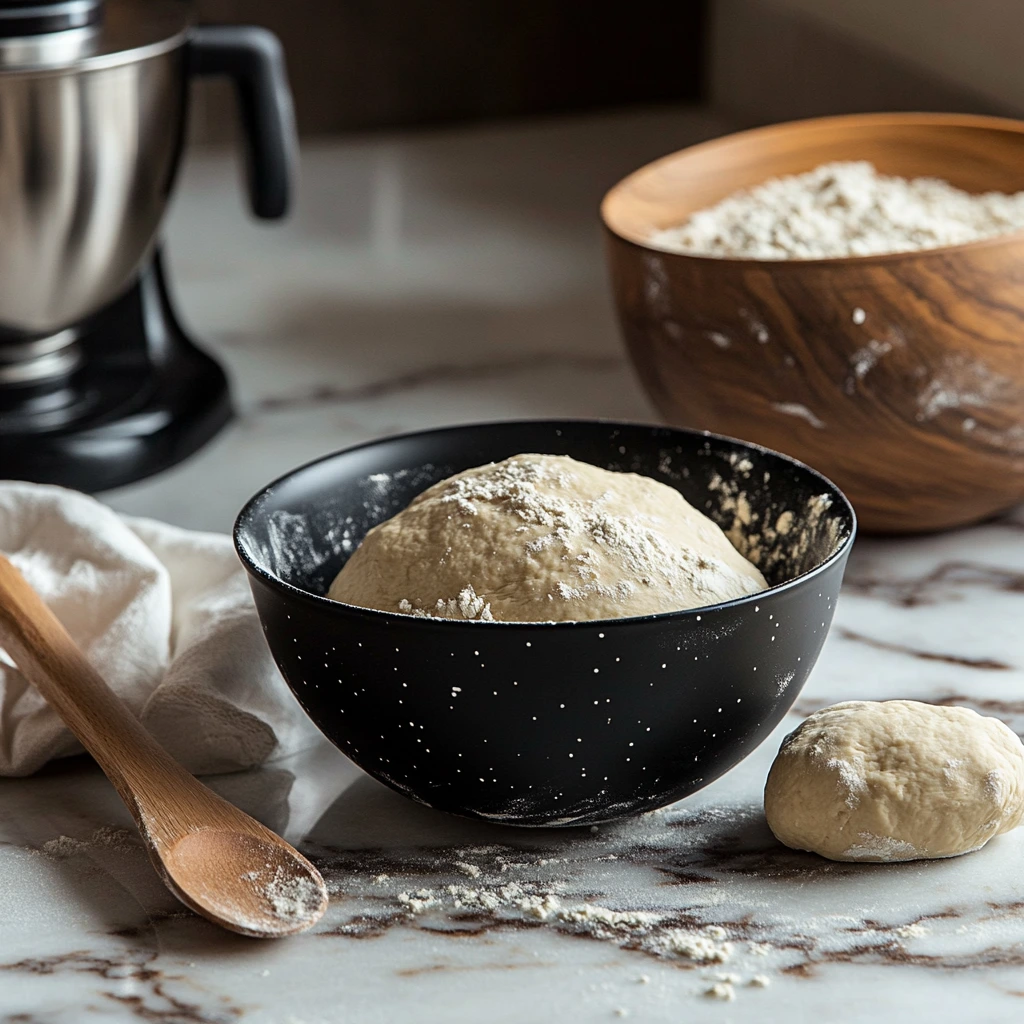
Now, slowly add your flour mixture into the wet ingredients, stirring just until everything comes together into a soft dough. Don’t overmix—it should be smooth but not sticky. Divide the dough into two equal parts, flatten each into a disc, wrap them in plastic wrap, and chill in the fridge for at least 1 hour. Chilling makes the dough easier to roll and prevents it from becoming too soft or sticky while you work.
STEP 2: Make the Nut Filling
While the dough chills, go ahead and make your filling. In a medium bowl, mix together:
-
2 cups of finely chopped walnuts or pecans
-
1/2 cup brown sugar
-
1/4 cup honey (or maple syrup for a twist)
-
1 teaspoon cinnamon (if you like that cozy spice)
-
2 tablespoons milk
Stir everything together until the mixture is fully combined and evenly moistened. It should be sticky but still spreadable. This mixture is the heart of the cookie, giving each bite that irresistible nutty sweetness.
STEP 3: Roll and Fill the Dough
Preheat your oven to 350°F (175°C) and line a baking sheet with parchment paper.
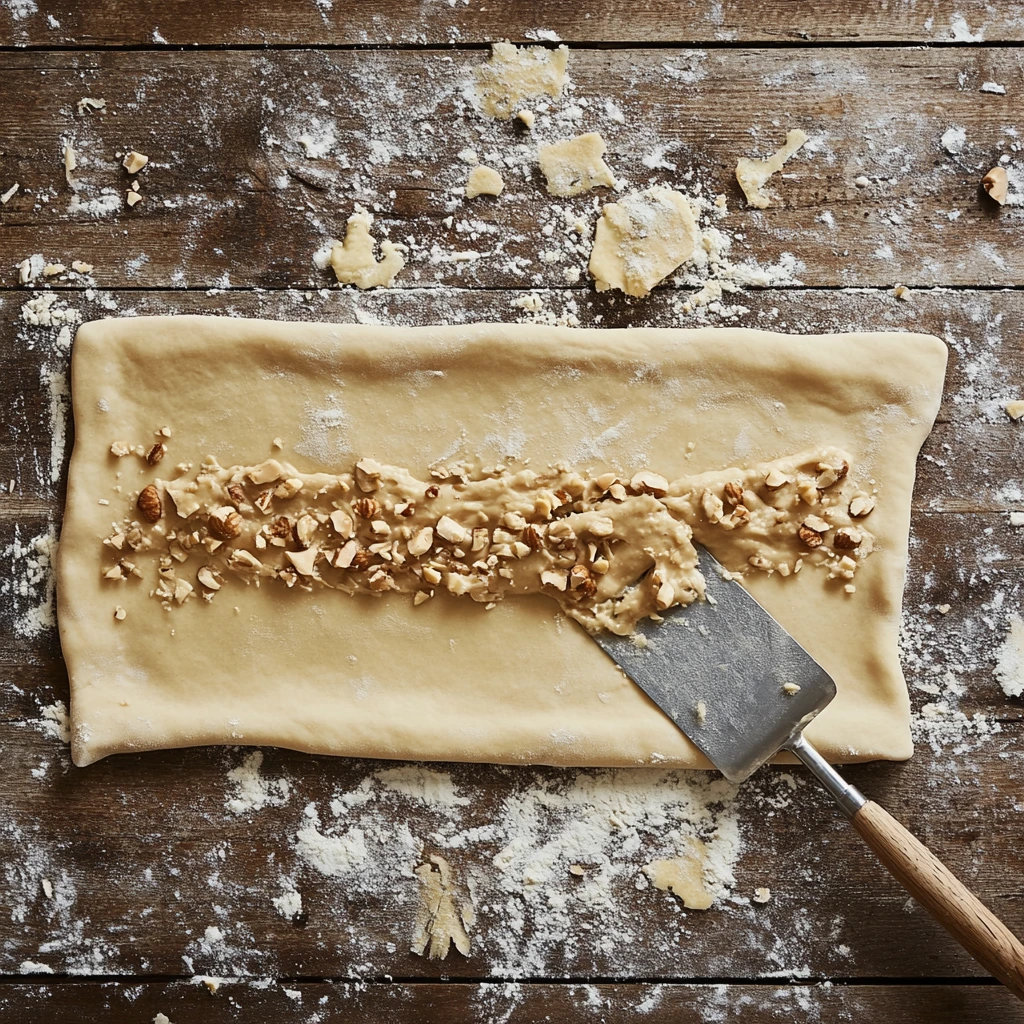
Once your dough is nicely chilled, take one portion and roll it out on a lightly floured surface into a rectangle about 1/8-inch thick. Try to keep the edges even, but don’t stress if it’s not perfectly shaped—these cookies are rustic by nature.
Spread half of the nut filling evenly over the dough, leaving about a 1/2-inch border around the edges. This helps keep the filling from spilling out when you roll it up.
Starting from the long edge, roll the dough into a tight log. Think of it like rolling cinnamon rolls. Press the seam gently to seal, and do the same with the ends. Repeat this process with the second half of the dough and remaining filling.
Baking, Glazing, and Tips for the Perfect Italian Nut Roll Cookies
Now that our dough is filled and rolled into those lovely little logs, it’s time for my favorite part—baking! There’s something so satisfying about watching these slices puff up just slightly in the oven and turn golden brown around the edges. The aroma that fills the kitchen? Pure comfort.
This next part is where the cookies truly come to life, with golden edges, crisp layers, and that nutty, sweet swirl in every bite. And while the glaze is optional, I highly recommend it—it adds just the right touch of sweetness and gives the cookies that polished, bakery-style look.
Let’s finish these off and talk about a few extra tips to make sure your cookies are as perfect as they can be.
STEP 4: Slice and Bake
Now that your logs are rolled up and ready, it’s time to cut them into cookies.
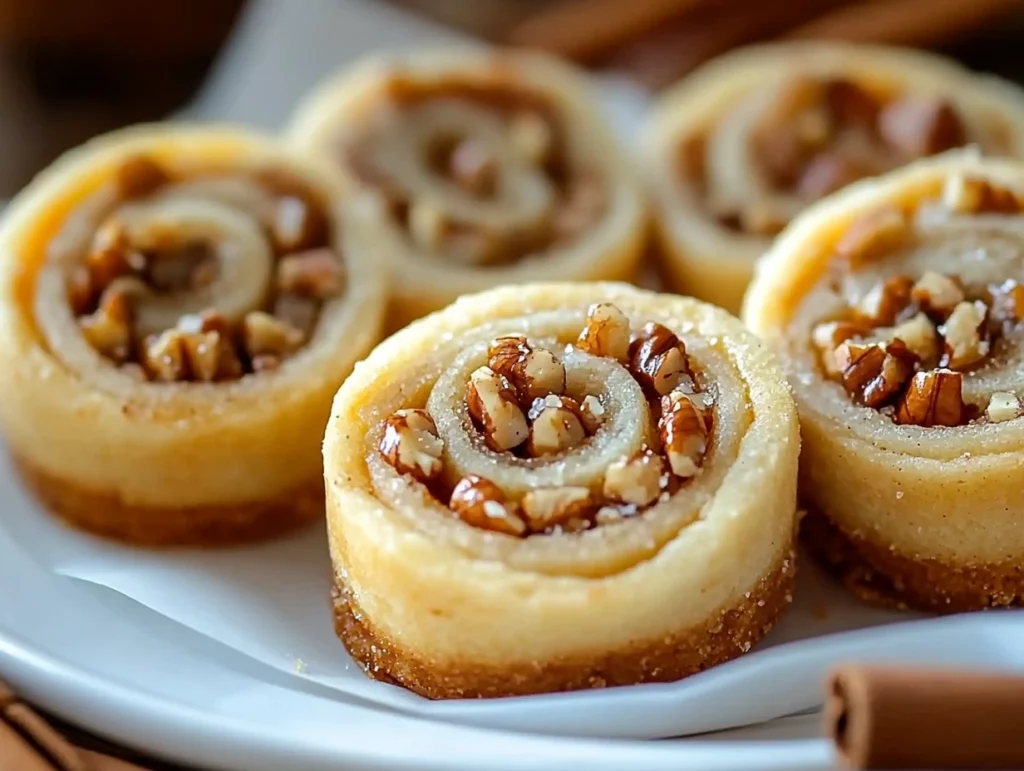
Using a sharp knife, slice each log into 1-inch pieces. You should get about 12 to 15 cookies per log, depending on how tightly you rolled and the length of your dough. Place each cookie cut-side down on your parchment-lined baking sheet, spacing them about an inch apart to give them room to bake evenly.
Bake in your preheated oven at 350°F (175°C) for 12 to 15 minutes, or until the edges begin to turn a light golden brown. Every oven is a little different, so start checking around the 12-minute mark. You’re looking for firm, lightly browned edges and a dry surface on the dough.
Once they’re done, transfer the cookies to a wire rack to cool completely. If you try to glaze them while they’re warm, the glaze will melt right off—so patience here really pays off.
STEP 5: Add the Glaze (Optional, but Recommended)
If you’re going for that glossy finish and a hint of extra sweetness, this simple vanilla glaze is the way to go.
In a small bowl, whisk together:
-
1 cup powdered sugar
-
2 to 3 tablespoons milk (start with 2 and add more if needed)
-
1/2 teaspoon vanilla extract
Mix until smooth and pourable. It should be thick enough to coat a spoon but fluid enough to drizzle.
Once your cookies are completely cooled, use a spoon or a small piping bag to drizzle the glaze over the top of each cookie. You can make zigzags, swirls, or just go rustic—it’s all about your style.
Let the glaze set for about 20–30 minutes before storing the cookies. It’ll firm up into a shiny, sweet layer that adds both texture and a little visual wow factor.
Tips & Tricks for the Best Nut Roll Cookies
-
Chill that dough: Don’t skip the chilling step. A firm dough is much easier to roll and gives you clean slices.
-
Use parchment or silicone baking mats: This helps prevent sticking and makes cleanup a breeze.
-
Nut choice matters: Walnuts are traditional, but pecans bring a slightly sweeter, buttery flavor. Toasting your nuts before chopping can enhance the flavor even more.
-
Customize your filling: Add a pinch of orange zest for brightness or a splash of almond extract for a twist. You could even mix in mini chocolate chips if you’re feeling adventurous.
-
Storage tips: These cookies keep really well! Store them in an airtight container at room temperature for up to 5 days. You can also freeze them (unglazed) for up to 2 months—just thaw and glaze before serving.
Italian Nut Roll Cookies FAQ + Final Thoughts
By now, you’ve got a tray full of beautiful, golden-baked nut roll cookies cooling on your counter—maybe even a few glazed and ready for sharing. Whether you’re making these for the holidays or just treating yourself (because let’s be honest, you deserve a homemade cookie), they’re sure to bring warmth and a little old-world magic to your kitchen.
Before we wrap up, I want to tackle some of the most common questions that tend to come up when making Italian Nut Roll Cookies. From dough troubleshooting to storage tips, here’s everything you need to know to get it right every time.

Frequently Asked Questions
1. Can I make the dough ahead of time?
Yes! The dough can be made up to 2 days in advance. Just keep it tightly wrapped in plastic wrap in the refrigerator. Let it sit at room temperature for about 10–15 minutes before rolling if it’s too firm.
2. Can I freeze these cookies?
Absolutely. You can freeze the unbaked logs or the baked cookies (without glaze). Wrap them well in plastic and then in foil or a freezer bag. They’ll keep for about 2 months. Thaw at room temperature before glazing or serving.
3. What’s the best way to chop the nuts for the filling?
A food processor works great, but don’t over-process—you want small pieces, not nut dust. If you’re using a knife, just make sure the pieces are finely chopped for easier spreading and rolling.
4. My dough cracked while rolling. What went wrong?
Cracking usually means the dough is too cold or a little dry. Let it rest at room temperature for a few extra minutes and try rolling gently. If needed, dampen your fingers with water and smooth the edges.
5. Can I use other fillings besides nuts?
Yes, though it won’t be a traditional nut roll cookie, you can try poppy seed filling, sweetened cream cheese, or fruit preserves. Just avoid anything too wet or chunky as it can affect the structure.
6. Is the glaze necessary?
Not at all—but it does add a touch of sweetness and a pretty finish. If you prefer your cookies less sweet or want to skip the extra step, they’re still delicious without it.
7. Do I need to toast the nuts?
It’s optional, but toasting adds depth to the flavor. Just spread the chopped nuts on a baking sheet and bake at 350°F for 5–7 minutes, keeping a close eye so they don’t burn.
Final Thoughts: A Cookie Worth Passing Down
There’s something special about baking a cookie with history. These Italian Nut Roll Cookies are more than just a sweet treat—they’re a reminder of tradition, family, and the joy of sharing something made from scratch. They look impressive, but they’re surprisingly approachable—even if you’re not an expert baker.
Whether you’re pulling them out for a holiday dessert table or just sneaking one with your afternoon coffee, these cookies offer a balance of flavors and textures that make them unforgettable. The tender dough, the rich filling, that hint of spice—it all comes together beautifully in every single bite.
If you give these a try, I’d love to hear how they turn out. Did you add your own twist to the filling? Try a different glaze? Drop a comment and let’s keep the conversation going—I always love hearing about your kitchen adventures.
And if you’re anything like me, you might just find yourself making an extra batch to stash away… because once these are gone, they’re gone.
PrintItalian Nut Roll Cookies

These traditional Italian nut roll cookies are a delightful combination of tender, buttery dough wrapped around a rich, sweet nut filling. Often served during holidays or special occasions, they bring a perfect blend of textures and warm, nutty flavors. The glaze adds a delicate sweetness to complement the earthy tones of the nuts and cinnamon.
- Author: Mark's Recipe
Ingredients
For the Dough
3 cups all-purpose flour
1/2 teaspoon baking powder
1/4 teaspoon salt
1 cup unsalted butter, softened
3/4 cup granulated sugar
3 large eggs
1 teaspoon vanilla extract
For the Nut Filling
2 cups finely chopped walnuts or pecans
1/2 cup brown sugar, packed
1/4 cup honey or maple syrup
1 teaspoon cinnamon (optional)
2 tablespoons milk
For the Glaze (Optional)
1 cup powdered sugar
2–3 tablespoons milk
1/2 teaspoon vanilla extract
Instructions
Prepare the Dough
In a medium bowl, whisk together the flour, baking powder, and salt. In a separate large mixing bowl, cream the softened butter and granulated sugar until light and fluffy. Beat in the eggs one at a time, then mix in the vanilla extract. Gradually add the dry ingredients to the wet mixture, stirring just until a soft dough forms. Divide the dough into two equal parts, wrap in plastic wrap, and chill in the refrigerator for at least 1 hour to make rolling easier.
Make the Nut Filling
In a bowl, stir together the chopped walnuts or pecans, brown sugar, honey, cinnamon if using, and milk. Mix until the ingredients are fully combined and the mixture is evenly moistened.
Roll and Fill the Dough
Preheat your oven to 350°F (175°C). Line a baking sheet with parchment paper. On a lightly floured surface, roll out one portion of dough into a rectangle about 1/8-inch thick. Evenly spread half of the nut filling over the dough, leaving about a 1/2-inch border around the edges. Starting from the long side, roll the dough into a tight log. Press the seam and ends to seal. Repeat the same steps with the second portion of dough and remaining filling.
Slice and Bake
Cut each log into 1-inch slices and place the cookies cut-side down on the prepared baking sheet. Bake for 12 to 15 minutes, or until the edges turn golden brown. Let them cool on a wire rack.
Glaze (Optional)
In a small bowl, whisk together the powdered sugar, milk, and vanilla extract until smooth. Once the cookies are completely cooled, drizzle the glaze over the top for a glossy finish and added sweetness.
Notes
You can customize the filling with your favorite nuts or add a touch of citrus zest for a flavor twist. These cookies store well in an airtight container for several days and are perfect for gifting or enjoying with coffee or tea.


")
