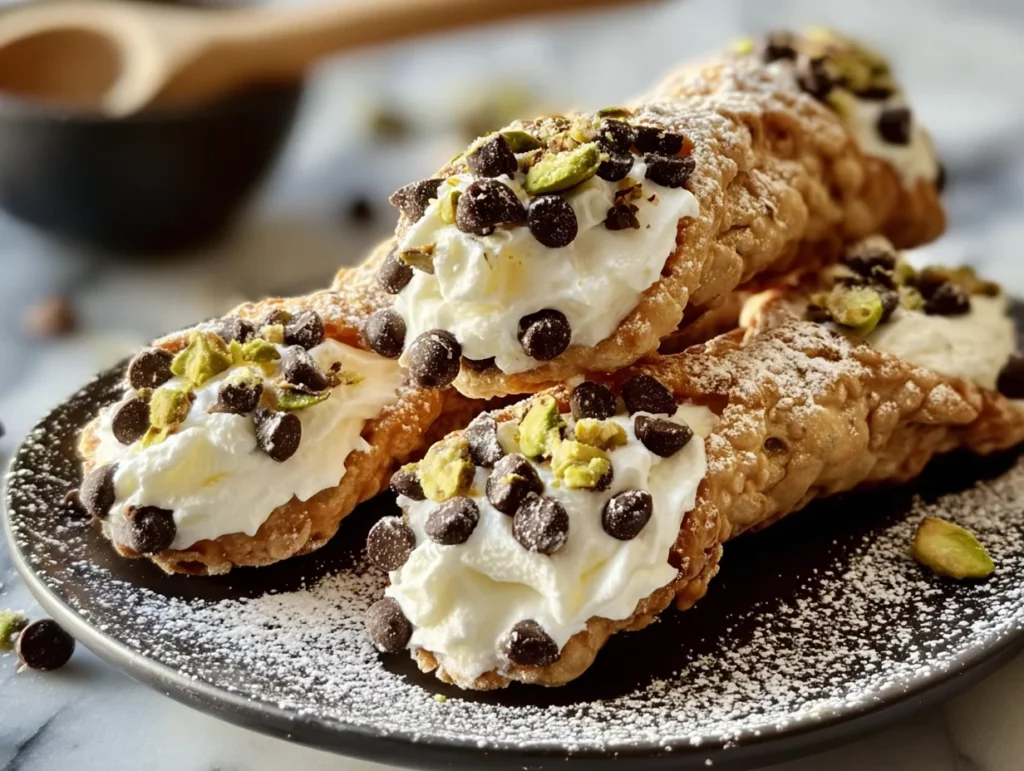
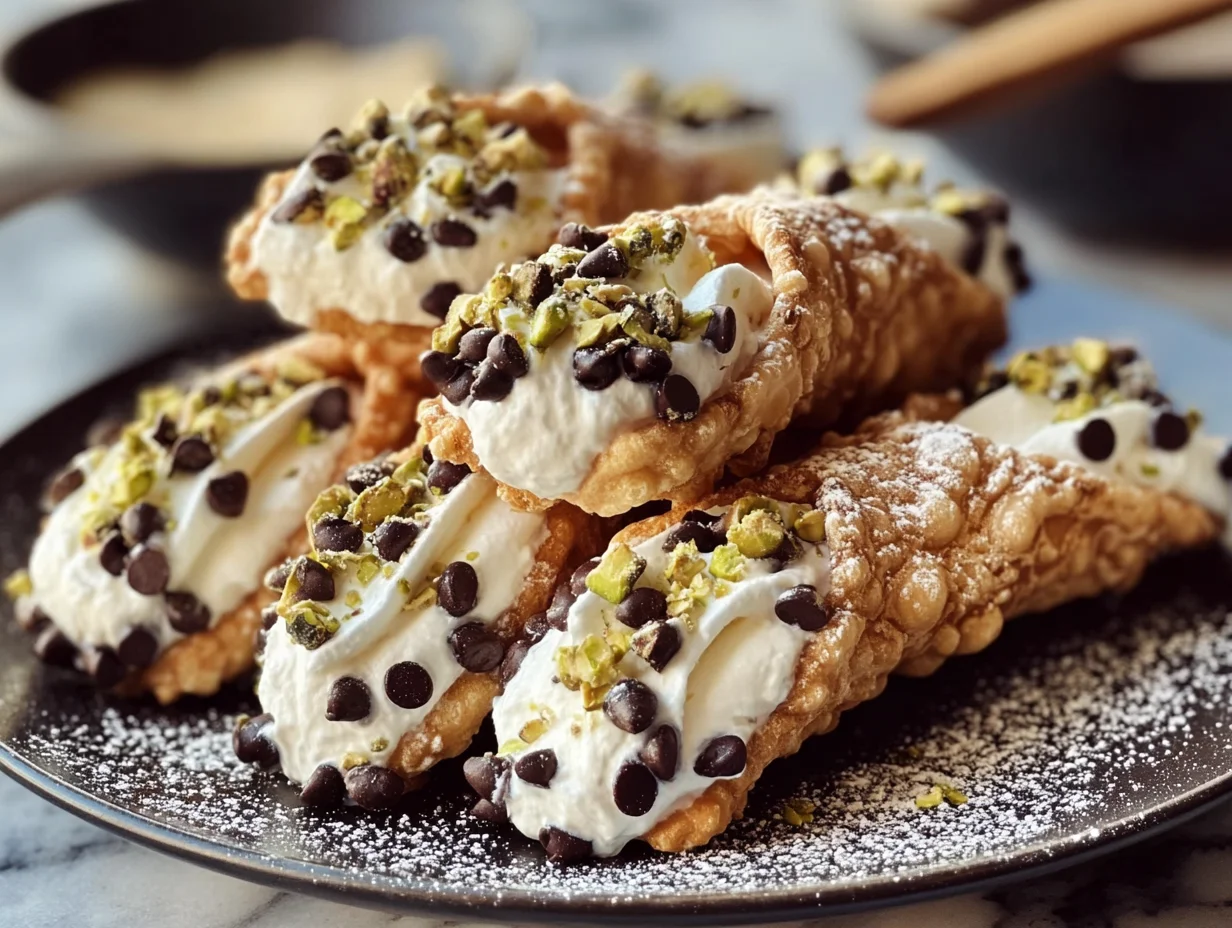
There’s just something undeniably magical about biting into a freshly made cannoli. That crispy, golden shell that gives way to a creamy, sweet ricotta filling—perfection. Whether you’ve enjoyed them at an Italian bakery or during a special holiday gathering, authentic Italian Cannoli have a way of making any moment feel like a celebration.
Today, I’m sharing a classic recipe that brings the flavors of Sicily straight to your kitchen. Don’t let the idea of making cannoli from scratch intimidate you! With a little patience (and a good rolling pin), you’ll be amazed at how achievable—and rewarding—these pastries are to make at home.
Cannoli are a staple in Italian households during holidays and special occasions, but there’s no reason they can’t be a weekend baking project too. And trust me, once you’ve tasted the homemade version, you’ll understand why they’ve been loved for generations. I still remember the first time I made these with my nonna—it was messy, fun, and absolutely delicious. We laughed through flour-dusted hands and took turns taste-testing the ricotta filling more times than necessary. Those memories are baked into every batch I make now.
Ready to get started? Let’s dive into the shell-crisping, filling-whipping magic of Italian Cannoli.
Making the Cannoli Shells from Scratch
We’re starting from the very beginning—yes, that means we’re making the cannoli shells by hand. Store-bought shells are okay in a pinch, but nothing compares to that just-fried freshness. The key to a crisp, delicate shell is rolling the dough paper-thin and frying it at the right temperature. Here’s how it all comes together.
Ingredients for the Shells:
-
2 cups all-purpose flour
-
1 tablespoon granulated sugar
-
1 teaspoon cocoa powder
-
½ teaspoon ground cinnamon
-
¼ teaspoon salt
-
3 tablespoons unsalted butter, cold and cut into small pieces
-
1 egg
-
½ cup dry white wine or marsala
-
Vegetable oil, for frying
STEP 1: Mix the Dry Ingredients
In a large mixing bowl, whisk together the flour, sugar, cocoa powder, cinnamon, and salt. The cocoa and cinnamon might seem subtle, but they add that warm, traditional depth that makes cannoli shells so flavorful.
STEP 2: Cut in the Butter
Using your fingers or a pastry cutter, work the cold butter into the flour mixture until it resembles coarse crumbs. This step is just like making pie dough—the bits of butter help the shell get that signature flakiness when fried.
STEP 3: Add the Wet Ingredients and Knead
Add the egg and dry white wine (or marsala, if you’re going the traditional route) to the flour mixture. Stir until a dough starts to form, then turn it out onto a lightly floured surface and knead it until it’s smooth and elastic, about 5–7 minutes. It should feel firm but pliable.
Once the dough is ready, wrap it tightly in plastic wrap and let it rest at room temperature for 30 to 45 minutes. Resting allows the gluten to relax, making it much easier to roll out later on.
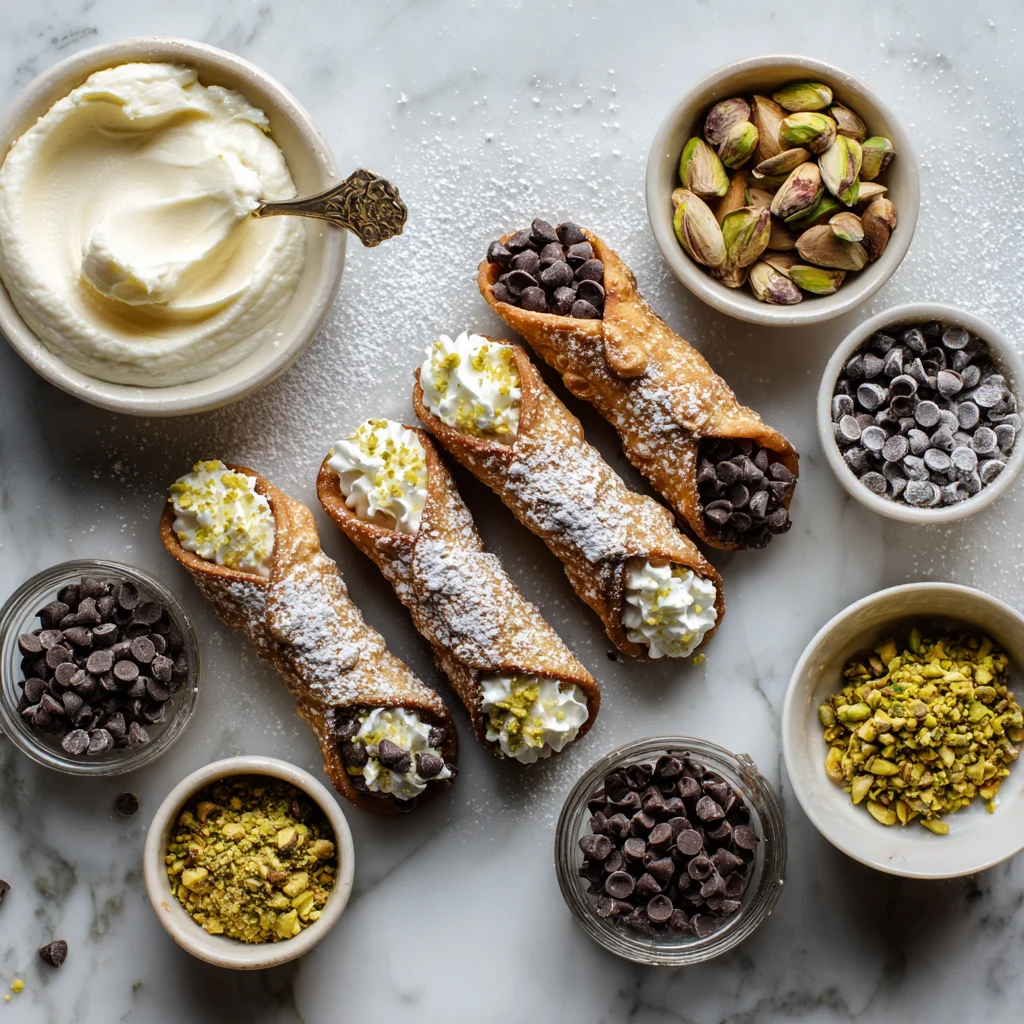
Prepping the Filling While the Dough Rests
Now that the dough is taking a well-earned break, it’s the perfect time to whip up the creamy ricotta filling. This filling is where all the magic happens—sweet, rich, and lightly scented with vanilla and citrus.
Ingredients for the Filling:
-
2 cups whole milk ricotta cheese, well-drained
-
¾ cup powdered sugar
-
½ teaspoon vanilla extract
-
½ teaspoon orange zest
-
¼ teaspoon ground cinnamon
-
½ cup mini chocolate chips or chopped pistachios
STEP 4: Mix the Filling
In a medium bowl, combine the well-drained ricotta cheese, powdered sugar, vanilla extract, orange zest, and cinnamon. Mix until the texture is smooth and creamy—no lumps.
Tip: Drain your ricotta really well before mixing. If it’s too watery, your filling will be loose and may make the shells soggy. I usually wrap mine in cheesecloth and place it in a colander over a bowl in the fridge for a few hours (or overnight, if I’m planning ahead).
Once smooth, gently fold in your mini chocolate chips or pistachios—whichever you prefer. You can also do a mix of both if you’re feeling fancy. Pop the filling into the fridge to chill while you roll out and fry the shells.
How to Shape and Fry Perfect Cannoli Shells
Welcome to Part 2 of our cannoli adventure! If you’ve made it this far, you’ve already prepped that gorgeous dough and whipped up a dreamy ricotta filling. Now it’s time to tackle the most iconic part of this dessert—the crisp, golden shell.
This is where your cannoli really take shape (literally). Don’t worry if you don’t have cannoli forms—I’ll share a little workaround later. The key is rolling the dough thin enough and frying at the right temperature. Done right, you’ll get those delightfully blistered, crunchy shells that snap with every bite.
Let’s get rolling (and frying)!
Rolling, Shaping, and Frying the Shells
Once your dough has rested and your filling is chilling in the fridge, it’s time to bring those cannoli to life.
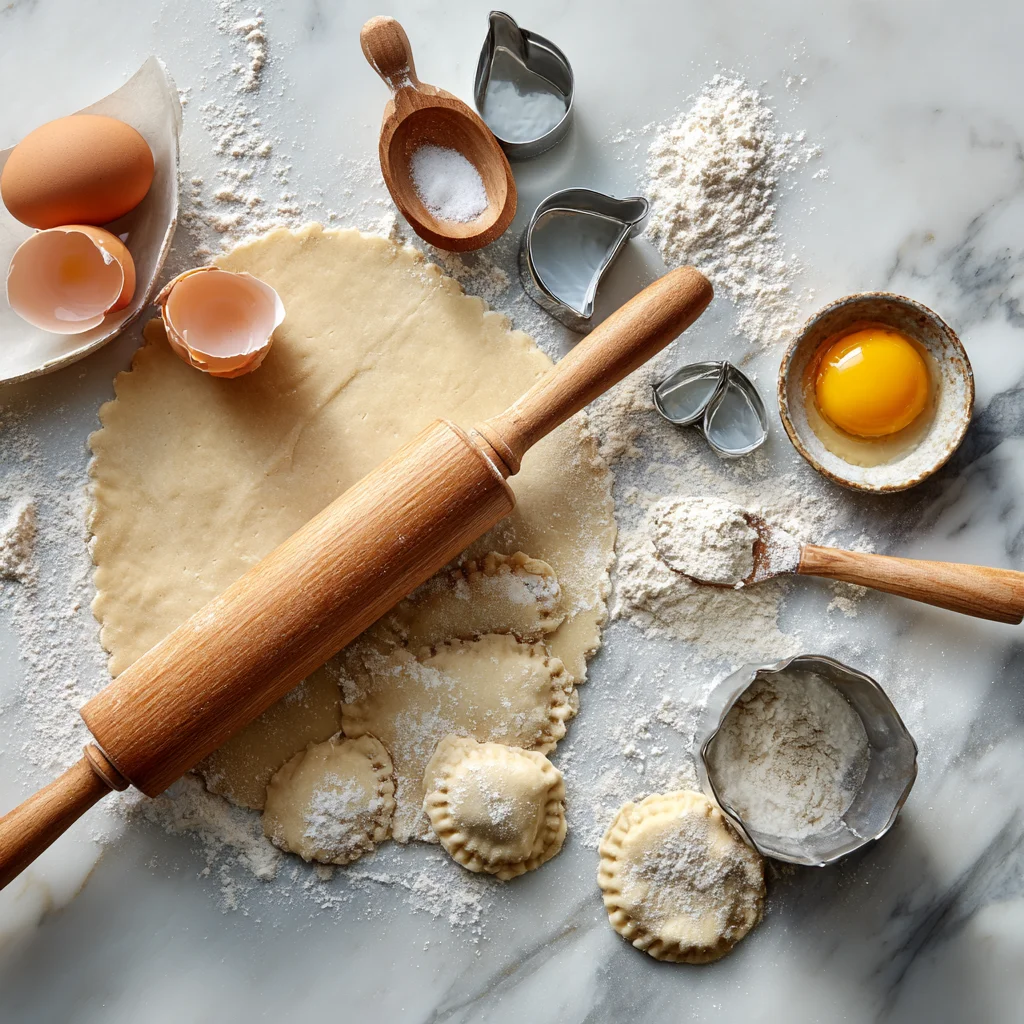
STEP 5: Roll the Dough Thin
Lightly flour your work surface and divide the dough into smaller portions to make it easier to handle. Roll each portion out very thin—about 1/16 of an inch thick. You want these shells to be delicate and crisp, and thickness can make a big difference.
Tip: If you can almost see through the dough when you hold it up, you’re on the right track.
Cut the rolled dough into ovals or circles about 4 to 5 inches across. A cookie cutter or even a small bowl works great for shaping.
STEP 6: Wrap Around Cannoli Forms
Wrap each dough piece around a metal cannoli form, gently overlapping the edges. Seal the edge with a little bit of beaten egg or water to keep it from opening while frying.
Don’t have cannoli forms? You can DIY them by wrapping heavy-duty aluminum foil around wooden dowels or metal tubes. Just be sure they’re tight and sturdy enough to handle the heat of frying.
STEP 7: Heat Oil and Fry
In a deep fryer or heavy pot, heat about 2–3 inches of vegetable oil to 350°F (175°C). Use a thermometer if possible—it’s important the oil stays at the right temperature to cook the shells evenly.
Carefully lower one or two shells at a time into the hot oil. Fry for 1 to 2 minutes, turning occasionally, until golden brown and blistered. Don’t overcrowd the pot—this helps maintain the oil temperature.
Once done, transfer the shells to a paper towel-lined tray to cool. While still warm, gently slide the shells off the forms using tongs or a towel to avoid burning your fingers. Let them cool completely before filling.
Tips for Perfect Cannoli Shells
Getting those crisp, golden shells takes practice, but here are a few tips that really help:
-
Keep the dough thin. Thicker dough makes chewy, dense shells. Roll it out as thinly as possible.
-
Seal the edges well. Use egg or water to make sure the dough stays wrapped during frying.
-
Fry at the right temp. Too hot and they’ll burn; too cool and they’ll get oily. 350°F is your sweet spot.
-
Drain and cool properly. Letting the shells cool and dry on a paper towel helps them stay crispy.
Assembling the Cannoli
With your shells cooled and your filling perfectly chilled, you’re finally ready for the most satisfying step—filling those cannoli!
STEP 8: Fill the Shells
Using a piping bag (or a plastic bag with the tip cut off), pipe the ricotta filling into each side of the shell. Fill from both ends to ensure the center is packed.
Optional Garnish Ideas:
-
Dip the ends in mini chocolate chips or chopped pistachios
-
Dust with powdered sugar before serving
-
Add a candied cherry on each end for a classic touch
Important: Only fill your cannoli right before serving. Once filled, the shells start to soften from the moisture in the filling. For that iconic crunch, keep the shells unfilled until the last minute.
Make-Ahead Tips and Variations
Here’s the good news: You don’t have to do everything all at once. Cannoli are great for prepping ahead in parts.
-
Shells: Make them up to 5 days in advance. Store in an airtight container at room temperature.
-
Filling: Mix and refrigerate for up to 2 days. Just stir before piping.
-
Variations: Try adding a few drops of almond extract to the filling for extra depth. Or fold in chopped candied orange peel for an old-school Sicilian flavor.
Italian Cannoli FAQ + Final Thoughts
You’ve rolled, fried, filled—and now it’s almost time to enjoy your beautiful batch of homemade Italian Cannoli! But before you take that first crunchy bite, let’s go over a few frequently asked questions that pop up when making these classic pastries from scratch.
Whether you’re wondering how to keep your shells crisp or if ricotta can be swapped for mascarpone, this section is here to help make your cannoli-making experience a success every time.
FAQ: Your Cannoli Questions Answered
1. How do I keep my cannoli shells crispy?
The best way to keep cannoli shells crispy is to store them unfilled in an airtight container at room temperature. Only fill them just before serving—filling them too early allows the ricotta to soften the shell. Also, make sure your ricotta is well-drained to avoid extra moisture in the filling.
2. Can I make the shells ahead of time?
Yes! Cannoli shells can be made several days in advance. Once they’re fried and fully cooled, store them in an airtight container lined with paper towels. They’ll stay crisp for up to 5 days as long as they’re kept dry and cool.
3. What’s the best way to drain ricotta cheese?
The easiest way is to place the ricotta in a cheesecloth-lined strainer set over a bowl. Cover and refrigerate for several hours or overnight. For quicker draining, gently press the ricotta with a spoon to help release excess moisture, but don’t squeeze too hard—you still want that creamy texture.
4. Can I use mascarpone instead of ricotta in the filling?
You can substitute mascarpone, but it will change the texture and flavor. Ricotta is traditional for cannoli and gives that slightly grainy, authentic feel, while mascarpone will make the filling smoother and richer. If using mascarpone, mix it gently to avoid thinning it out too much.
5. Do I need a deep fryer to make cannoli?
No deep fryer needed! A heavy-bottomed pot or Dutch oven works perfectly. Just be sure to use a thermometer to monitor the oil temperature and fry in small batches to keep the temperature stable.
6. Can I bake cannoli shells instead of frying them?
Technically yes, but they won’t be the same. Baked cannoli shells won’t have that iconic blistered, bubbly crunch that comes from frying. If you’re looking for the traditional experience, frying is the way to go.
7. What can I use if I don’t have cannoli forms?
You can DIY your own by wrapping strips of heavy-duty foil around the handle of a wooden spoon or small dowel. Just make sure they’re tightly rolled and secure enough to withstand frying temperatures.
Final Thoughts: Why You’ll Love Making Cannoli at Home
Making cannoli from scratch is a little bit of work, but the payoff? Completely worth it. Not only do you get that unbeatable flavor and texture, but you also get the satisfaction of creating something truly special by hand.
There’s a certain joy that comes with watching family and friends take that first bite—the audible crunch of the shell, the creamy sweetness of the filling, the little flecks of chocolate or pistachio at the ends. It’s a dessert that brings smiles, conversation, and just the right amount of indulgence.
Plus, this recipe is totally customizable. Want to add a little almond extract to the filling? Go for it. Prefer candied fruit over chocolate chips? Make it your own. Cannoli are wonderfully flexible once you have the basics down.
So, whether you’re making these for a holiday gathering, a family celebration, or just because you’re craving something extra special—these homemade Italian Cannoli are guaranteed to impress.
PrintItalian Cannoli

Italian Cannoli are classic Sicilian pastries made with crisp, golden-fried shells filled with a sweet, creamy ricotta-based filling. Traditionally flavored with hints of vanilla, cinnamon, and orange zest, cannoli are often dotted with mini chocolate chips or chopped pistachios. These iconic treats offer a perfect contrast between the delicate crunch of the shell and the silky richness of the filling.
- Author: Mark's Recipe
Ingredients
For the shells
2 cups all-purpose flour
1 tablespoon granulated sugar
1 teaspoon cocoa powder
½ teaspoon ground cinnamon
¼ teaspoon salt
3 tablespoons unsalted butter, cold and cut into small pieces
1 egg
½ cup dry white wine or marsala
Vegetable oil for frying
For the filling
2 cups whole milk ricotta cheese, well-drained
¾ cup powdered sugar
½ teaspoon vanilla extract
½ teaspoon orange zest
¼ teaspoon ground cinnamon
½ cup mini chocolate chips or chopped pistachios
Instructions
In a mixing bowl, whisk together the flour, sugar, cocoa powder, cinnamon, and salt. Cut in the butter using your fingers or a pastry cutter until the mixture resembles coarse crumbs. Add the egg and wine, mixing until a firm dough forms. Knead briefly until smooth, then wrap in plastic and let it rest for 30 to 45 minutes.
While the dough rests, prepare the filling by mixing the drained ricotta, powdered sugar, vanilla, orange zest, and cinnamon in a bowl until smooth. Stir in the chocolate chips or pistachios. Chill the filling in the refrigerator until ready to use.
Roll the rested dough very thin on a floured surface and cut into circles or ovals about 4 to 5 inches wide. Wrap each piece around a metal cannoli form, sealing the edge with a bit of beaten egg or water.
Heat oil in a deep fryer or heavy pot to 350 degrees Fahrenheit. Fry the shells, one or two at a time, until golden brown and crisp, about 1 to 2 minutes. Drain on paper towels and let cool before carefully removing the shells from the forms.
Once the shells are fully cooled, pipe the ricotta filling into each side using a pastry bag or spoon. Serve immediately, optionally dusted with powdered sugar or garnished with additional chocolate or nuts.
Notes
Cannoli shells can be made ahead and stored in an airtight container for several days. For best results, fill just before serving to maintain crispness. Make sure to drain the ricotta thoroughly to avoid a watery filling. The filling can also be flavored with a touch of almond extract or mixed with candied fruit for a traditional touch.
")
