If you’re anything like me, cinnamon rolls are a top-tier comfort food. Add Biscoff cookie butter to the mix? Say no more. These Biscoff Cookie Butter Cinnamon Rolls are a gooey, caramelized dream that feels like it came straight from your favorite bakery—but they’re 100% homemade and totally doable.
I remember the first time I made these rolls on a chilly weekend morning. The whole house filled with the smell of warm cinnamon and sweet cookie butter, and by the time they came out of the oven, no one could wait to dig in. They disappeared in minutes, and now they’re one of my go-to recipes for brunches, holidays, or just whenever I need a cozy treat.
Whether you’re new to baking or a seasoned cinnamon roll pro, this recipe is simple, reliable, and delivers big on flavor. And the best part? You don’t need any fancy equipment or ingredients—just a few pantry staples, a jar of Biscoff cookie butter, and a little time.
Let’s dive into how to make these indulgent rolls from scratch.
Ingredients You’ll Need
For the Dough:
-
¾ cup warm milk
-
2 ¼ teaspoons active dry yeast
-
¼ cup granulated sugar
-
1 large egg + 1 egg yolk
-
¼ cup unsalted butter, melted
-
3 cups all-purpose flour
-
½ teaspoon salt
For the Filling:
-
½ cup Biscoff cookie butter, softened
-
⅓ cup brown sugar
-
1 tablespoon ground cinnamon
For the Glaze:
-
½ cup powdered sugar
-
2 tablespoons milk
-
2 tablespoons Biscoff cookie butter
STEP 1: ACTIVATE THE YEAST
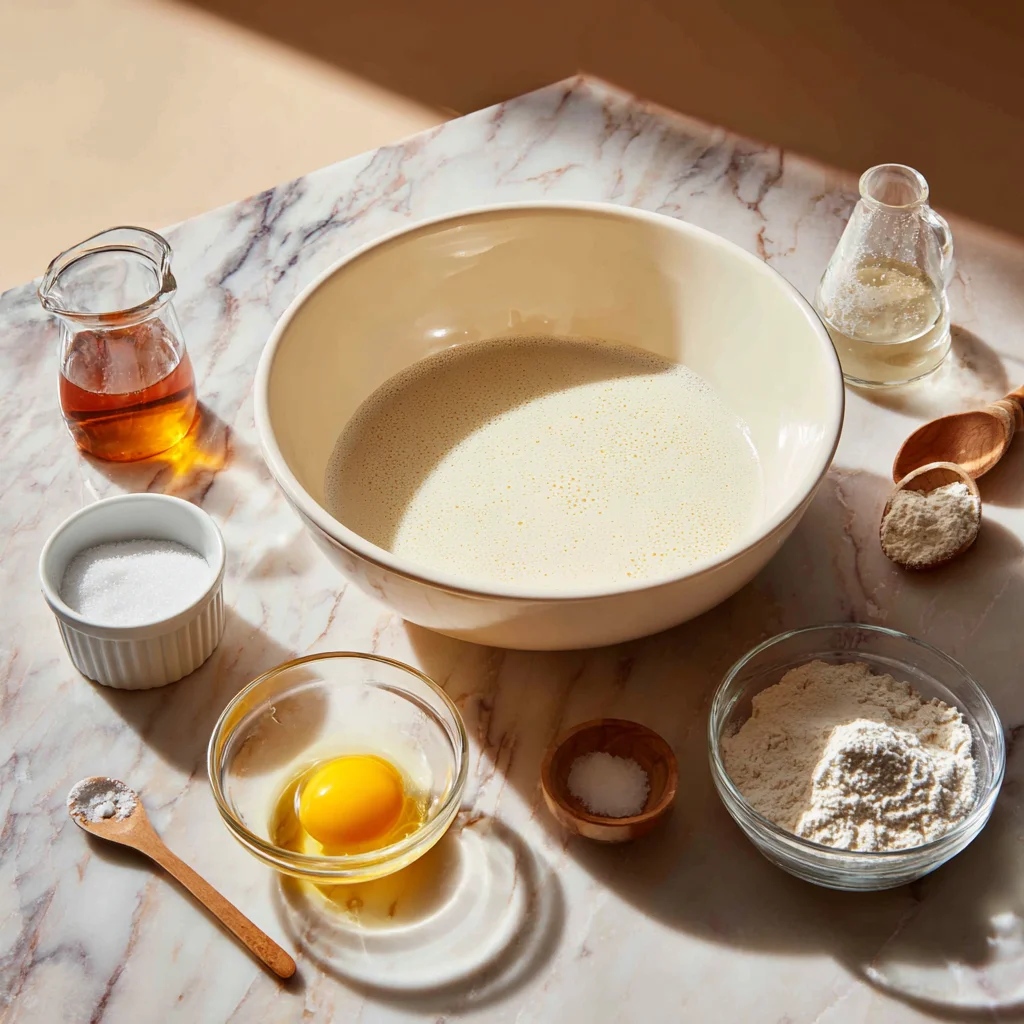
First things first, let’s get that dough going. In a large mixing bowl (or the bowl of your stand mixer if you’re using one), combine ¾ cup warm milk, 2 ¼ teaspoons of active dry yeast, and a pinch of sugar. Let it sit for about 5–10 minutes until it gets foamy on top. This step helps wake up the yeast and ensures your rolls rise beautifully.
Tip: Make sure your milk is warm—not hot. Around 100–110°F is ideal. Too hot and it could kill the yeast; too cold and it won’t activate properly.
STEP 2: MIX THE DOUGH
Once the yeast is foamy, add in the remaining ¼ cup sugar, 1 large egg, 1 egg yolk, and ¼ cup melted butter. Give that a good mix.
Next, add the 3 cups of all-purpose flour and ½ teaspoon salt. Stir everything together until a soft dough begins to form. If you’re using a stand mixer, switch to a dough hook and knead on medium speed for about 8 to 10 minutes. If kneading by hand, turn the dough out onto a lightly floured surface and knead until it becomes smooth and elastic.
What you’re looking for: The dough should be soft and slightly tacky, but not sticky. If it’s sticking too much to your hands, dust in a tablespoon or two of extra flour.
STEP 3: FIRST RISE
Once your dough is smooth and stretchy, form it into a ball and place it in a lightly greased bowl. Cover it with plastic wrap or a clean kitchen towel and let it rise in a warm spot for about 1 hour, or until it’s doubled in size.
My go-to rising spot: I like to place the bowl in my (turned-off) oven with just the oven light on. It creates the perfect cozy environment for dough to rise faster.

STEP 4: ROLL OUT THE DOUGH AND ADD THE FILLING
After the dough has doubled in size, turn it out onto a floured surface. Use a rolling pin to roll it into a large rectangle, about ¼ inch thick.
Now for the best part: the filling.
Take ½ cup of softened Biscoff cookie butter and spread it evenly over the surface of the dough. You want every inch coated in that rich, spiced cookie goodness.
In a small bowl, mix together ⅓ cup brown sugar and 1 tablespoon cinnamon, then sprinkle that all over the Biscoff layer.
STEP 5: ROLL AND SLICE
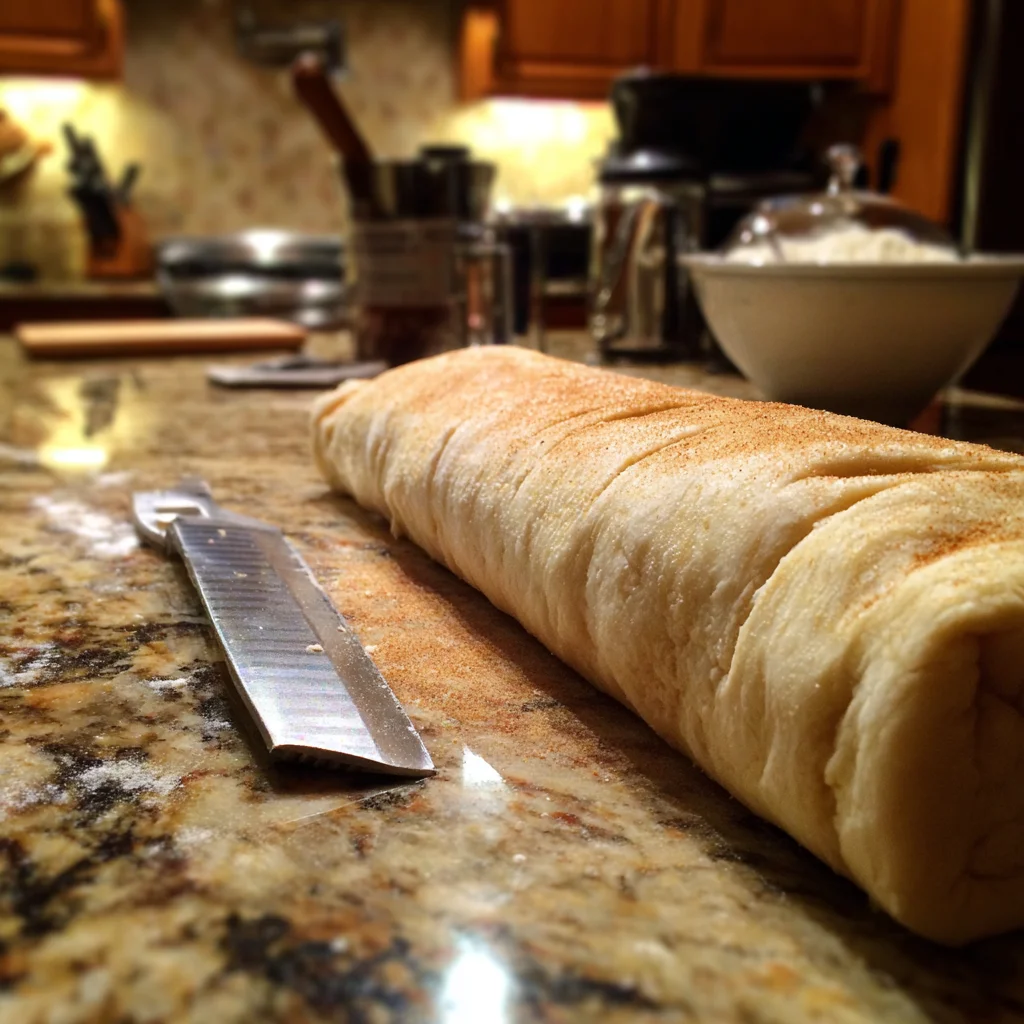
Starting from one of the long sides of your rectangle, roll the dough up tightly into a log. Take your time and roll evenly so the layers are uniform.
Once rolled, use a sharp knife or unflavored dental floss to slice the log into 9 to 12 equal rolls, depending on how thick you like them. I usually go for 9 larger rolls because they feel more indulgent, but 12 smaller ones work great if you’re serving a crowd.
Grease a 9×13 baking dish and arrange your rolls inside, leaving just a little space between them to rise again.
Baking, Glazing & Tips for Success
Now that our rolls are shaped and nestled in the baking dish, we’re getting close to the finish line. This next part is where the magic really happens—when those spirals of dough puff up, bake to golden perfection, and get drizzled with the most luscious cookie butter glaze. Trust me, you’re going to want to lick the spoon.
Let’s keep the momentum going and get these Biscoff cinnamon rolls ready to serve!
STEP 6: SECOND RISE
Once your rolls are arranged in the greased baking dish, it’s time for the second rise. Cover them with plastic wrap or a clean kitchen towel and let them rest in a warm place for 30 to 45 minutes, or until they’ve puffed up noticeably.
This rise helps the rolls become extra soft and fluffy, so don’t skip it!
Tip: If you’re prepping ahead, this is the perfect stopping point. You can cover the rolls and pop them in the fridge overnight. In the morning, just take them out and let them come to room temperature while the oven preheats.
STEP 7: BAKE TO GOLDEN PERFECTION
Preheat your oven to 350°F (175°C). Once the rolls are puffy and ready, place the baking dish on the center rack and bake for 20 to 25 minutes, or until the tops are golden brown and the centers are cooked through.
Every oven is a little different, so start checking around the 20-minute mark. You want the rolls to be lightly golden—not too pale, but not overly browned either.
Baking Tip: If the tops are browning too quickly, loosely tent the dish with aluminum foil during the last 5–7 minutes of baking.
STEP 8: MAKE THE GLAZE
While the rolls are in the oven, it’s the perfect time to whip up the Biscoff glaze. This simple, three-ingredient topping ties everything together with its sweet, cookie butter richness.
In a small bowl, whisk together:
-
½ cup powdered sugar
-
2 tablespoons milk
-
2 tablespoons Biscoff cookie butter
Mix until smooth and pourable. If you prefer a thicker glaze, use a little less milk; for a thinner drizzle, add a splash more.
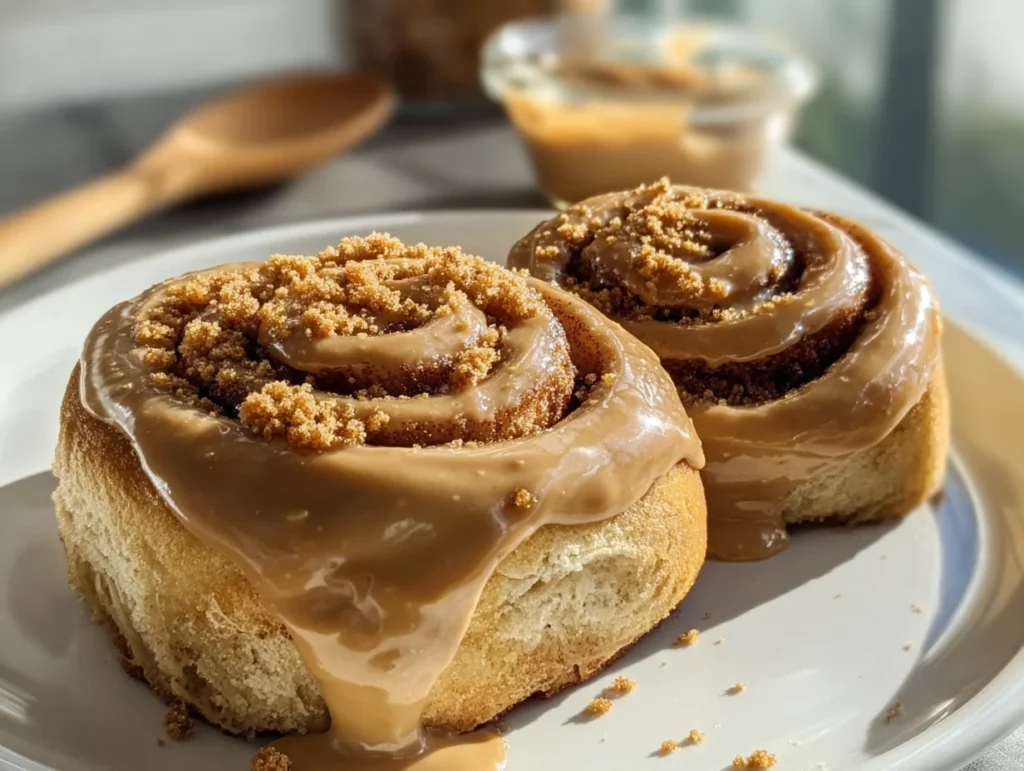
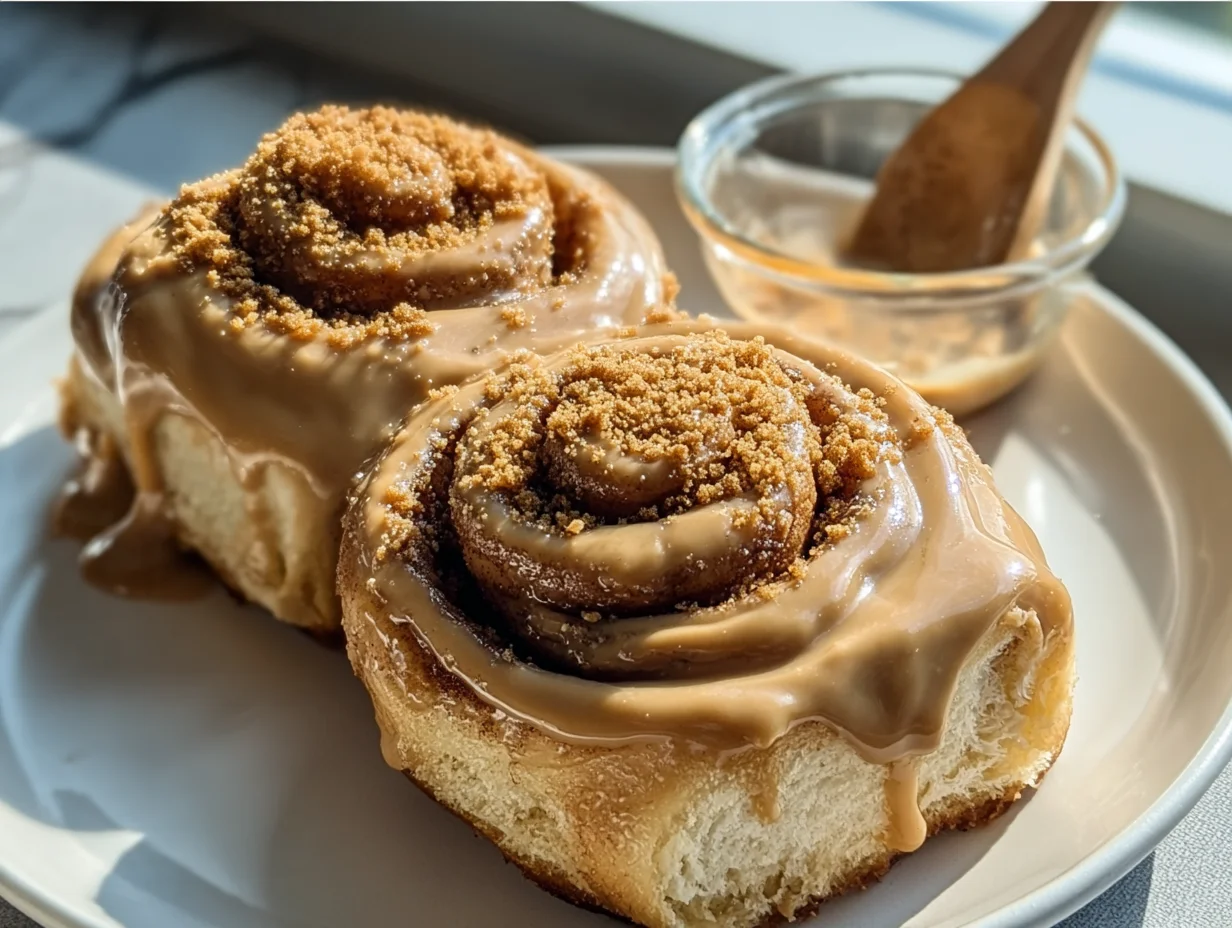
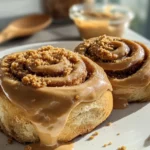
Optional but delightful: For extra flair, crumble a couple of Biscoff cookies on top after glazing. It adds a nice crunch and really brings that flavor home.
STEP 9: GLAZE WHILE WARM
As soon as the rolls come out of the oven, drizzle the glaze over the top while they’re still warm. This lets it sink into the crevices just a bit, making every bite gooey and irresistible.
You can serve them right away or let them cool for 10–15 minutes if you prefer a firmer texture. Either way, they’re going to be amazing.
Tips for Success
These Biscoff cinnamon rolls are pretty straightforward, but here are a few tried-and-true tips to make sure they come out bakery-perfect every time:
-
Use room-temperature ingredients: Make sure your eggs and butter aren’t cold. It helps everything mix together smoothly and creates a better dough texture.
-
Don’t over-flour the dough: A little tackiness is okay! Adding too much flour can make the rolls dense.
-
Softened, not melted, cookie butter: If your Biscoff is too runny, it can leak out during rolling. Aim for a spreadable, peanut butter-like consistency.
-
Chill overnight for easy mornings: Want fresh rolls in the morning without the hassle? Prep the night before, let them do the second rise in the fridge, and bake when you wake up.
-
Store extras right: Keep leftovers in an airtight container at room temp for 2–3 days. Pop them in the microwave for 10–15 seconds to bring back that fresh-from-the-oven taste.
Fun Variations to Try
Once you’ve nailed the base recipe, there’s plenty of room to play:
-
Add chopped pecans or walnuts to the filling for some crunch.
-
Top with cream cheese frosting instead of Biscoff glaze for a tangy twist.
-
Sprinkle crushed Biscoff cookies on the filling before rolling for extra flavor and texture.
FAQs & Final Thoughts
We’ve mixed, rolled, baked, and glazed—and now you’re just about ready to dive into one of the most irresistible treats you’ll ever make at home. Before we wrap things up, I want to answer a few common questions I often get about these Biscoff Cookie Butter Cinnamon Rolls. Whether you’re baking them for the first time or adding them to your weekend rotation, these tips and clarifications will help make the process as smooth (and delicious) as possible.
Frequently Asked Questions
Can I use instant yeast instead of active dry yeast?
Yes! If you’re using instant yeast, you can skip the proofing step. Just mix it directly into the dry ingredients and proceed with the recipe. That said, I still like activating yeast in warm milk to be sure it’s alive and kicking—especially if it’s been sitting in the pantry for a while.
Can I make these cinnamon rolls ahead of time?
Absolutely. These are perfect for prepping the night before. Just follow the recipe up through shaping the rolls, then cover the pan and refrigerate overnight. In the morning, take them out, let them come to room temperature (about 30–45 minutes), and bake as directed.
What if I don’t have Biscoff cookie butter?
If you can’t get your hands on Biscoff, you can substitute with any cookie butter brand like Trader Joe’s Speculoos Spread. The flavor might vary slightly, but you’ll still get that spiced, caramelized goodness.
Can I freeze the rolls?
Yes! After baking and cooling, you can freeze the rolls (without glaze) in an airtight container or freezer-safe bag for up to 2 months. When ready to eat, thaw and warm them in the oven or microwave, then glaze.
You can also freeze the unbaked rolls after the first rise and shaping. Just place them in a pan, cover well, and freeze. When ready to use, thaw overnight in the fridge, let them rise again, and bake as usual.
Why are my rolls dry or dense?
This usually happens when too much flour is added or the dough is overbaked. Stick to the suggested flour amount and keep the dough slightly tacky. Also, check your oven temperature with an oven thermometer—many home ovens run a bit hot.
Can I make these dairy-free?
You can! Use non-dairy milk (like almond or oat milk), a dairy-free butter substitute, and double-check your cookie butter brand to ensure it’s dairy-free. The results will be slightly different in taste and texture, but still delicious.
What’s the best way to store leftovers?
Keep them in an airtight container at room temperature for 2–3 days, or refrigerate if you prefer. To reheat, pop them in the microwave for 10–15 seconds to bring back that warm, gooey texture.
Final Thoughts: Give These Rolls a Try!
If you’re on the hunt for a cinnamon roll recipe that’s just a little extra—without being extra work—Biscoff Cookie Butter Cinnamon Rolls are the answer. They’re soft, fluffy, and packed with that rich, spiced caramel flavor that cookie butter fans crave.
These rolls are made for slow mornings, holiday brunches, or just anytime you want something cozy and indulgent straight from your own kitchen. And the best part? They’re easier to make than you might think.
So go ahead—gather your ingredients, roll up your sleeves, and treat yourself (and your people) to a batch of these dreamy rolls. If you give them a try, I’d love to hear how they turned out. Leave a comment below, share your photos, or let me know if you added your own twist. Crushed cookies on top? Cream cheese glaze? I’m here for it all.
PrintIrresistible Biscoff Cookie Butter Cinnamon Rolls
These Biscoff cookie butter cinnamon rolls are a rich, gooey twist on a classic favorite. With soft, fluffy dough swirled with cinnamon sugar and creamy Biscoff spread, each bite delivers warm spice and deep caramelized cookie flavor. Topped with a cookie butter glaze, these rolls are an indulgent breakfast treat or dessert that feels bakery-worthy without being overly complicated.
- Author: Mark's Recipe
Ingredients
For the dough
¾ cup warm milk
2 ¼ teaspoons active dry yeast
¼ cup granulated sugar
1 large egg plus 1 egg yolk
¼ cup unsalted butter, melted
3 cups all-purpose flour
½ teaspoon salt
For the filling
½ cup Biscoff cookie butter, softened
⅓ cup brown sugar
1 tablespoon ground cinnamon
For the glaze
½ cup powdered sugar
2 tablespoons milk
2 tablespoons Biscoff cookie butter
Instructions
In a large mixing bowl, combine the warm milk, yeast, and a pinch of sugar. Let sit for 5 to 10 minutes until foamy. Add the remaining sugar, egg, egg yolk, melted butter, flour, and salt. Mix until a soft dough forms, then knead for 8 to 10 minutes until smooth and elastic. Cover and let rise in a warm place for about 1 hour or until doubled in size.
Once risen, roll the dough into a large rectangle about ¼ inch thick. Spread the softened Biscoff evenly over the surface. In a small bowl, mix the brown sugar and cinnamon, then sprinkle it over the Biscoff layer.
Roll the dough tightly into a log, starting from the long side. Cut into 9 to 12 equal rolls and place in a greased baking dish. Cover and let rise again for 30 to 45 minutes.
Preheat the oven to 350°F and bake the rolls for 20 to 25 minutes, or until golden brown and cooked through.
While the rolls bake, whisk together powdered sugar, milk, and Bisco
Notes
For an extra touch, top the glaze with crushed Biscoff cookies. These rolls can be prepared the night before and baked fresh in the morning. Let them do the second rise in the fridge overnight, then bring to room temperature before baking. Store leftovers in an airtight container and reheat briefly before serving.


")
