There’s something about sliders that just screams comfort food, right? Whether you’re prepping for a game day gathering, hosting a casual get-together, or just looking to shake up your weeknight dinner routine, these Hot Italian Sub Sliders check all the boxes. They’re warm, cheesy, loaded with bold Italian flavors, and best of all—super easy to make. This is one of those recipes that feels a little fancy but takes hardly any effort. Win-win!
So let’s talk about why I love this recipe so much. It’s basically your favorite Italian sub transformed into melty, pull-apart sliders—perfectly portioned and practically begging to be dipped into warm marinara. I first whipped these up for a Super Bowl party, and I swear they disappeared faster than anything else on the table. Now, they’re on regular rotation in my kitchen anytime we’re feeding a crowd (or just craving a no-fuss dinner that hits the spot).
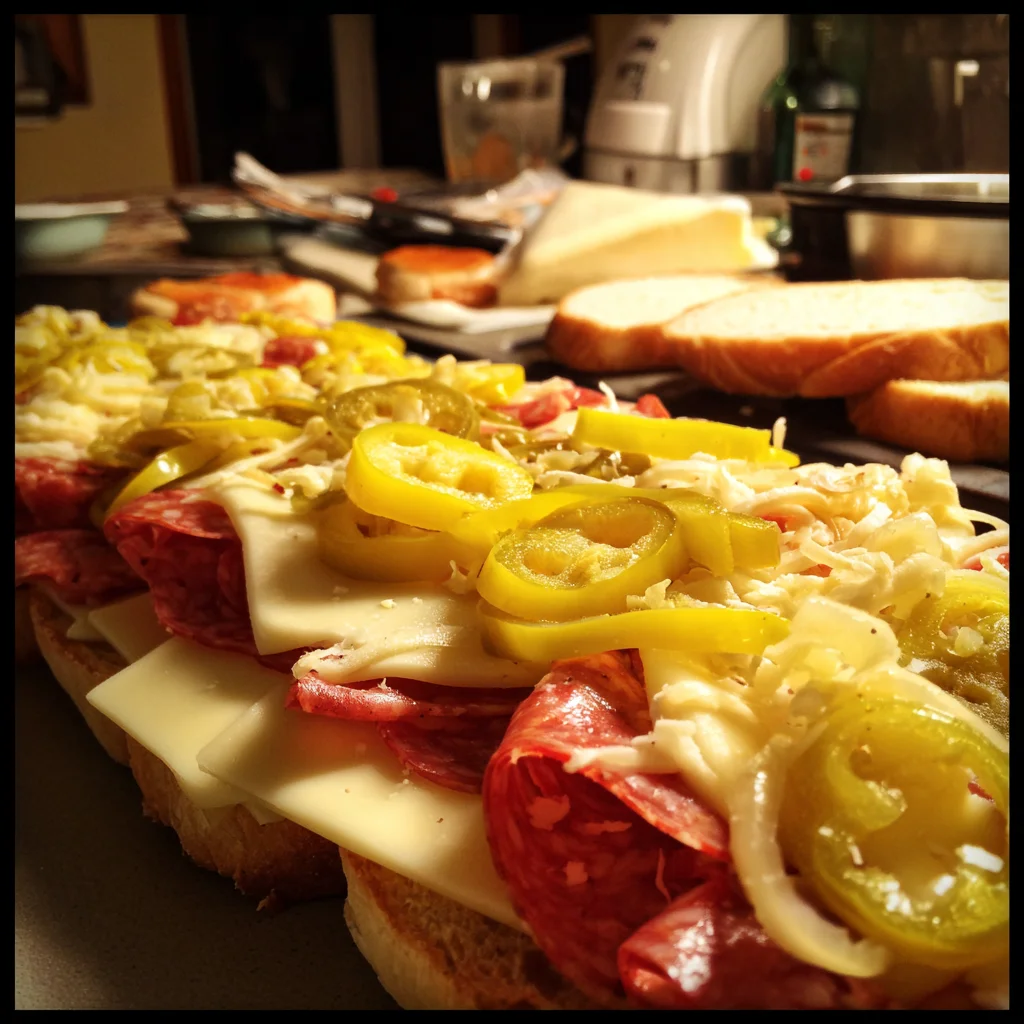
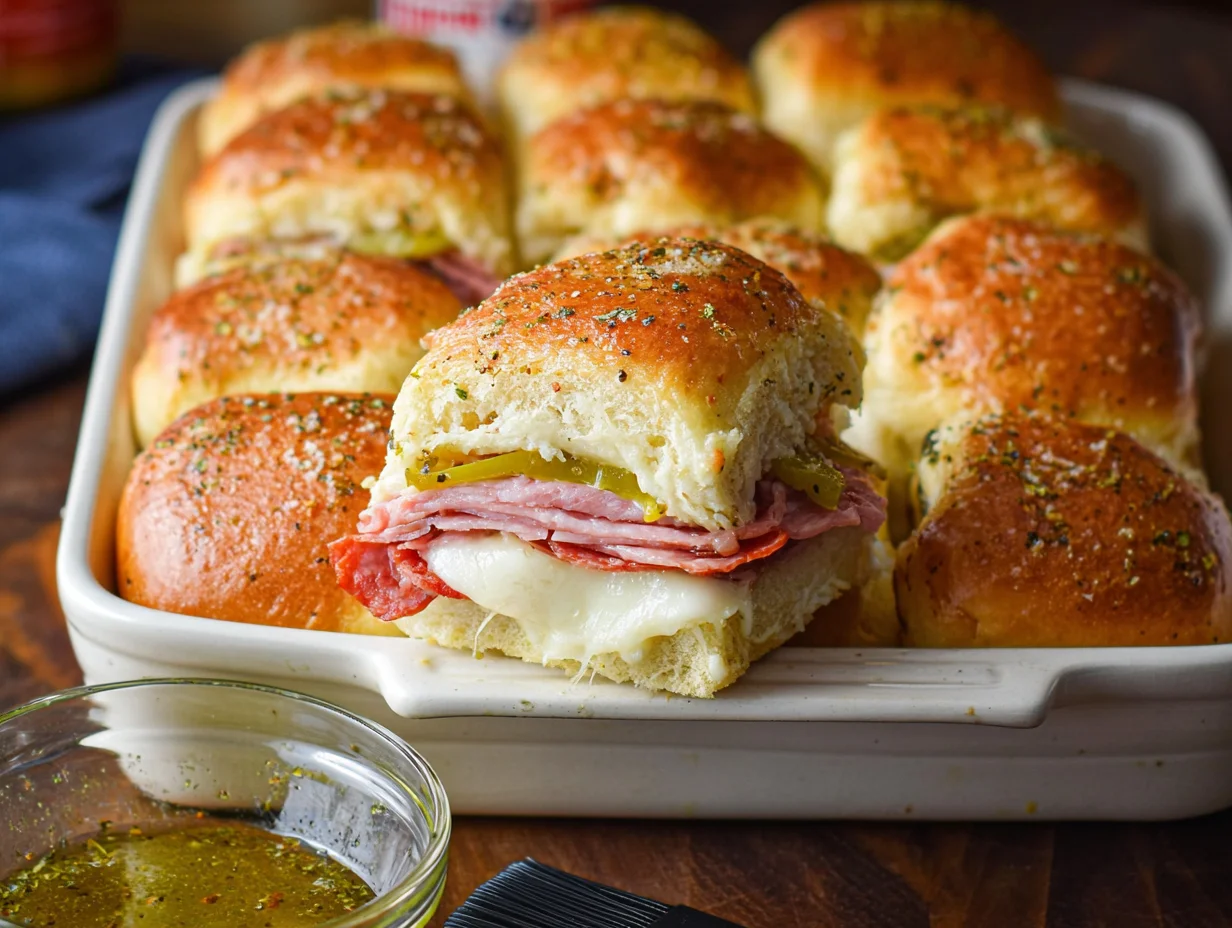
The magic here is in the layering—salami, pepperoni, ham, melty provolone, and those zesty banana peppers tucked inside soft slider rolls. And don’t even get me started on the buttery topping. Garlic, Italian herbs, a little sprinkle of Parmesan? It’s flavor city, and everyone’s invited.
Ready to get started? Let’s break it down step by step.
Ingredients You’ll Need
-
12 slider rolls, connected if possible
-
¼ pound sliced salami
-
¼ pound sliced pepperoni
-
¼ pound sliced ham or capicola
-
8 slices provolone or mozzarella cheese
-
½ cup sliced banana peppers (or pepperoncini)
-
¼ cup mayonnaise (optional)
-
2 tablespoons butter, melted
-
1 teaspoon Italian seasoning
-
½ teaspoon garlic powder
-
1 tablespoon grated Parmesan cheese
-
Fresh parsley for garnish (optional)
STEP 1: Preheat and Prep
Start by preheating your oven to 350°F. Lightly grease a 9×13-inch baking dish—this is going to keep your rolls from sticking and make cleanup way easier.
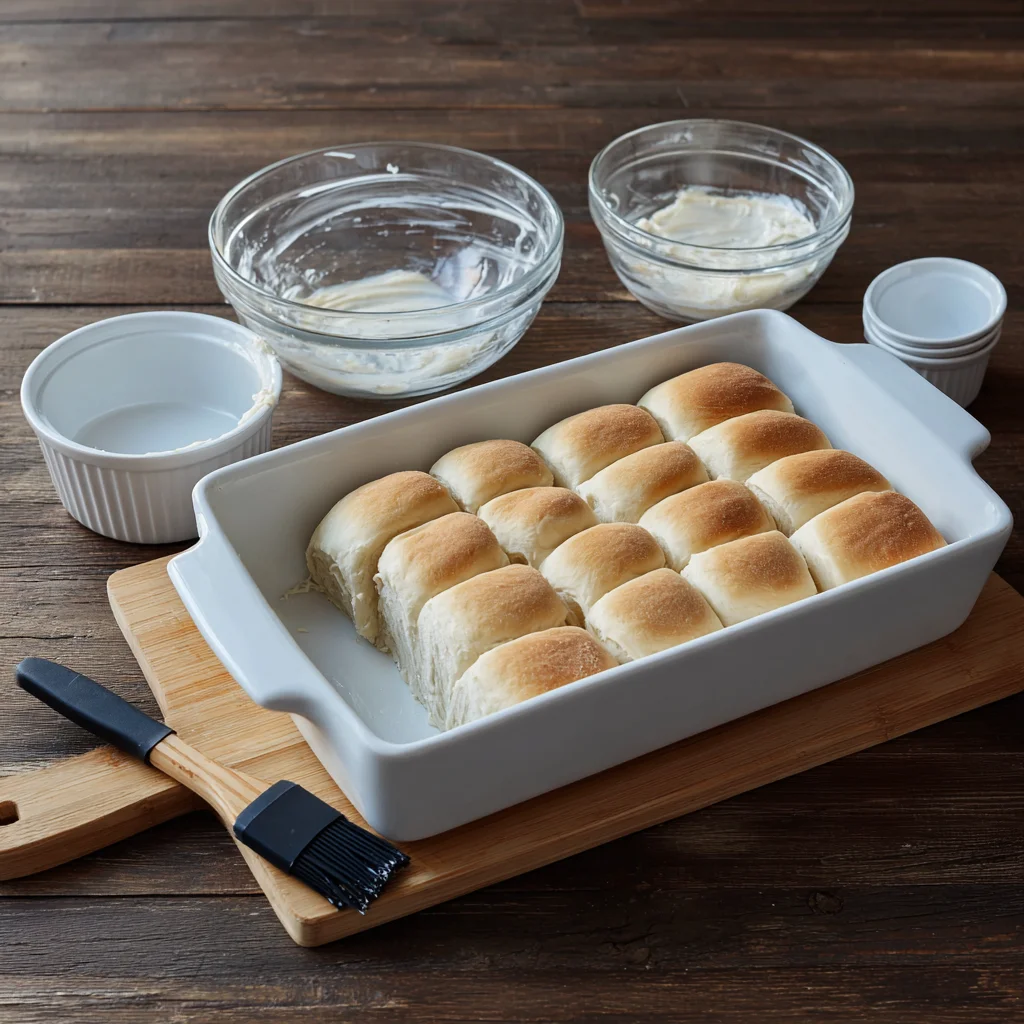
STEP 2: Slice the Rolls
Take your slider rolls and slice them in half horizontally. Try to keep them all connected if you can—it makes assembling (and later, serving) the sliders a breeze. Place the bottom half into your greased baking dish.
STEP 3: Add a Creamy Base (Optional)
If you’re using mayo (and I definitely recommend it for that creamy contrast), go ahead and spread it over the bottom half of the rolls. It adds a subtle richness that ties all the flavors together.
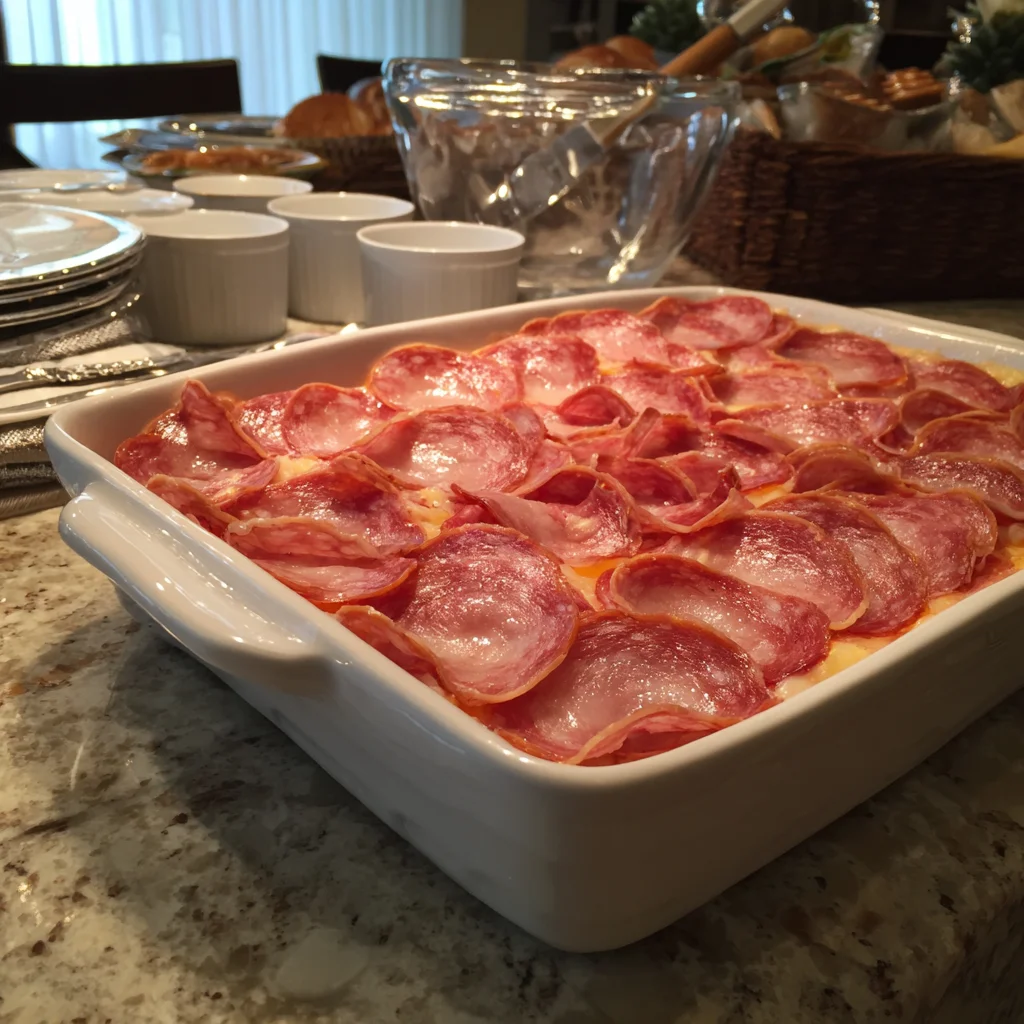
STEP 4: Layer the Meats and Cheese
Now for the fun part—layering! Start with the salami, then add the pepperoni, and finish with the ham or capicola. Be generous—you want every bite to be packed with bold flavor. After the meats, layer on your slices of provolone or mozzarella cheese, followed by a handful of banana peppers for that tangy kick.
STEP 5: Close and Press
Carefully place the top half of the rolls back on and gently press them down. This helps everything melt together beautifully once it’s baked.
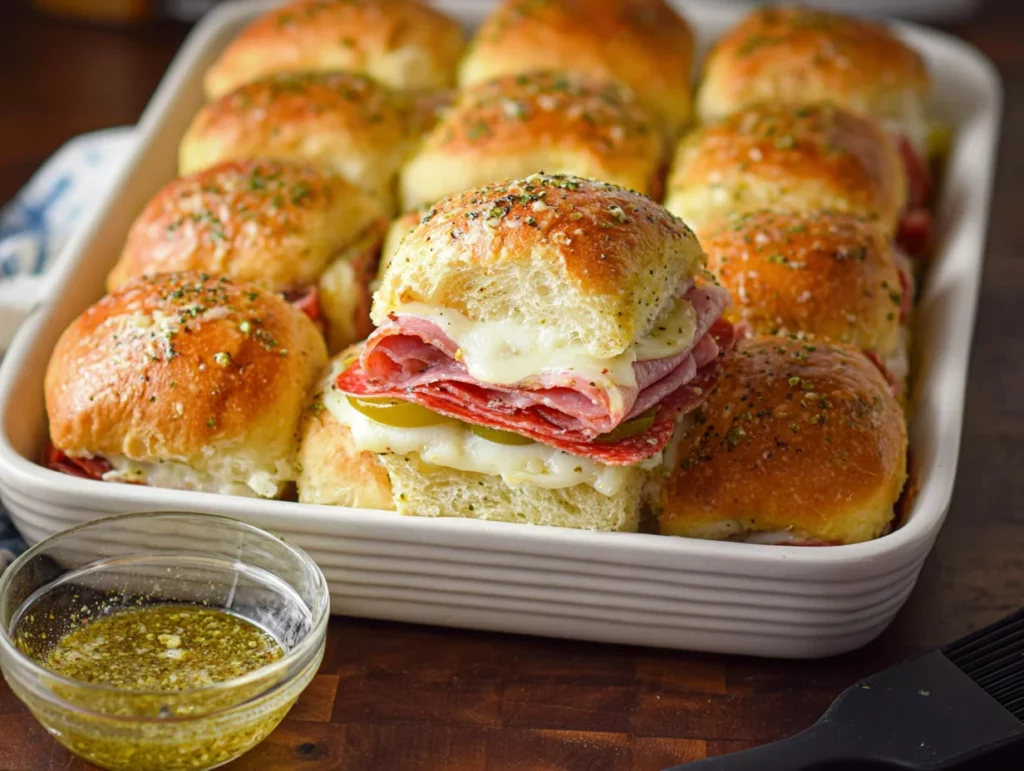
Hot Italian Sub Sliders: How to Bake and Serve Like a Pro
Welcome back! If you’re here for Part 2, you’ve already layered up your sliders with all that savory meat, gooey cheese, and those tangy banana peppers. And let’s be honest—it’s looking pretty irresistible already. But now it’s time to take these sliders from good to absolutely next-level with a buttery, flavorful topping and a perfectly melty bake.
This is where the real magic happens. That golden top you see on a great baked sandwich? It’s all about the butter mixture. It seeps into the rolls just enough to make them soft and flavorful, while the Parmesan crisps up slightly on top for the ultimate texture. Let’s get into the next steps and talk through a few tricks to make sure your sliders come out restaurant-worthy every single time.
STEP 6: Mix the Buttery Topping
In a small bowl, combine the melted butter, Italian seasoning, garlic powder, and grated Parmesan cheese. Stir everything together until it’s fully blended.
This buttery mix is the secret sauce to making your sliders taste like they came out of a cozy Italian deli. The garlic and herbs give it that signature sub shop flavor, and the Parmesan adds a touch of salty richness.
STEP 7: Brush It On
Take a pastry brush (or just use the back of a spoon if that’s what you’ve got!) and generously brush the butter mixture over the tops of the rolls. Don’t be shy here—you want every roll covered.
Pro Tip: If you like an extra crispy top, brush half the butter before baking, then the other half right when they come out of the oven. It adds a little shine and a lot of flavor.
STEP 8: Bake Until Golden
Now it’s time to cover the dish loosely with foil and pop it in the oven. Bake for 15 minutes covered to let everything heat through and melt.
Then, remove the foil and bake for an additional 5 to 7 minutes, or until the tops of the rolls are golden brown and the cheese is perfectly melted. Your kitchen will smell amazing, guaranteed.
STEP 9: Cool and Slice
Once baked, let the sliders cool for about 5 minutes in the pan. This short rest time helps everything set up, so you don’t lose all that cheesy goodness when slicing.
Use a sharp knife to cut them into individual sliders and transfer to a serving platter—or just serve them right from the baking dish for a more casual vibe.
Tips, Tricks, and Easy Variations
Now that you’ve got the basics down, here are a few ways to make these sliders your own:
-
Switch up the meats: Not a fan of ham? Try mortadella, prosciutto, or even roast beef for a different twist.
-
Cheese options: Mozzarella and provolone are classic, but sharp white cheddar or fontina add a fun spin.
-
Add marinara: Want a saucier sandwich? Spread a thin layer of marinara inside before baking, or serve warm sauce on the side for dipping.
-
Make it spicy: Toss in a few extra pepperoncini or a drizzle of hot giardiniera oil for heat lovers.
-
Prep ahead: These sliders can be assembled a day in advance and kept covered in the fridge. Just don’t brush on the butter topping until right before baking.
Why These Sliders Work Every Time
There’s a reason these hot Italian sub sliders have become a go-to for parties, potlucks, and lazy dinners—they’re low-effort, high-reward. You get everything you love in a classic Italian sub—meaty layers, melted cheese, that tang from the peppers—but in a format that’s warm, easy to serve, and completely satisfying.
And the best part? You don’t need any fancy ingredients or equipment. Just a handful of deli items, a good butter brush, and a baking dish, and you’re in business.
Hot Italian Sub Sliders: FAQs and Final Thoughts
By now, your kitchen probably smells incredible and you’re just about ready to dig into these cheesy, melty sliders. But before we wrap things up, let’s take a moment to go over some of the most frequently asked questions I get about this recipe. Whether you’re planning ahead for a party or trying to make this dinner-friendly for a picky eater, I’ve got you covered.
Frequently Asked Questions
1. Can I make these sliders ahead of time?
Absolutely. You can fully assemble the sliders—just stop before adding the butter topping. Cover the dish tightly and refrigerate for up to 24 hours. When you’re ready to bake, brush on the butter mixture and pop them in the oven as directed. This makes them perfect for party prep or easy weeknight meals.
2. What’s the best way to reheat leftovers?
The best way to reheat is in the oven or air fryer. Place sliders on a baking sheet and cover loosely with foil. Warm them at 325°F for about 10 minutes, or until heated through. This helps maintain the crispiness of the rolls. The microwave works in a pinch, but the bread can get a little soft.
3. Can I freeze these sliders?
Technically, yes—but with a couple of tips. Assemble the sliders, skip the butter topping, and wrap tightly with foil or plastic wrap. Freeze for up to 2 months. When ready to eat, thaw in the fridge overnight, then add the butter topping and bake as directed. Just note that the texture of the rolls might be a little softer after freezing.
4. What if I don’t like banana peppers or pepperoncini?
No problem! The peppers add a nice zing, but if you’re not a fan, you can leave them out entirely or swap in roasted red peppers, sun-dried tomatoes, or even sliced olives. You can also add more meat or cheese to bulk up the flavor.
5. Can I make this recipe vegetarian?
Definitely. Skip the deli meats and layer in some grilled or roasted veggies like zucchini, bell peppers, and mushrooms with your favorite cheese. A spread of pesto or marinara inside can also add great flavor.
6. What are the best side dishes to serve with these sliders?
These sliders go great with simple sides like a green salad, potato chips, pasta salad, or even a cup of tomato soup. For parties, I like to serve them alongside a tray of raw veggies and some kind of dip—ranch, hummus, or a warm marinara.
7. How do I keep the rolls from getting soggy?
The key is to use moderate amounts of moist ingredients (like mayo or marinara) and not overdo it. Also, baking the sliders uncovered for the last few minutes helps crisp the tops, which balances out the moisture from the filling.
Final Thoughts: Try These Sliders Once and You’ll Be Hooked
There’s something so satisfying about pulling a warm tray of sliders out of the oven and seeing everyone’s face light up. These Hot Italian Sub Sliders are one of those foolproof recipes that deliver every single time. Whether you’re serving them as a hearty appetizer or a no-fuss dinner, they’re guaranteed to please a crowd—and trust me, there won’t be any leftovers.
I love how easy it is to customize this recipe with whatever you’ve got in the fridge. Different meats? Go for it. A new cheese combo? Have fun with it. These sliders are super forgiving and totally adaptable, which is exactly what makes them a repeat favorite in my kitchen.
If you end up making these, I’d love to hear how they turn out! Leave a comment with your favorite meat and cheese combos, or let me know if you tried a creative variation. This recipe is a great base, but the possibilities really are endless.
PrintHot Italian Sub Sliders

Hot Italian sub sliders are a bold and savory appetizer or main dish, loaded with layers of deli meats, melty cheese, and zesty peppers, all baked inside soft slider rolls with a flavorful seasoned butter topping. These mini sandwiches are perfect for game day, parties, or an easy weeknight dinner. They’re quick to assemble, easy to serve, and always a crowd-pleaser.
- Author: Mark's Recipe
Ingredients
12 slider rolls, connected if possible
¼ pound sliced salami
¼ pound sliced pepperoni
¼ pound sliced ham or capicola
8 slices provolone or mozzarella cheese
½ cup sliced banana peppers or pepperoncini
¼ cup mayonnaise (optional)
2 tablespoons butter, melted
1 teaspoon Italian seasoning
½ teaspoon garlic powder
1 tablespoon grated Parmesan cheese
Fresh parsley for garnish (optional)
Instructions
Preheat the oven to 350°F and lightly grease a 9×13-inch baking dish.
Carefully slice the slider rolls in half horizontally, keeping them connected if possible. Place the bottom half in the prepared dish.
Spread mayonnaise on the bottom layer if using. Layer the salami, pepperoni, ham, and cheese evenly across the rolls. Top with banana peppers.
Place the top half of the rolls back on and gently press down.
In a small bowl, mix together the melted butter, Italian seasoning, garlic powder, and Parmesan cheese.
Brush the butter mixture generously over the tops of the rolls.
Cover loosely with foil and bake for 15 minutes. Uncover and bake for another 5 to 7 minutes, or until the tops are golden and the cheese is melted.
Remove from the oven and let cool for a few minutes before slicing and serving.
Notes
You can substitute or add other deli meats like mortadella or prosciutto for extra flavor.
To make ahead, assemble the sliders and refrigerate them covered for up to one day. Add the butter topping just before baking.
Serve with marinara sauce on the side for dipping or add it inside the sliders for a saucier bite.
Leftovers can be reheated in the oven or air fryer to keep the rolls crispy.
")
