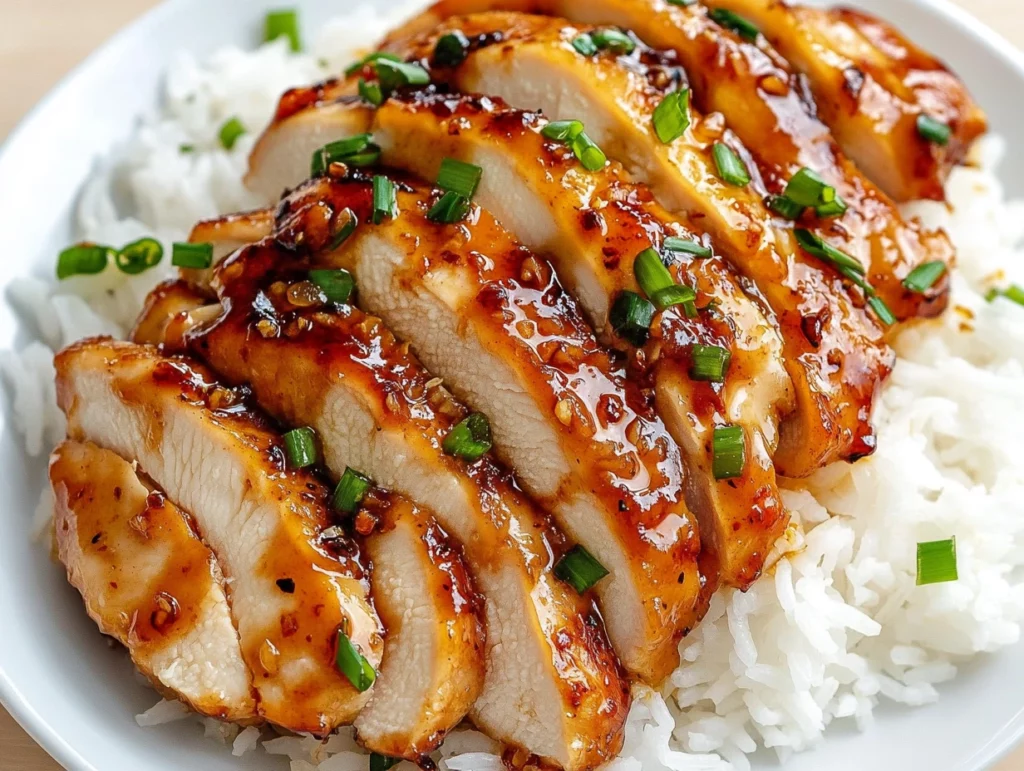
There’s something so magical about a dish that’s both simple and packed with flavor, and that’s exactly what these Honey Garlic Chicken Breasts are. Picture this: tender, juicy chicken coated in a luscious honey garlic sauce that’s sweet, savory, and just the right amount of sticky. It’s the kind of meal that feels fancy but is actually easy enough for a weeknight dinner.
This dish is perfect for those nights when you don’t feel like spending hours in the kitchen but still want something delicious. Serve it over rice with a side of steamed veggies, and you’ve got yourself a meal that tastes like it came straight from your favorite restaurant. Trust me, once you try this recipe, it’ll become a go-to in your dinner rotation!
Why You’ll Love This Recipe
- Quick & Easy: Ready in under 30 minutes!
- Minimal Ingredients: Uses simple pantry staples.
- Flavorful & Versatile: The perfect balance of sweet, salty, and garlicky goodness.
- Crowd-Pleaser: A dish the whole family will love!
Let’s Get Cooking!
Ingredients You’ll Need
Here’s what you need to make this drool-worthy Honey Garlic Chicken:
For the Chicken:
- 1 tbsp olive oil
- 2 tbsp butter (divided)
- 1 lb boneless, skinless chicken breasts
- ¼ cup all-purpose flour
- Kosher salt (to taste)
- Freshly cracked black pepper (to taste)
For the Honey Garlic Sauce:
- 6 garlic cloves, thinly sliced
- ¼ cup soy sauce
- 1 tbsp seasoned rice vinegar
- ⅓ cup honey
For Garnish:
- Green onions, thinly sliced
Step 1: Prepare the Cooking Base
Before we get started, let’s heat things up! Grab a large frying pan and add 1 tablespoon of olive oil along with 1 tablespoon of butter. Set your stove to medium-high heat and let everything melt together. This combination of oil and butter is the secret to getting a beautiful golden crust on the chicken while still keeping it tender inside.
Step 2: Prepping the Chicken
Now, let’s talk chicken!
- Start by slicing your chicken breasts in half lengthwise to create thinner pieces. This not only helps them cook faster but also ensures every bite is perfectly juicy.
- Season both sides of the chicken generously with salt and black pepper.
- Dredge each piece in all-purpose flour, making sure to shake off any excess. This step helps create a light coating that gives the chicken a crispy edge while also helping the sauce cling beautifully.
Step 3: Searing the Chicken
Time to cook!
- Place the floured chicken into your hot pan and cook for 4-5 minutes per side. You’re looking for a deep golden-brown crust.
- Once done, remove the chicken from the pan and set it aside. Don’t wipe out the pan—those little crispy bits left behind are flavor gold!
At this point, your kitchen is probably smelling amazing, but we’re just getting started. Up next? That irresistible honey garlic sauce!
Step 4: Making the Honey Garlic Sauce
This sauce is the heart of the dish—it’s the perfect balance of sweet, savory, and umami flavors. And the best part? It comes together in just a few minutes.
Here’s how to make it:
- In the same pan where you cooked the chicken, melt the remaining 1 tablespoon of butter over medium-low heat.
- Add 6 cloves of thinly sliced garlic and sauté for 30-60 seconds. You’ll know it’s ready when your kitchen smells like heaven. Just be careful—garlic burns quickly, so keep an eye on it!
- Pour in ¼ cup of soy sauce and 1 tablespoon of seasoned rice vinegar, making sure to scrape up all those delicious browned bits from the pan (that’s where the flavor lives).
- Stir in ⅓ cup of honey, along with a pinch of salt and a few cracks of black pepper.
- Let the sauce simmer on medium-low heat for 4-5 minutes, until it thickens slightly and can coat the back of a spoon.
Pro Tip: If you want your sauce a little thicker, let it simmer for an extra minute or two. If you prefer a thinner sauce, add a tablespoon of water or chicken broth.
Step 5: Bringing It All Together
Now that your sauce is thick, glossy, and full of garlicky goodness, it’s time to reunite it with the chicken!
- Return the chicken (along with any juices from the plate) back to the pan.
- Spoon the sauce generously over the chicken, making sure every piece is coated in that delicious glaze.
- Let everything simmer together for 1-2 minutes, just long enough to ensure the chicken is fully cooked and infused with the sauce.
At this point, you’ll have perfectly glazed honey garlic chicken that’s juicy on the inside, slightly crispy on the outside, and loaded with flavor.
Step 6: Garnish & Serve
To finish off your dish, sprinkle some thinly sliced green onions over the top. They add a fresh, slightly sharp contrast to the sweet and sticky sauce.
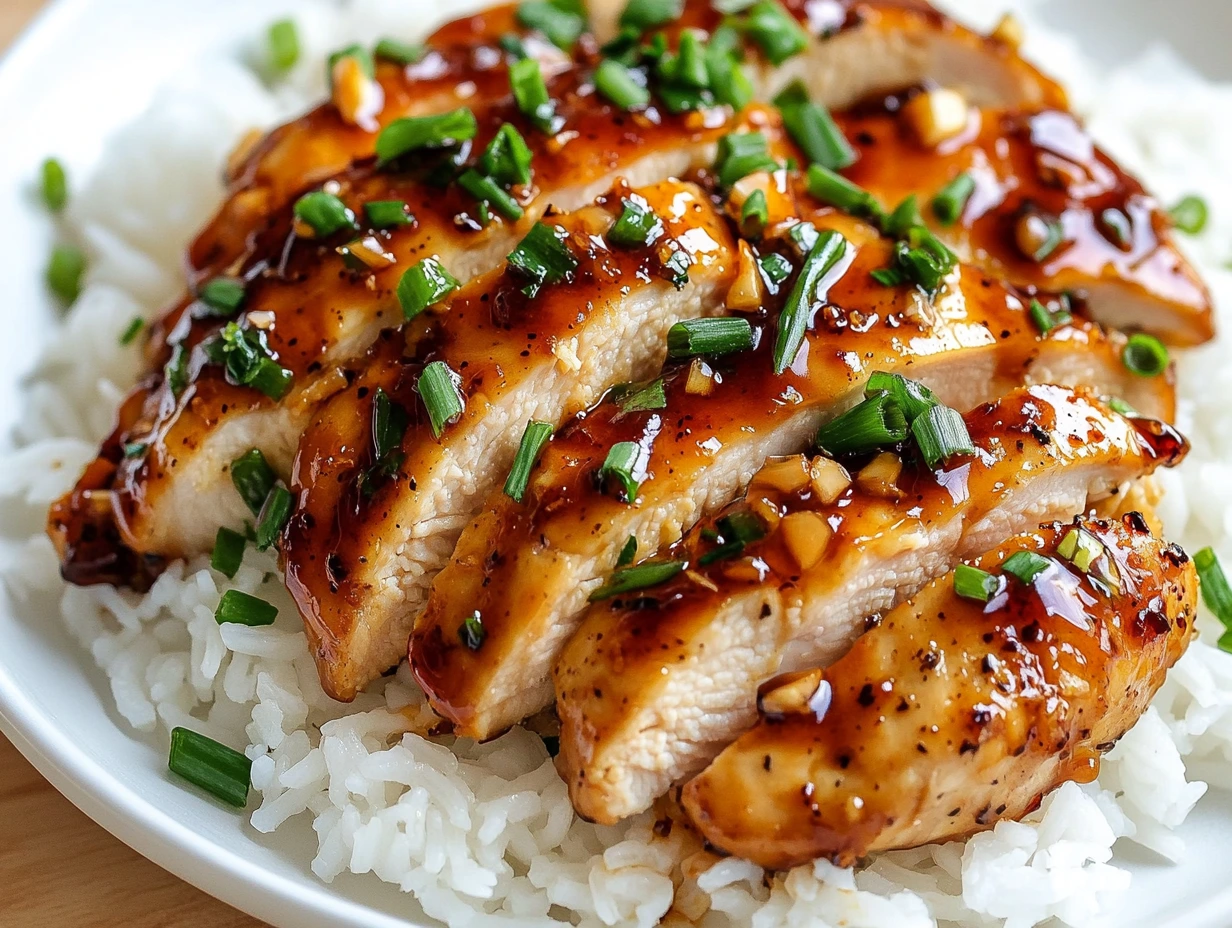
How to Serve Your Honey Garlic Chicken
This chicken is incredibly versatile and pairs well with so many sides! Here are a few serving ideas:
- Over rice – The sauce seeps into the rice, making every bite extra flavorful.
- With steamed or roasted veggies – Think broccoli, green beans, or even carrots.
- With mashed potatoes – For a comforting, hearty meal.
- Inside lettuce wraps – If you’re looking for a lighter, low-carb option.
Variations & Customizations
Want to switch things up a bit? Here are a few ways you can make this dish your own:
Spicy Honey Garlic Chicken
- Add ½ teaspoon of red pepper flakes or a drizzle of sriracha for a spicy kick.
Crunchier Coating
- Instead of dredging the chicken in just flour, mix flour with cornstarch for a crispier crust.
Extra Veggies
- Toss in some sautéed bell peppers or snap peas for a complete one-pan meal.
Make It Gluten-Free
- Swap the all-purpose flour for gluten-free flour and use tamari instead of soy sauce.
FAQ: Your Questions Answered
I know firsthand that when trying a new recipe, a few questions can pop up along the way. Here are some common ones that might come up while making this dish.
1. Can I use chicken thighs instead of chicken breasts?
Absolutely! Boneless, skinless chicken thighs work wonderfully in this recipe and stay extra juicy. Just keep in mind they might take a minute or two longer to cook through since they’re slightly thicker.
2. How do I know when my chicken is fully cooked?
The safest way to check is by using a meat thermometer. The internal temperature should read 165°F (75°C). If you don’t have a thermometer, slice into the thickest part—there should be no pink, and the juices should run clear.
3. What can I use instead of seasoned rice vinegar?
If you don’t have seasoned rice vinegar, you can substitute it with:
- Apple cider vinegar (mild and slightly sweet)
- Lemon juice (for a fresh, citrusy touch)
4. Can I make this recipe ahead of time?
Yes! You can cook the chicken and sauce ahead of time, then store them separately in airtight containers in the fridge. When ready to eat, simply reheat the sauce and chicken in a pan over low heat until warmed through.
5. How do I make the sauce thicker?
If you want a thicker, more glaze-like sauce, mix 1 teaspoon of cornstarch with 2 teaspoons of water and stir it into the sauce while it’s simmering. This will help thicken it up without altering the flavor.
6. Can I double the sauce?
Yes! If you love extra sauce (who doesn’t?!), simply double the sauce ingredients. You’ll have plenty for drizzling over rice or veggies.
7. What should I serve this with?
Here are some of my favorite pairings:
- Rice or quinoa – Perfect for soaking up all that delicious sauce.
- Steamed broccoli or green beans – A fresh, healthy balance to the sweet and savory flavors.
- Garlic mashed potatoes – Because buttery mashed potatoes + honey garlic chicken = heaven.
Final Thoughts: Why You’ll Love This Recipe
This Honey Garlic Chicken Breasts recipe is one of those magical meals that checks all the boxes:
- Easy to make – No fancy ingredients or complicated techniques.
- Quick – From start to finish, you’ll have dinner ready in about 30 minutes.
- Full of flavor – The combination of honey, garlic, and soy sauce is pure perfection.
- Versatile – Serve it with rice, veggies, noodles, or even in lettuce wraps!
It’s one of those recipes that feels special but is actually super simple. Whether you’re making it for a busy weeknight dinner or serving it to guests, you’re guaranteed to impress.
So go ahead, grab your ingredients, and give this Honey Garlic Chicken a try tonight. And if you do, I’d love to hear how it turns out! Drop a comment below and let me know your favorite way to serve it.
PrintHONEY GARLIC CHICKEN BREASTS

This Honey Garlic Chicken is a perfect balance of sweet, savory, and garlicky goodness! Tender chicken breasts are coated in a rich, sticky sauce made with soy sauce, honey, and garlic. It’s quick, easy, and pairs beautifully with rice or vegetables.
- Prep Time: 10 mins
- Cook Time: 15 mins
- Total Time: 25 mins
Ingredients
For the Chicken:
- 1 tbsp olive oil
- 2 tbsp butter (divided)
- 1 lb boneless, skinless chicken breasts
- ¼ cup all-purpose flour
- Kosher salt (to taste)
- Freshly cracked black pepper (to taste)
For the Honey Garlic Sauce:
- 6 garlic cloves, thinly sliced
- ¼ cup soy sauce
- 1 tbsp seasoned rice vinegar
- ⅓ cup honey
For Garnish:
- Green onions, thinly sliced
Instructions
1️⃣ Prepare the Cooking Base:
Heat 1 tablespoon of olive oil and 1 tablespoon of butter in a large frying pan over medium to medium-high heat.
2️⃣ Prepare the Chicken:
Slice the chicken breasts in half lengthwise to create four thinner pieces. Season both sides with salt and black pepper. Dredge each piece in all-purpose flour, shaking off any excess.
3️⃣ Cook the Chicken:
Place the floured chicken in the hot pan and cook for 4-5 minutes per side, until golden brown and nearly cooked through. Remove the chicken from the pan and set aside, keeping any juices in the pan.
4️⃣ Make the Sauce:
In the same pan, melt the remaining 1 tablespoon of butter over medium-low heat. Add the sliced garlic and sauté for 30-60 seconds, stirring constantly until fragrant but not browned.
5️⃣ Deglaze and Thicken the Sauce:
Pour in the soy sauce and seasoned rice vinegar, scraping up any browned bits from the pan. Stir in the honey, along with a pinch of salt and a few cracks of black pepper. Simmer the sauce on medium-low heat for 4-5 minutes, until it thickens slightly and coats the back of a spoon.
6️⃣ Combine and Finish Cooking:
Return the chicken (along with any juices) to the pan. Spoon the sauce over the chicken and let it simmer for about 1-2 minutes, ensuring the chicken is fully cooked and coated in the sticky glaze.
7️⃣ Garnish and Serve:
Plate the chicken and sprinkle with thinly sliced green onions for a pop of freshness. Serve immediately with rice, steamed vegetables, or a side of your choice.
Notes
- For extra crispiness, you can dredge the chicken in a mix of flour and cornstarch.
- Want more heat? Add a pinch of red pepper flakes or a drizzle of sriracha.
- Make it a full meal by serving over jasmine rice with stir-fried broccoli or snap peas.
")
