
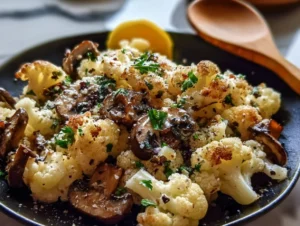
If you’re anything like me, you live for those recipes that hit all the right notes—flavorful, easy to make, and healthy without even trying too hard. Well, friend, let me introduce you to one of my all-time favorites: this Garlic Cauliflower Mushroom Skillet. It’s hearty, garlicky, and just packed with that irresistible savory goodness that makes you want to eat straight from the pan (no judgment here).
Now, this dish is not only super quick—think 30 minutes max—but it’s also low-carb, vegan-friendly, and honestly just one of those back-pocket recipes you’ll find yourself turning to over and over again. Whether you’re trying to clean out the veggie drawer or just need a solid side dish that won’t steal the spotlight, this skillet gets the job done. And let’s not forget, it’s all made in one pan. That’s right, minimal cleanup, maximum flavor.
I actually stumbled on this combo by accident one night when my fridge was down to its bare bones—some cauliflower, a forgotten bag of mushrooms, and a few cloves of garlic. I wasn’t expecting much, but after one bite, I knew I’d hit gold. I’ve made it a dozen times since, tweaking the seasonings and finish until it was just right. Now I’m sharing it with you because I think you’re going to love it just as much.
Let’s get right into it!
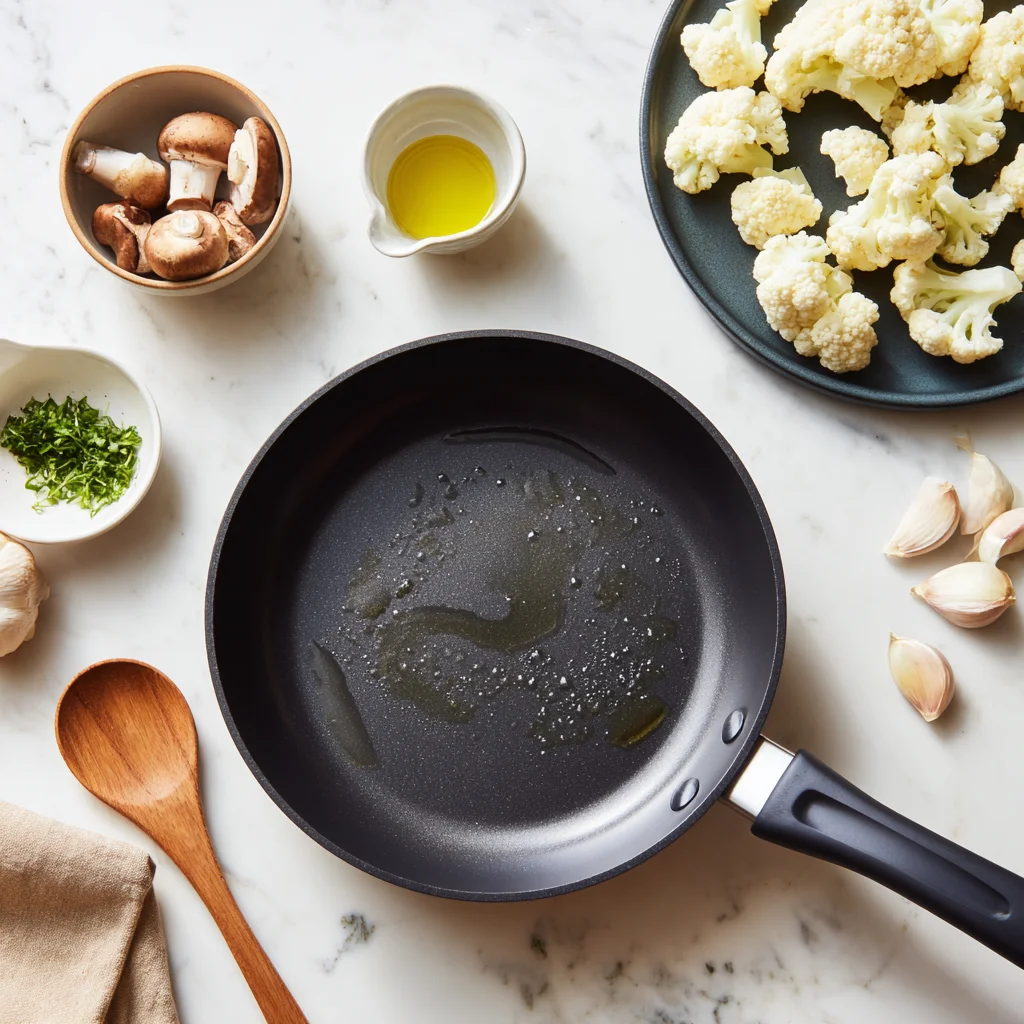
Ingredients You’ll Need:
-
1 medium head of cauliflower, cut into small florets
-
8 ounces mushrooms, sliced
-
3 tablespoons olive oil
-
4 garlic cloves, minced
-
½ teaspoon salt
-
¼ teaspoon black pepper
-
½ teaspoon smoked paprika or chili flakes (optional)
-
1 tablespoon fresh parsley, chopped
-
Juice of half a lemon
STEP 1: Start with the Cauliflower
Heat a large skillet over medium heat and add the olive oil. Once it’s shimmering (but not smoking), toss in your cauliflower florets. Give them a good stir to coat in the oil and let them cook for 6 to 8 minutes.
Now, the key here is to let them get some nice color. Don’t stir too often—just enough to keep them from burning. You want those edges to start turning golden and crispy. That’s where the flavor starts to build.
Pro Tip: Don’t overcrowd the pan. If your skillet is on the smaller side, consider cooking the cauliflower in batches. This helps avoid steaming and ensures that beautiful browning we’re after.
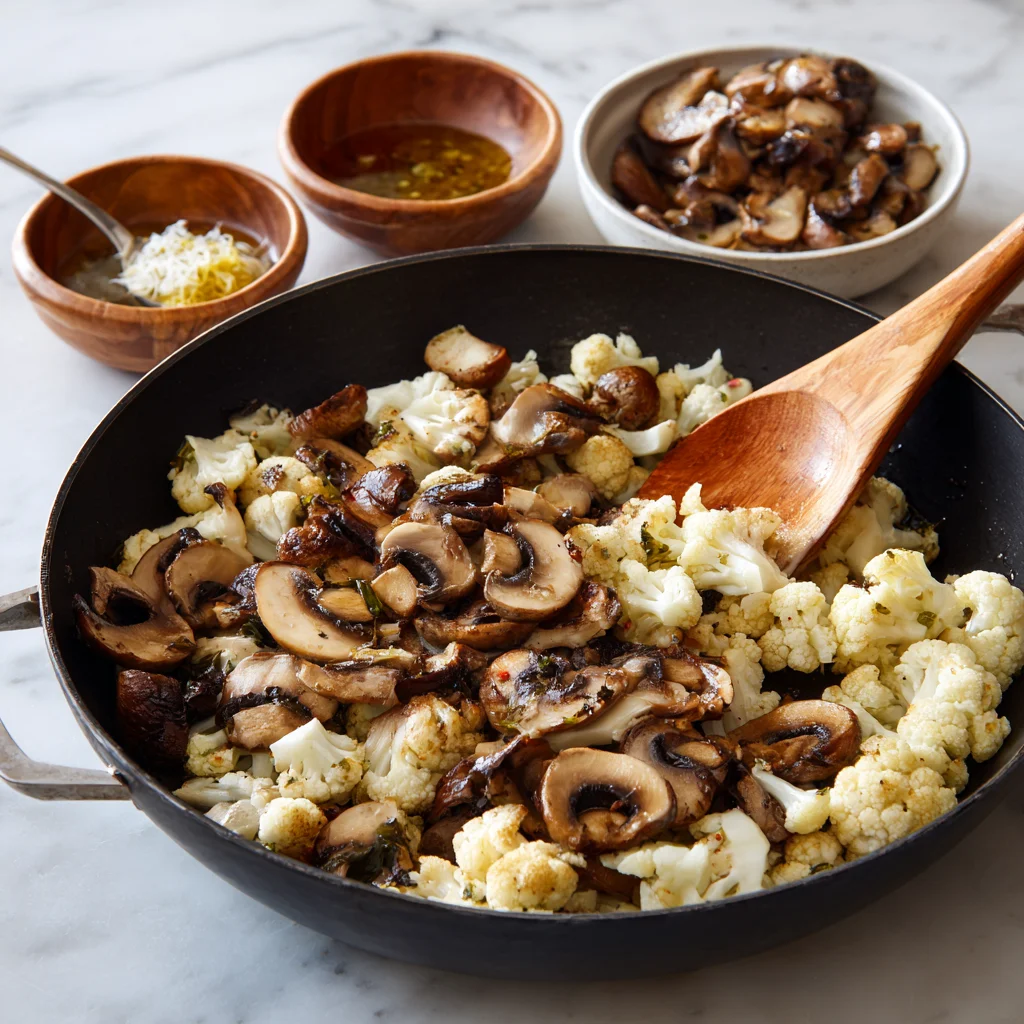
STEP 2: Add the Mushrooms
Next, in go the mushrooms. I usually go for cremini or white button mushrooms, but honestly, any variety you love will work here. Stir them into the cauliflower and keep things moving every few minutes so nothing sticks.
You’ll notice the mushrooms start to release moisture—that’s totally normal. Keep cooking for 5 to 7 minutes, until they’ve softened and picked up some color of their own.
At this point, the kitchen is going to start smelling really good. But we’re just getting started.
STEP 3: Bring on the Garlic and Seasonings
Once your cauliflower and mushrooms are golden and cooked through, it’s time to add the flavor powerhouses: garlic, salt, pepper, and a touch of smoked paprika or chili flakes if you like a little heat.
Toss in the minced garlic and seasonings, and stir constantly for 1 to 2 minutes. The garlic should be fragrant and lightly golden—not burnt. Trust me, burnt garlic will overpower the whole dish, so keep a close eye on it here.
This is the point in the recipe where everything starts to come together, and that savory, garlicky aroma hits you right in the cravings.
Garlic Cauliflower Mushroom Skillet: Finish Strong with Big Flavor
Welcome back to Part 2 of our garlic cauliflower mushroom skillet adventure! In Part 1, we sautéed our cauliflower and mushrooms to golden perfection and brought in the bold flavor with garlic and seasonings. Now we’re going to take this skillet to the finish line—with just a couple more steps and some super helpful tips to make it truly your own.
Whether you’re serving this as a side or turning it into a quick lunch or dinner, this part of the recipe is where everything really comes together. And honestly, it’s hard to mess this one up. Just follow along and you’ll have a warm, satisfying dish on the table in no time.
STEP 4: Add a Splash of Brightness
With everything sizzling and smelling amazing in your skillet, it’s time to add a pop of brightness. Squeeze in the juice of half a lemon and give everything a good toss to coat.
This might seem like a small step, but don’t skip it. That little hit of acidity cuts through the richness of the garlic and olive oil and really lifts the whole dish. It adds a fresh note that balances everything out and makes each bite feel light, not heavy.
Let it cook for just one more minute—just long enough for the lemon juice to mingle with the garlic and infuse the dish with even more flavor.
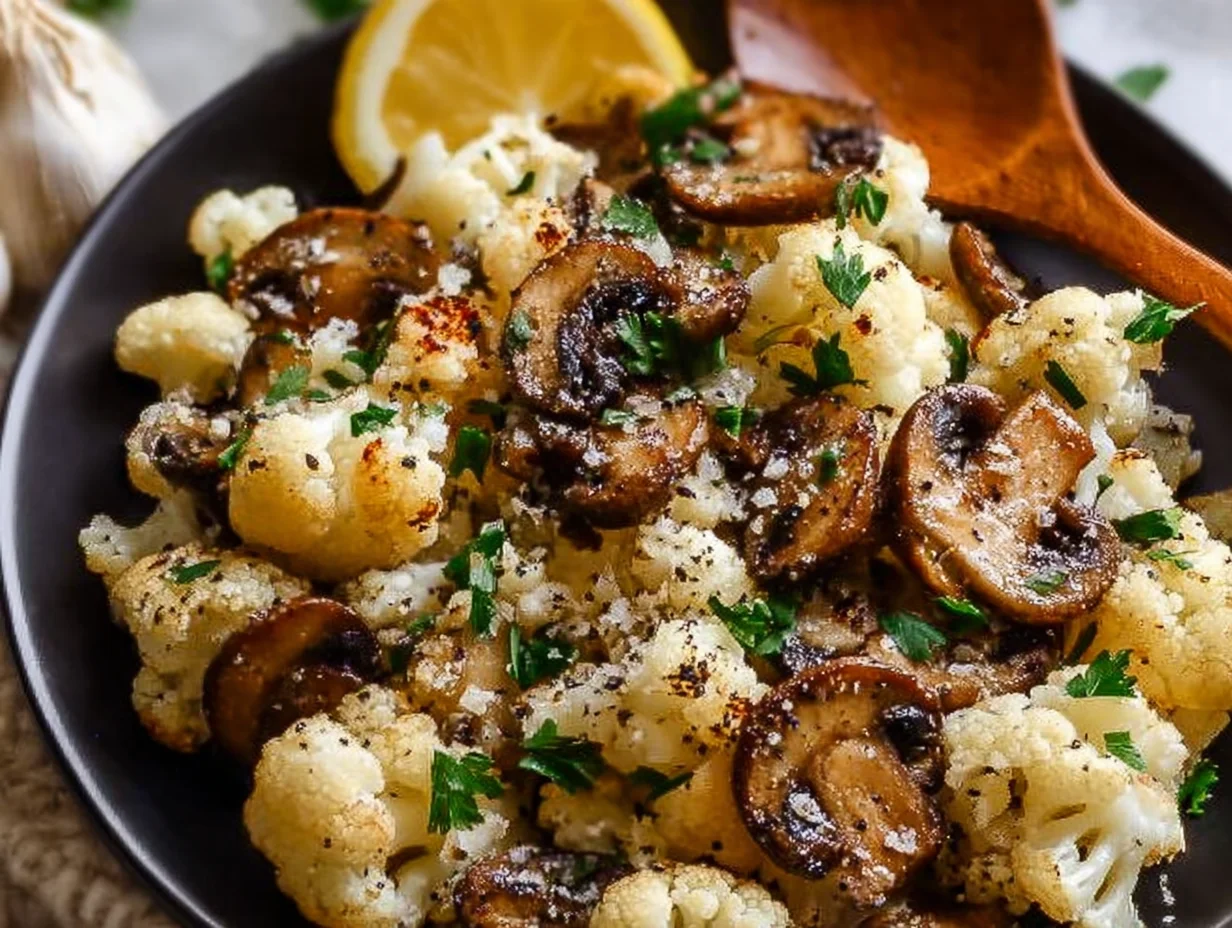
STEP 5: Finish with Fresh Herbs and Serve
Last but definitely not least, sprinkle your skillet with chopped fresh parsley. It adds color, freshness, and just a hint of herbiness that pairs so nicely with the rest of the flavors.
Then? You’re done. That’s it! Serve it straight from the pan (because we all know skillet meals taste better that way), or transfer to a serving dish if you’re feeling fancy.
Make It Your Own: Simple Variations & Add-Ons
What I love most about this recipe is how easy it is to customize. Depending on what you’ve got in the fridge or what kind of meal you’re going for, you can totally switch things up. Here are a few of my favorite ways to adapt this skillet:
-
Add protein: Stir in some cooked chickpeas or white beans to make it heartier, or if you’re not plant-based, top with a fried or poached egg for a simple but satisfying meal.
-
Bulk it up: Toss in a handful of cooked quinoa, farro, or rice for a filling lunch bowl.
-
Try other herbs: Don’t have parsley? Fresh basil, chives, or thyme all work beautifully here.
-
Cheesy finish: A sprinkle of grated Parmesan (or a dairy-free alternative) right at the end adds a rich, salty layer that’s hard to resist.
-
Spice it up: If you’re craving more heat, double down on those chili flakes or stir in a dash of hot sauce before serving.
Leftovers? No Problem
This skillet holds up surprisingly well as leftovers. Just pop any extras into an airtight container and store in the fridge for up to 3 days.
To reheat, I recommend tossing it back into a skillet for a few minutes to bring back some of that golden crispness. But the microwave works in a pinch too—just keep an eye on it and don’t overcook or it may get mushy.
You can even serve leftovers cold, tossed into a salad with a drizzle of vinaigrette. It’s just one of those versatile dishes that keeps on giving.
Garlic Cauliflower Mushroom Skillet: FAQs & Final Thoughts
We’ve sautéed, seasoned, and served this delicious garlic cauliflower mushroom skillet, but before we wrap things up, let’s tackle some of the most common questions readers have about this recipe. Whether you’re wondering about substitutions, prep tips, or storage, this FAQ section is here to help make your cooking experience even smoother.
Frequently Asked Questions
1. Can I use frozen cauliflower or mushrooms?
Yes, you can use frozen cauliflower or mushrooms in a pinch, but fresh is definitely best for texture and flavor. If using frozen, make sure to thaw and drain them well to avoid excess moisture in the skillet. You might also need to cook them a bit longer to get that nice golden color.
2. How can I make this dish more filling?
If you’re looking for something a little more satisfying, try adding a protein like chickpeas, lentils, or even cooked chicken if you’re not keeping it vegan. You can also mix in cooked quinoa, brown rice, or even pasta to turn it into a complete meal.
3. Is this dish good for meal prep?
Absolutely. This skillet keeps well in the fridge for up to 3 days and reheats easily in a skillet or microwave. If you’re prepping ahead, you can chop the veggies and store them separately, then throw everything together when you’re ready to cook.
4. What kind of mushrooms work best?
Cremini or white button mushrooms are great here, but feel free to get creative. Shiitake, oyster, or even portobello mushrooms will bring different flavors and textures. Just slice them evenly so they cook at the same rate.
5. Can I skip the lemon juice?
You can skip it, but I don’t recommend it. The lemon juice really balances the richness of the garlic and olive oil. If you don’t have lemon, a splash of apple cider vinegar or white wine vinegar works in a pinch.
6. What’s the best way to avoid soggy cauliflower?
The trick is to not overcrowd the pan. If your skillet isn’t big enough, cook the cauliflower in batches to make sure it browns instead of steams. Also, make sure your cauliflower is dry before cooking—no extra water clinging to those florets.
7. Can I add other vegetables to this dish?
Yes! This recipe is super flexible. Bell peppers, zucchini, or even spinach can be added in. Just keep in mind that some veggies cook faster than others, so adjust your timing accordingly.
Final Thoughts: A Simple Dish That Delivers Every Time
There’s something really satisfying about putting together a dish that’s healthy, delicious, and fast—and this garlic cauliflower mushroom skillet checks all those boxes. Whether you’re whipping it up as a side, enjoying it as a light main, or adding your own twist to make it a full meal, it’s one of those recipes that just fits into everyday life.
It’s simple enough for busy weeknights, but tasty enough to serve to guests. And the best part? You probably already have most of the ingredients sitting in your kitchen.
If you do give it a try (and I hope you will), let me know how it turns out! Leave a comment with your favorite add-ins or substitutions. I love hearing how others make this dish their own—it’s what keeps recipes like this alive and evolving in real kitchens.
PrintGarlic Cauliflower Mushroom Skillet
This garlic cauliflower mushroom skillet is a simple, flavorful, and wholesome dish that comes together in under 30 minutes. With tender cauliflower florets, earthy mushrooms, and a rich garlic-infused finish, it’s a perfect side or light main that works for any meal. It’s low-carb, vegan-friendly, and packed with natural flavor and texture.
- Author: Mark's Recipe
Ingredients
1 medium head of cauliflower, cut into small florets
8 ounces mushrooms, sliced
3 tablespoons olive oil
4 garlic cloves, minced
½ teaspoon salt
¼ teaspoon black pepper
½ teaspoon smoked paprika or chili flakes (optional)
1 tablespoon fresh parsley, chopped
Juice of half a lemon
Instructions
Heat olive oil in a large skillet over medium heat. Add the cauliflower florets and cook for 6 to 8 minutes, stirring occasionally, until they start to soften and brown slightly.
Add the sliced mushrooms to the pan and continue cooking for another 5 to 7 minutes until the mushrooms release their moisture and turn golden.
Stir in the minced garlic, salt, pepper, and smoked paprika or chili flakes if using. Cook for 1 to 2 more minutes, stirring constantly, until the garlic is fragrant and lightly golden.
Squeeze in the lemon juice and toss to combine. Cook for an additional minute to let the flavors meld.
Remove from heat and garnish with fresh parsley before serving.
Notes
For best results, use a large skillet to avoid overcrowding, which can lead to steaming instead of browning. If you want to make this dish more filling, stir in a handful of cooked quinoa or top with a fried egg. Leftovers can be stored in the fridge and reheated easily in a skillet or microwave.

")
