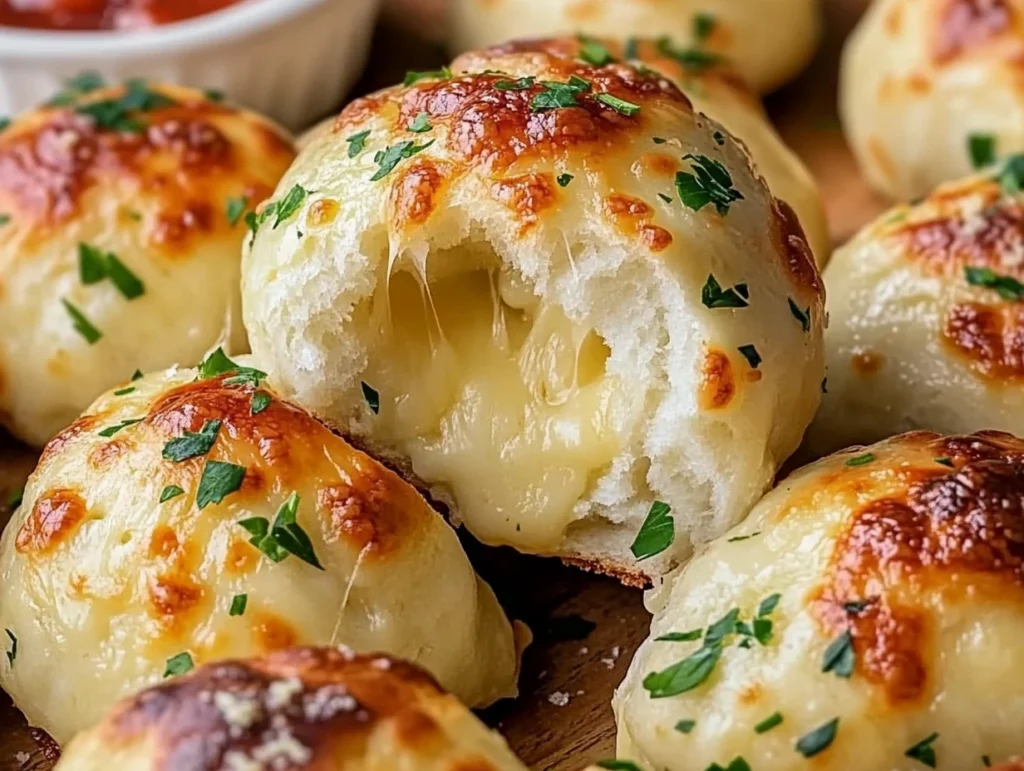
There’s something magical about biting into a warm, buttery roll and discovering a gooey, cheesy center. These Garlic Cheese Bombs are exactly that—soft, golden-brown rolls filled with melty mozzarella and topped with a flavorful garlic butter. Whether you serve them as an appetizer, snack, or side dish, they’re bound to steal the show.
If you’ve ever had cheesy breadsticks at a restaurant and wished you could make something just as good at home, this recipe is for you. The best part? It’s incredibly easy! Thanks to frozen Texas rolls, there’s no need to mess with homemade dough, making this a foolproof recipe for any level of home cook.
Now, let’s get started on making these cheesy little bites of heaven!
Ingredients You’ll Need
Here’s what you need to make these cheesy garlic bombs:
- Frozen Texas Rolls (thawed) – We’re using Rhodes brand for convenience. They bake up light, fluffy, and perfect for this recipe.
- Mozzarella Cheese – Use mozzarella sticks, cut into bite-sized pieces for the perfect melt.
- Butter – Melted salted butter gives these rolls that rich, buttery flavor.
- Garlic – Fresh minced garlic adds an irresistible aroma and taste.
- Parsley – Fresh or dried parsley flakes add a pop of color and a mild herby touch.
You might already have most of these ingredients on hand, which makes this recipe even better. Now, let’s move on to prepping the dough.
Step 1: Thaw the Dough
Since we’re using frozen Texas rolls, they need time to thaw before we start shaping them. Place eight frozen rolls on a plate, cover them with plastic wrap, and let them thaw in the refrigerator for at least four hours or overnight. They should double in size once they’re ready to use.
If you’re short on time, you can speed up the process by letting the rolls sit at room temperature for about an hour, but keeping them in the fridge overnight gives the best texture.
Step 2: Prep the Cheese and Dough
While the dough is thawing, go ahead and cut the mozzarella sticks into one-inch pieces. You’ll need two pieces per roll, so cut up four sticks of mozzarella to get 16 pieces total.
Once the dough is ready, preheat your oven to 350°F and line a baking sheet with parchment paper to prevent sticking.
Now comes the fun part—shaping the cheese bombs! Take each roll and flatten it into a small disk using your hands. The dough is soft and easy to work with, so there’s no need for a rolling pin.
Place two pieces of cheese in the center of each dough disk, then carefully fold and pinch the edges together to seal in the cheese completely. This step is important—if the dough isn’t sealed tightly, the cheese might leak out while baking. Once sealed, place each roll seam-side down on the prepared baking sheet.

Step 3: Bake Until Golden and Perfectly Fluffy
Now that your cheese bombs are assembled and ready to go, it’s time to bake them to golden perfection.
Place the baking sheet in the preheated 350°F oven and let the rolls bake for 9-11 minutes. Keep an eye on them—every oven is different, and you want them to turn a beautiful golden brown without overbaking.
As they bake, you’ll start to smell that warm, yeasty dough transforming into soft, fluffy rolls. But the real magic is happening inside—where the mozzarella is melting into gooey, cheesy goodness.
A quick tip: If your rolls aren’t browning evenly, you can rotate the baking sheet halfway through to ensure an even bake.

Step 4: Prepare the Garlic Butter Topping
While the rolls are in the oven, it’s time to make the flavorful garlic butter that will take these cheese bombs to the next level.
In a microwave-safe dish or a small saucepan over low heat, melt 4 tablespoons of salted butter. Once the butter is fully melted, stir in 2 cloves of minced garlic and 1 tablespoon of parsley flakes.
The moment the minced garlic hits the warm butter, the aroma is absolutely irresistible. Fresh garlic gives the best flavor, but if you’re in a pinch, you can substitute ½ teaspoon of garlic powder instead.
Once the butter is ready, set it aside while you wait for the rolls to finish baking.
Step 5: Brush with Garlic Butter
As soon as the rolls come out of the oven, grab a pastry brush and generously coat each one with the garlic butter mixture. The heat from the fresh-baked rolls will absorb the butter, infusing them with rich, garlicky flavor.
For an extra punch of taste, you can also sprinkle a little grated Parmesan cheese on top. The slight saltiness of the Parmesan pairs perfectly with the warm, buttery rolls.
Let the cheese bombs cool slightly before serving—just enough so you don’t burn your mouth on that melty mozzarella center.

Serving Suggestions and Variations
These garlic cheese bombs are incredibly versatile. Here are a few ways to serve them:
- With Marinara Sauce – A side of warm marinara is perfect for dipping, giving them that classic pizza-inspired flavor.
- With Ranch Dressing – If you’re a fan of garlic bread and ranch, this is a match made in heaven.
- As a Side Dish – Serve these alongside pasta, soup, or a salad for a deliciously cheesy addition to your meal.
If you’re looking for a little variation, try these fun twists:
- Add Pepperoni – Place a slice of pepperoni inside each roll with the cheese for a mini pizza bomb.
- Spicy Kick – Sprinkle a little red pepper flakes into the garlic butter for a touch of heat.
- Different Cheeses – Swap out mozzarella for cheddar, gouda, or provolone to change up the flavor.
These garlic cheese bombs are best enjoyed fresh out of the oven, but if you have leftovers, they can easily be reheated. Just pop them in a 350°F oven for a few minutes to crisp up the exterior again.
Frequently Asked Questions
Making these garlic cheese bombs is simple, but you might have a few questions before you get started. Here are some of the most common ones:
1. Can I use homemade dough instead of frozen rolls?
Absolutely! If you have a favorite homemade bread dough, you can use that instead of frozen Texas rolls. Just make sure to let the dough rest for about 10 minutes after shaping so it’s easier to work with.
2. How do I keep the cheese from leaking out?
The key to preventing leaks is sealing the dough tightly. Pinch the edges of the dough together well and place the rolls seam-side down on the baking sheet. If any cheese does leak out, don’t worry—they’ll still be delicious!
3. Can I make these ahead of time?
Yes! You can assemble the cheese bombs, place them on a baking sheet, and refrigerate them for a few hours before baking. When ready to bake, let them sit at room temperature for 10-15 minutes before putting them in the oven.
4. How do I store leftovers?
These are best enjoyed fresh, but if you have leftovers, store them in an airtight container in the refrigerator for up to 3 days. To reheat, place them in a 350°F oven for about 5 minutes to regain that crispy, golden exterior.
5. Can I freeze these?
Yes! After baking, let them cool completely, then freeze them in a zip-top bag for up to 2 months. Reheat in a 350°F oven until warmed through.
6. Can I use a different type of cheese?
Definitely! While mozzarella is the classic choice for that gooey center, you can experiment with cheddar, gouda, provolone, or even pepper jack for a bit of spice.
Final Thoughts
These garlic cheese bombs are proof that sometimes the simplest recipes are the most delicious. With just a few ingredients and minimal prep, you can create a snack or side dish that’s crispy on the outside, soft on the inside, and oozing with cheesy goodness.
Whether you’re making them for a party, game night, or just because you’re craving something warm and cheesy, this recipe is a winner. Don’t forget to serve them with your favorite dipping sauce and share them with family and friends—though, fair warning, they’ll disappear fast!
If you try this recipe, let us know how it turned out! Do you have a favorite cheese or dipping sauce to pair with them? Share your thoughts in the comments below. Happy baking!
PrintEasy Garlic Cheese Bombs
These soft, buttery garlic cheese bombs are filled with gooey mozzarella and brushed with a flavorful garlic butter topping. They make the perfect appetizer, snack, or side dish for any meal!
- Author: Mark's Recipe
Ingredients
- 8 frozen Texas Rolls (thawed, Rhodes brand preferred)
- 4 sticks mozzarella cheese (cut into 16 pieces)
- 4 tablespoons salted butter (melted)
- 2 cloves garlic (minced)
- 1 tablespoon parsley flakes (freshly chopped or dried)
Instructions
Thaw the frozen dough by placing 8 rolls on a plate, covering them with plastic wrap, and refrigerating for at least 4 hours or overnight until they double in size.
Cut the mozzarella sticks into approximately 1-inch pieces.
Preheat the oven to 350°F and line a baking sheet with parchment paper.
Flatten each dough ball into a disk using your hands. Place two pieces of cheese in the center of each disk.
Pinch the edges of the dough tightly to seal in the cheese completely. Place each roll seam side down on the prepared baking sheet. Repeat with all rolls.
Bake for 9-11 minutes, or until they turn golden brown.
While the rolls are baking, melt the butter in a microwave-safe dish or over low heat in a saucepan. Stir in the minced garlic and parsley flakes once melted.
Remove the rolls from the oven and immediately brush each with the garlic butter mixture.
Let them cool slightly before serving to enjoy the melty, cheesy center.
Notes
- For extra flavor, sprinkle the rolls with grated Parmesan before baking.
- Serve with marinara sauce or ranch dressing for dipping.
- If using fresh dough instead of frozen rolls, allow it to rest for about 10 minutes before shaping.
- These are best enjoyed fresh but can be reheated in the oven for a crispy exterior.


