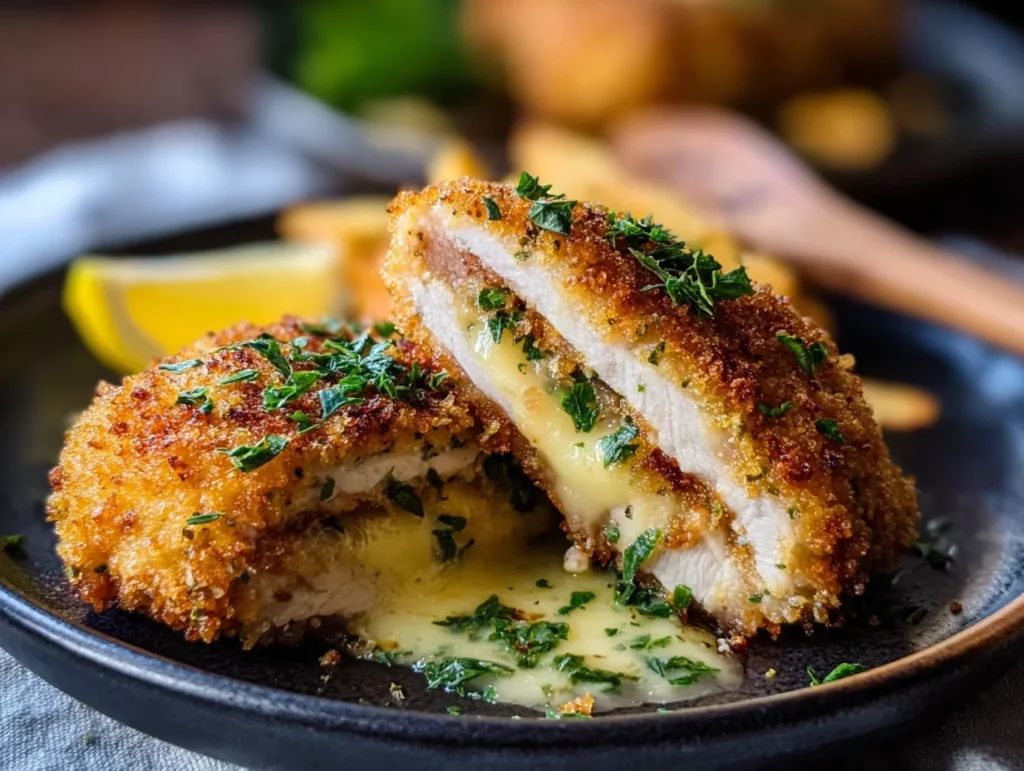
There’s something magical about cutting into a perfectly golden Chicken Kiev and watching that garlicky herb butter ooze out—like a reward for a job well done in the kitchen. But if you’ve ever been intimidated by the traditional version of this dish, you’re not alone. That’s exactly why I’m excited to share this Easy Chicken Kiev recipe—it brings you all that rich, buttery flavor with way less effort and stress.
I still remember the first time I tried to make the “real deal” version. There were rolling pins, plastic wrap, butter escaping in every direction… and let’s just say it wasn’t exactly a weeknight win. This simplified version? A total game changer. It skips the pounding and rolling, and instead, keeps things straightforward, approachable, and perfect for a cozy dinner or an impressive dish when friends come over.
We’re talking juicy chicken breasts stuffed with a flavorful garlic herb butter, coated in crispy breadcrumbs, pan-fried until golden, then finished off in the oven. It’s the kind of recipe that looks and tastes like you spent hours in the kitchen—but no one needs to know how easy it actually was.
Let’s dive into how to make this comfort food classic with a no-fuss twist.
Ingredients You’ll Need
-
Boneless, skinless chicken breasts
-
Salt and black pepper
-
Garlic powder
-
Unsalted butter, softened
-
Fresh parsley, finely chopped
-
Minced garlic
-
Lemon zest (optional, but recommended for a little brightness)
-
All-purpose flour
-
Eggs, beaten
-
Breadcrumbs (Panko works great for added crunch)
-
Vegetable oil (for frying)
STEP 1: Make the Garlic Herb Butter
This is where all that flavor starts. In a small bowl, mix together the softened butter, minced garlic, chopped parsley, and lemon zest (if using). The lemon zest isn’t essential, but it adds a bright note that balances the richness of the butter beautifully.
Once everything’s combined and smooth, go ahead and pop that butter mixture in the fridge. You want it to firm up so it’s easier to stuff into the chicken without it melting too quickly in the cooking process.
Pro tip: If you have time, make the butter mixture earlier in the day and chill it for a few hours. You can even shape it into a log using plastic wrap for easier slicing later.
STEP 2: Prep the Chicken Breasts
This is the part that might sound tricky, but it’s really not! Grab your boneless, skinless chicken breasts and carefully use a sharp knife to cut a pocket into the thickest part of each breast. Be sure not to cut all the way through—you want to create a little space for the butter to sit inside.
Once your butter is firm, divide it evenly between the chicken breasts and stuff it into the pockets you just made. If the edges aren’t sealing tightly, you can use toothpicks to help hold everything together. Just remember to take them out before serving!
STEP 3: Season and Bread the Chicken
Now that the chicken is stuffed, season the outside with salt, black pepper, and a light sprinkle of garlic powder. That outer layer of seasoning makes a big difference in the final flavor.
Next, it’s time for the breading station. Set up three shallow dishes: one with all-purpose flour, one with beaten eggs, and one with breadcrumbs. Dredge each stuffed chicken breast in the flour first, then dip into the egg, and finally coat it well in the breadcrumbs.
Press those breadcrumbs on gently so they really stick—you want that golden crust to hold up during frying.
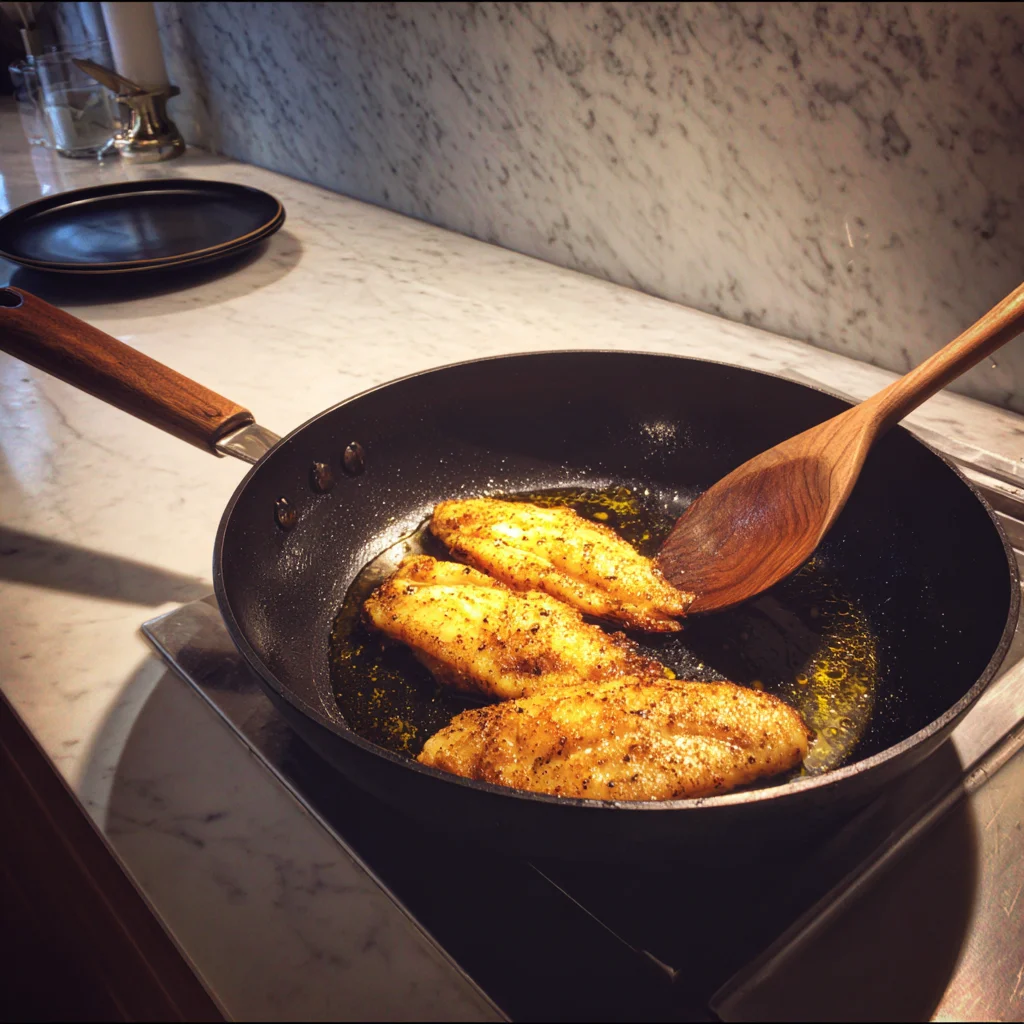
STEP 4: Fry to Golden Perfection
Heat a generous amount of vegetable oil in a large skillet over medium heat. Once it’s hot, carefully add your breaded chicken breasts. You’ll want to fry them for about 3 to 4 minutes per side, just until they’re golden brown and crispy.
Don’t worry about cooking them all the way through at this stage—they’ll finish in the oven. The goal here is to get that beautiful color and crunch on the outside.
Easy Chicken Kiev: A Crispy, Buttery Classic Made Simple
We left off with your beautiful, golden-crusted chicken sizzling in the skillet—and now it’s time to finish it off and bring everything together. This next part is where the magic really happens. That herbed garlic butter inside begins to melt into the juicy chicken, turning every bite into something seriously crave-worthy.
If you’ve never baked a pan-fried chicken breast before, don’t worry—it’s a super simple step that ensures your chicken is fully cooked while keeping the outside nice and crispy. Let’s jump back in and wrap up this crowd-pleasing dish.

STEP 5: Bake the Chicken to Perfection
After you’ve pan-fried the chicken breasts on both sides (about 3 to 4 minutes per side), transfer them to a preheated oven at 375°F (190°C). Bake for about 15 to 18 minutes, or until the internal temperature of the thickest part of the chicken reaches 165°F (74°C).
You can transfer the chicken directly from the skillet to a baking sheet, or if your skillet is oven-safe, pop the whole thing right into the oven. Just be sure to keep an eye on the time—you don’t want to overcook and lose that juicy center.
Tip: If you’re unsure about doneness, use an instant-read thermometer. It takes the guesswork out and ensures that rich, buttery center stays sealed inside.
STEP 6: Let It Rest Before Slicing
This is one of those little steps that makes a big difference. After baking, remove the chicken from the oven and let it rest for 5 minutes before slicing. I know it’s tempting to cut right into it (especially with that butter inside calling your name), but letting it rest allows the juices—and the garlic herb butter—to settle. That means less leaking and more flavor in every bite.
TIPS FOR SUCCESS
Making Chicken Kiev might seem fancy, but with just a few helpful tips, it becomes totally weeknight-friendly. Here are a few things I’ve learned after making this recipe more times than I can count:
-
Seal it tight: Make sure the chicken is sealed well before breading. If needed, use toothpicks to help hold the pocket shut. You can remove them just before serving.
-
Chill the butter thoroughly: Don’t rush this step! If the butter is too soft, it’s more likely to leak during cooking. It should be firm enough to hold its shape when stuffed.
-
Double coat for extra crunch: If you love a super crispy crust, you can do a second dip in the egg and breadcrumbs after the first coat. Just be careful not to make the crust too thick, or it could overpower the delicate butter filling.
-
Use Panko breadcrumbs: These give a nice crunch without being too heavy. If you only have regular breadcrumbs on hand, they’ll still work just fine—just expect a slightly softer texture.
-
Avoid overcrowding the skillet: Fry in batches if needed. Crowding the pan lowers the oil temperature and makes the chicken absorb more oil, which can make the crust soggy.
SERVING SUGGESTIONS
One of the best things about Chicken Kiev is how well it pairs with all kinds of sides. Since it’s rich and buttery, I like to keep the sides simple and fresh.
Here are a few of my go-to pairings:
-
Mashed potatoes: Creamy and smooth, they soak up any extra garlic butter beautifully.
-
Steamed green beans or asparagus: A light veggie side helps balance the richness of the chicken.
-
Lemon rice or herbed couscous: These grains are flavorful without stealing the spotlight.
-
Crisp green salad: A simple vinaigrette and crunchy lettuce make a great contrast to the warm, crispy chicken.
VARIATIONS TO TRY
If you want to play around with flavors or make this dish a little more personalized, here are a few fun variations:
-
Cheesy Kiev: Add a bit of shredded mozzarella or Parmesan to the butter mixture for a melty surprise inside.
-
Spicy twist: Mix in a pinch of red pepper flakes or a dash of hot sauce with the garlic butter for some subtle heat.
-
Herb swap: Don’t have parsley? Try fresh dill, chives, or tarragon for a different flavor profile.
-
Air fryer method: After breading, you can cook the chicken in an air fryer at 375°F for 18-20 minutes, flipping halfway through. Just make sure the butter is sealed tightly to avoid leaks.
Easy Chicken Kiev: A Crispy, Buttery Classic Made Simple
By now, your kitchen probably smells incredible, and if you’ve followed along, you’ve got a plate of golden-brown, butter-filled Chicken Kiev ready to impress. Before we wrap up, let’s tackle some of the most common questions readers have about this recipe. Whether it’s your first time making it or you’re just looking to perfect your technique, these answers should help you feel even more confident.

FREQUENTLY ASKED QUESTIONS
1. How do I keep the butter from leaking out during cooking?
The key is making sure the butter is very cold and the chicken is sealed well. After stuffing, use toothpicks to close the pocket, and press the edges of the chicken together tightly. Also, try not to over-handle the chicken once it’s stuffed—less movement means fewer chances for the seal to break.
2. Can I prepare Chicken Kiev ahead of time?
Yes, absolutely! You can stuff and bread the chicken in advance, then refrigerate it for up to 24 hours before cooking. This actually helps the butter stay cold and the coating set better. Just make sure to bring the chicken out of the fridge about 15–20 minutes before frying so it cooks evenly.
3. What’s the best way to reheat leftovers?
The best method is in the oven. Reheat the Chicken Kiev at 350°F for 15–20 minutes or until warmed through. This helps maintain the crispy coating. Avoid the microwave—it tends to make the breading soggy and can cause the butter to leak out.
4. Can I freeze Chicken Kiev?
Definitely. Once breaded (but before frying), you can freeze the stuffed chicken breasts individually on a baking sheet, then transfer them to a freezer-safe bag or container. When ready to cook, fry from frozen for a couple of minutes longer per side, then bake as usual, adding about 5 extra minutes to the oven time.
5. What can I use instead of parsley in the butter?
Fresh herbs like dill, chives, or tarragon work beautifully. Each gives the dish a slightly different flavor, so you can choose based on what you have on hand or your personal taste.
6. Is there a gluten-free option for this recipe?
Yes! You can use gluten-free flour and gluten-free breadcrumbs to make this recipe suitable for gluten-free diets. Just double-check that all ingredients, including seasonings, are certified gluten-free.
7. Do I have to fry the chicken before baking?
Frying gives the Chicken Kiev its classic crispy texture, but if you prefer to skip frying, you can bake it entirely in the oven. Just brush the breaded chicken with a little oil or melted butter and bake at 375°F for 25–30 minutes, flipping once halfway through. The crust won’t be quite as crispy, but it’ll still be delicious.
FINAL THOUGHTS
If you’ve ever shied away from making Chicken Kiev because it seemed too fussy, I hope this simplified version shows you just how approachable and rewarding it can be. With that golden crust, juicy chicken, and melt-in-your-mouth garlic butter center, it’s one of those dishes that delivers every single time.
Whether you serve it for a weeknight dinner or bring it out for a special occasion, this Easy Chicken Kiev is sure to impress without causing any kitchen stress. And once you’ve made it once, you’ll find yourself craving that crispy, buttery bite again and again.
PrintEasy Chicken Kiev

Easy Chicken Kiev is a simplified take on the classic dish, delivering all the buttery, garlicky goodness with less fuss. A seasoned herb and garlic butter is wrapped inside tender chicken breasts, then breaded and pan-fried to golden perfection. The result is a crispy exterior with a juicy, flavor-packed center that oozes rich butter when sliced.
- Author: Mark's Recipe
Ingredients
Boneless, skinless chicken breasts
Salt and black pepper
Garlic powder
Unsalted butter, softened
Fresh parsley, finely chopped
Minced garlic
Lemon zest (optional)
All-purpose flour
Eggs, beaten
Breadcrumbs
Vegetable oil for frying
Instructions
In a small bowl, combine softened butter, minced garlic, parsley, and lemon zest if using. Mix until smooth and refrigerate until firm enough to shape.
Carefully slice a pocket into the side of each chicken breast, being sure not to cut all the way through.
Divide the chilled garlic butter mixture and stuff it into each chicken pocket. Press the edges to seal, using toothpicks if necessary to hold it closed.
Season the outside of the chicken with salt, pepper, and garlic powder.
Dredge each chicken breast in flour, dip into the beaten eggs, then coat evenly in breadcrumbs, pressing to adhere.
Heat oil in a skillet over medium heat. Fry the chicken on each side until golden brown and crispy, about 3 to 4 minutes per side.
Transfer the chicken to a preheated oven at 375°F and bake for 15 to 18 minutes, or until fully cooked and the internal temperature reaches 165°F.
Let rest briefly before serving to allow the butter to settle inside.
Notes
To prevent the butter from leaking, ensure the chicken is well sealed and the butter mixture is cold before stuffing.
Panko breadcrumbs can be used for extra crunch.
Chicken Kiev pairs well with mashed potatoes, rice, or a crisp green salad.
Leftovers can be reheated in the oven to preserve the crispy texture. Avoid microwaving to keep the crust from becoming soggy.


")
