If there’s one thing I absolutely love when it comes to casual get-togethers or low-fuss dinners, it’s a recipe that’s as fun as it is flavorful. That’s exactly what you get with Doritos Walking Tacos. These little handheld taco bags are totally genius—no plates required, minimal cleanup, and everyone gets to customize their own. Whether it’s a backyard BBQ, a birthday bash, or a simple weeknight dinner with the kids, these walking tacos bring smiles (and full bellies) every time.
I first tried these at a school fundraiser, and I was instantly hooked. I mean, who could resist crunchy chips, warm seasoned taco meat, melty cheese, and all your favorite toppings, all tucked into a single-serving Doritos bag? It’s like taco night, but with way less mess—and way more fun. Ever since then, they’ve been my go-to for everything from game day snacks to family movie nights.
Let’s break it down step by step so you can whip up your own batch of these delicious, portable tacos.
Ingredients You’ll Need
Here’s what you’ll need to pull together your walking tacos. This recipe serves about six, but it’s easy to double or triple for a crowd.
-
1 pound ground beef or ground turkey
-
1 packet taco seasoning
-
⅔ cup water
-
6 individual bags of Doritos (nacho cheese or your favorite flavor)
-
1 cup shredded cheddar cheese
-
1 cup shredded lettuce
-
½ cup diced tomatoes
-
¼ cup sliced jalapeños (optional)
-
¼ cup sour cream
-
¼ cup salsa or taco sauce
Optional Toppings: Guacamole, sliced black olives, diced onions, hot sauce—feel free to get creative!
STEP 1: Cook the Taco Meat
Start by browning your ground beef or turkey in a large skillet over medium heat. Use a spatula to break the meat into crumbles as it cooks. This usually takes about 7 to 8 minutes. Once the meat is fully cooked, go ahead and drain off any extra grease.
Now it’s time to add that classic taco flavor. Sprinkle in your taco seasoning and pour in the water. Stir it all together and let it simmer for about 4–5 minutes, or until it thickens up nicely. Once it’s ready, take it off the heat and set it aside—you’ll be assembling the tacos soon!

STEP 2: Prep the Doritos Bags
This step is where the magic happens. Grab your individual Doritos bags—nacho cheese is the fan-favorite around here, but you can use any flavor you like. Gently crush the chips in each bag just a bit. You don’t want powder—just bite-sized pieces so it’s easier to dig in with a fork.
Carefully open each bag across the top (not the side). You want enough room to add all the tasty toppings.
STEP 3: Assemble Your Walking Tacos
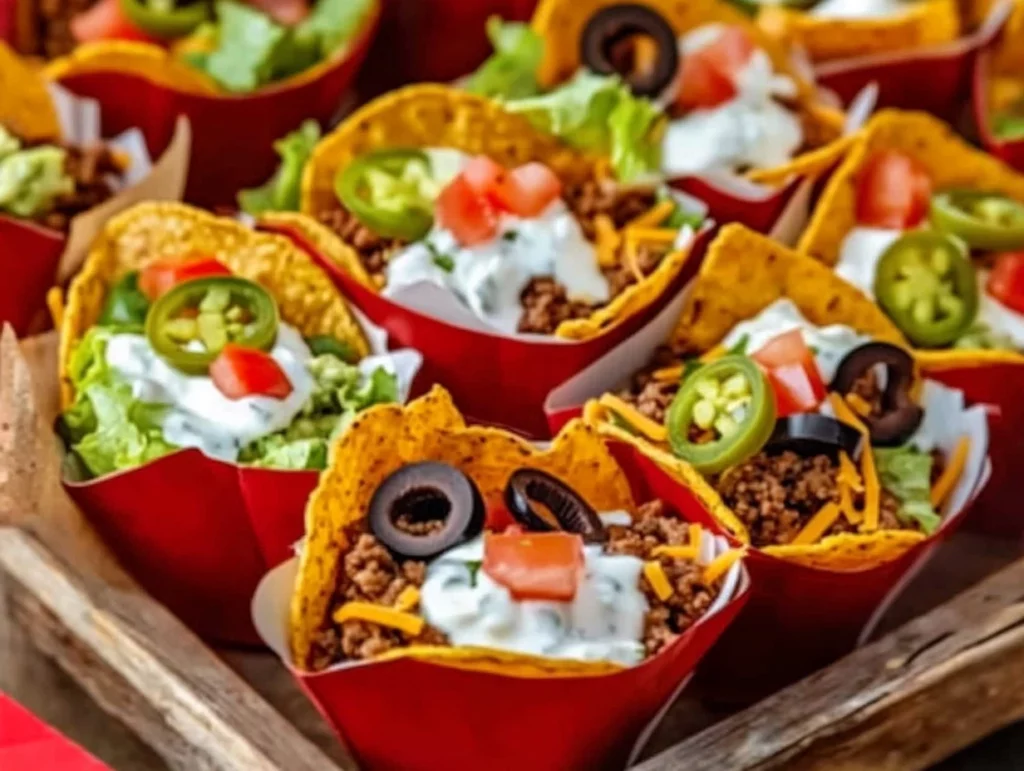
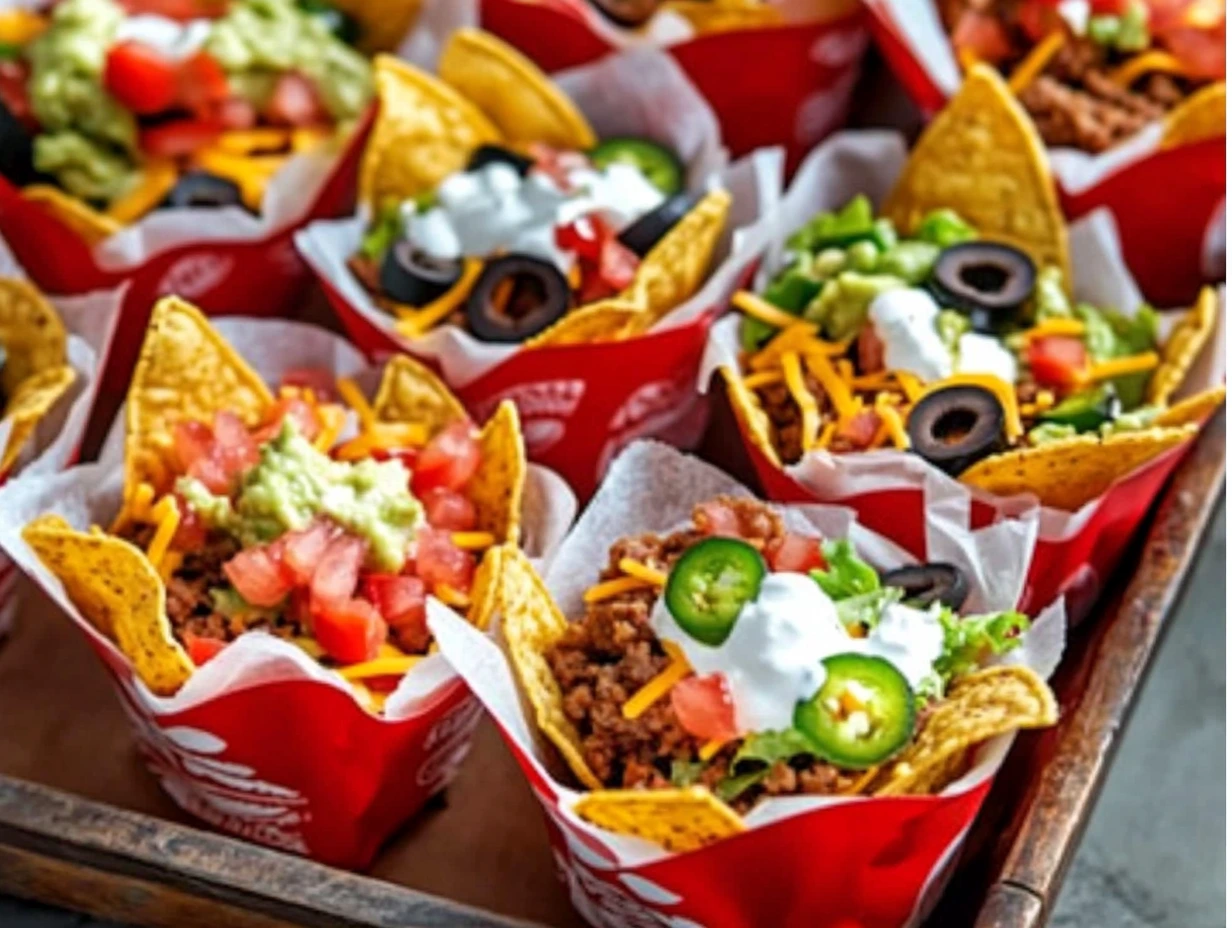
Now comes the fun part. Spoon a generous portion of your seasoned taco meat right over the crushed chips in each bag. Then go wild with the toppings—shredded cheese, crunchy lettuce, juicy tomatoes, spicy jalapeños, a dollop of sour cream, and a drizzle of salsa or taco sauce. Honestly, the combos are endless.
And just like that, you’re ready to dig in! Hand each person a fork and let them enjoy their taco straight from the bag. No plates, no cleanup, just pure taco joy.
Tips, Tricks, and Variations
By now, you’ve got the basics down: seasoned meat, crunchy chips, and all the taco toppings you love—packed right into a Doritos bag. But let’s take it a step further. Whether you’re prepping for a big party or just want to keep things simple during a busy weeknight, I’ve got some tips that’ll help you serve these up like a pro.
Honestly, the beauty of Doritos Walking Tacos is how easy they are to customize. You can tweak them to suit picky eaters, go vegetarian, or even give them a little heat for those who like it spicy. Let’s jump back into the next steps and some helpful tricks that’ll make these walking tacos even better.
STEP 4: Keep the Taco Meat Warm
If you’re serving a crowd or planning to eat later, it’s a great idea to prep the taco meat ahead of time. Just brown and season the meat as outlined in Part 1, then transfer it to a slow cooker on the warm setting. This way, it stays hot and ready to serve whenever your guests are ready to dive in.
Hosting outdoors or heading to a potluck? An insulated food container works wonders for keeping the meat warm on the go. Just pack your toppings separately in small containers or baggies for easy assembly.
STEP 5: Create a DIY Taco Bar
Setting up a build-your-own walking taco station is always a hit. Line up the Doritos bags at the start of your table, followed by a few bowls of meat and all your toppings. This lets everyone build their perfect taco combo—and you don’t have to play short-order cook.
A few helpful setup tips:
-
Use a muffin tin to organize smaller toppings like jalapeños, diced onions, and olives.
-
Set out plastic forks, napkins, and disposable spoons for easy serving.
-
Provide a few topping suggestions on small note cards for inspiration!
STEP 6: Switch Up the Flavor
You don’t have to stick with just nacho cheese Doritos—though they’re definitely a classic. Try mixing it up with other flavors like:
-
Cool Ranch – for a tangy twist
-
Flamin’ Hot – if you love a spicy kick
-
Spicy Sweet Chili – a fun sweet-and-spicy combo
Not into Doritos? Use regular corn chips, tortilla chips, or even cheese puffs if you’re feeling adventurous. This recipe works great with any crunchy snack as the base.
STEP 7: Make It Vegetarian or Vegan
These walking tacos are super easy to adapt for different diets:
-
Vegetarian option: Swap the ground meat for black beans, pinto beans, or lentils. You can sauté them with taco seasoning just like you would with meat.
-
Vegan version: Use plant-based meat crumbles and dairy-free toppings like vegan cheese and sour cream.
Even carnivores won’t miss the meat when the flavors are this good!
Pro Tips for the Best Walking Tacos
-
Don’t over-crush the chips: You want small, bite-sized pieces—not crumbs. Give each bag a gentle squeeze or two.
-
Use fresh toppings: Crisp lettuce, ripe tomatoes, and shredded cheese go a long way in making these taste just like a classic taco.
-
Label the bags: If you’re serving different chip flavors or want to track dietary restrictions, a little masking tape and a marker are lifesavers.
-
Serve immediately: Once the toppings are added, the chips will start to soften. For the perfect crunch, serve and eat right away.
FAQs and Final Thoughts
By now, you’ve got all the steps down for making Doritos Walking Tacos a hit in your home or at your next get-together. These portable, flavor-packed snacks are not only incredibly fun to eat but also a breeze to make and serve.
Before we wrap up, let’s go over some of the most common questions I get asked about this recipe. Whether you’re trying it for the first time or just looking for a few pro tips, this FAQ section has you covered.
Frequently Asked Questions
1. Can I make the taco meat ahead of time?
Absolutely. You can brown and season the meat up to two days in advance. Just store it in an airtight container in the fridge and reheat it on the stove or in a slow cooker when you’re ready to serve.
2. What are the best chips to use for walking tacos?
Nacho cheese Doritos are the classic choice, but Cool Ranch, Spicy Sweet Chili, or even regular corn chips like Fritos or tortilla chips work great too. Just make sure you’re using individual snack-size bags.
3. Can I make these in bulk for a party or event?
Yes! Walking tacos are perfect for feeding a crowd. Prepare a large batch of taco meat and set up a taco bar with different toppings and chip options. Guests can grab a bag, add their favorite toppings, and dig in.
4. What can I use instead of ground beef?
Ground turkey is a great leaner option. For vegetarians, black beans, pinto beans, or lentils seasoned with taco spices work beautifully. You can also use plant-based meat alternatives if you prefer.
5. How can I keep everything hot during a gathering?
Keep the taco meat warm in a slow cooker or insulated container. Place toppings like cheese and sour cream in bowls over ice if you’re outside or in warm temps. Let everyone build their own taco just before eating for the freshest results.
6. Can I make a healthier version of walking tacos?
Definitely. Choose a baked chip option, use lean ground turkey or plant-based protein, and load up on fresh veggies like lettuce, tomatoes, and avocado. You can also skip heavier toppings like sour cream or cheese if you want to cut back.
7. Do I have to eat them straight from the bag?
Not at all. If you prefer, you can dump the contents into a bowl or plate. But part of the fun is eating them straight out of the chip bag with a fork—just be careful not to squeeze too hard or you’ll end up with a taco explosion!
Final Thoughts: Why You’ll Love Doritos Walking Tacos
There’s just something magical about a meal that’s easy, fun, and totally satisfying—and Doritos Walking Tacos check every box. Whether you’re feeding a big group or just trying to get dinner on the table without creating a pile of dirty dishes, this recipe brings major flavor with minimal effort.
I love how flexible this recipe is, too. You can make it spicy or mild, meaty or meatless, indulgent or lighter—it all depends on what you and your crew are in the mood for. And because each taco is built right in the bag, it’s hands-down one of the easiest meals to serve and clean up.
If you give these a try, I’d love to hear how they turned out! Did you go classic with nacho cheese and sour cream, or try a totally new combo? Share your take in the comments or tag your photos—you might just inspire someone else to try them too.
PrintDoritos Walking Tacos

Homemade Raspberry Jam is a sweet and slightly tart preserve that’s bursting with fresh berry flavor. With just a few ingredients and no need for pectin, this jam is perfect for spreading on toast, spooning over yogurt, or gifting in small jars. Simple, quick, and utterly delicious.
- Author: Mark's Recipe
Ingredients
4 cups fresh or frozen raspberries
1 ½ cups granulated sugar
1 tablespoon lemon juice
1 teaspoon lemon zest (optional, for extra brightness)
Instructions
In a large saucepan, combine the raspberries, sugar, lemon juice, and zest if using. Stir to combine and let sit for 5 minutes to allow the sugar to start dissolving.
Place the saucepan over medium heat and bring the mixture to a boil, stirring frequently.
Continue boiling gently for 15–20 minutes, stirring often and mashing some of the berries with the back of a spoon, until the mixture thickens and reaches a jam-like consistency.
To test the jam, place a small spoonful on a chilled plate and let it sit for a minute—if it wrinkles when you push it, it’s ready.
Remove the pan from heat and let the jam cool slightly. Transfer to clean jars and let cool completely before sealing.
Store in the refrigerator for up to 3 weeks or process in a water bath for longer shelf life.
Notes
You can strain out the seeds using a fine mesh sieve after cooking if you prefer a smoother jam. Adjust sugar to taste depending on the sweetness of your berries. This jam also freezes well—just leave some space at the top of the container for expansion.


")
