If there’s one thing I can always count on to make my family smile at the dinner table, it’s this Cheesy Taco Rice. It’s cozy, filling, and packed with those classic taco flavors that everyone seems to love—only this time, it’s all happening in one skillet. That means no taco shells to fall apart, no mess all over the counter, and definitely no stack of dishes to tackle afterward. It’s a total weeknight win!
Now, if you’re like me and constantly hunting for meals that check all the boxes—easy, budget-friendly, picky-eater approved—this one’s going to become a regular in your rotation. The combo of seasoned ground beef, tender rice, melty cheese, and a kick from the salsa just hits the spot. And the best part? You can tweak it however you like. Use ground turkey instead of beef, add in black beans, throw in some chopped bell peppers… the possibilities are endless.
Let me walk you through exactly how to make this crowd-pleasing dish. We’ll keep it simple, straightforward, and stress-free—because dinner should never feel like a chore.
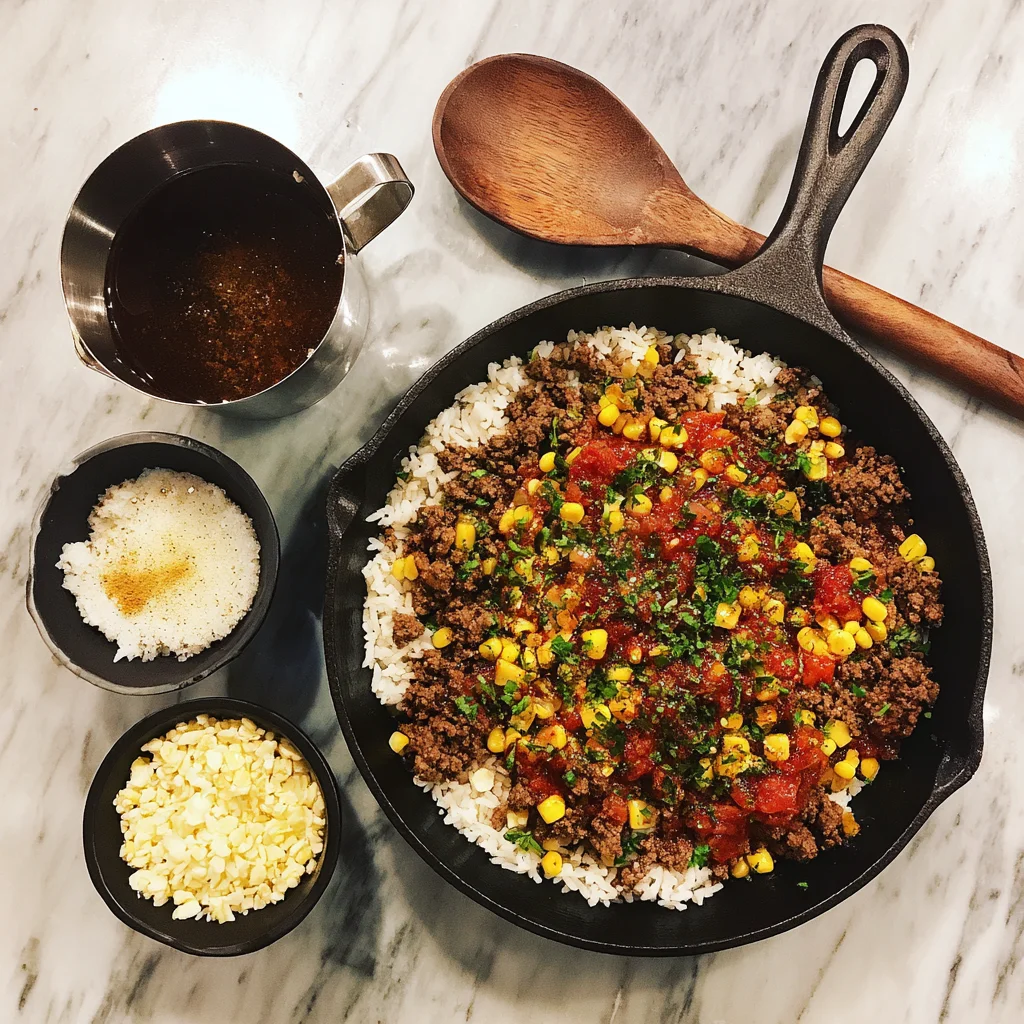
Ingredients You’ll Need
-
1 tablespoon olive oil
-
1 pound ground beef
-
1 small onion, diced
-
2 cloves garlic, minced
-
1 packet taco seasoning
-
1 cup long-grain white rice
-
2 cups beef broth or water
-
1 cup canned corn, drained
-
1 cup salsa
-
1 ½ cups shredded cheddar or Mexican blend cheese
-
Salt and black pepper to taste
-
Optional toppings: fresh cilantro, green onions, sour cream
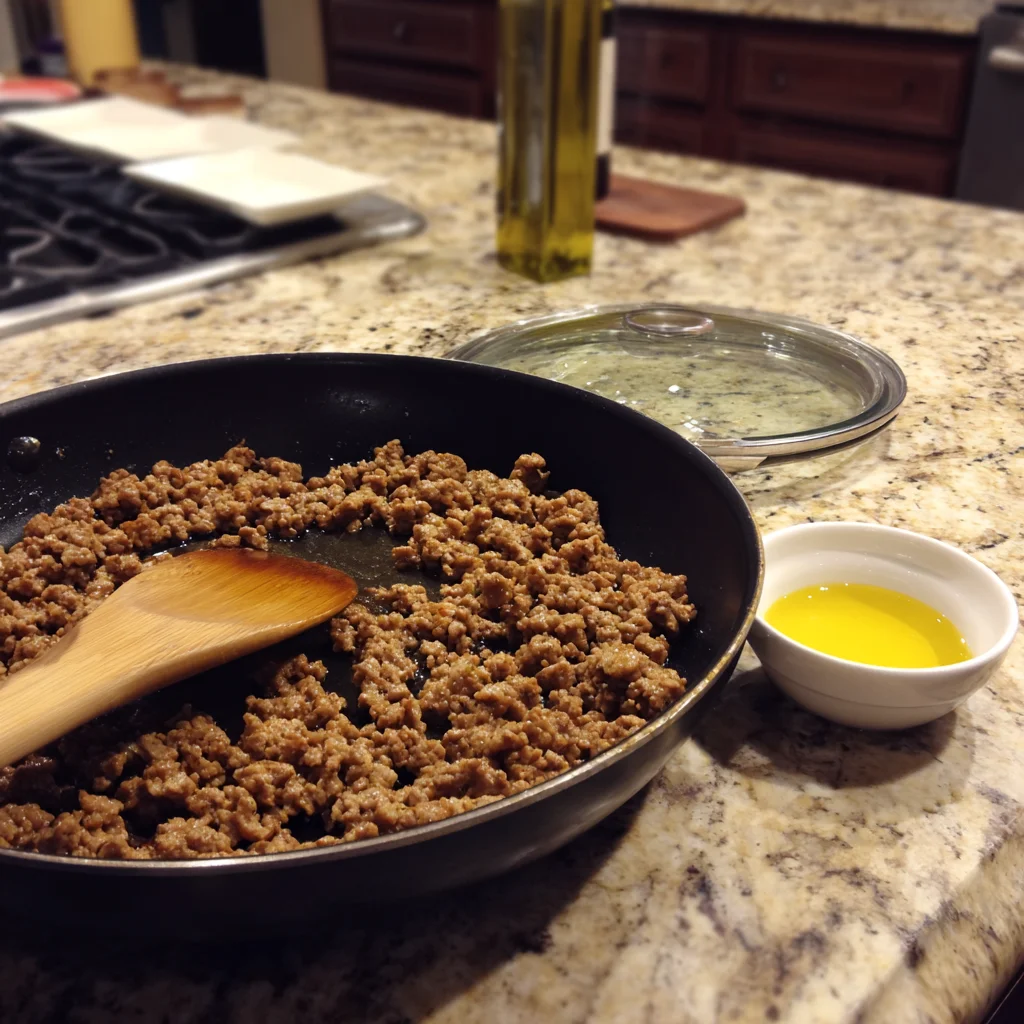
STEP 1: Brown the Ground Beef
First things first—grab a large, deep skillet and heat a tablespoon of olive oil over medium heat. Add your ground beef and cook it until it’s completely browned, breaking it apart as it cooks. If there’s a lot of grease in the pan, go ahead and drain off the excess fat. We want flavor, not grease puddles.
This is also where the kitchen starts to smell pretty amazing. There’s something about that sizzling beef that instantly gets everyone peeking into the kitchen, asking, “What’s for dinner?”

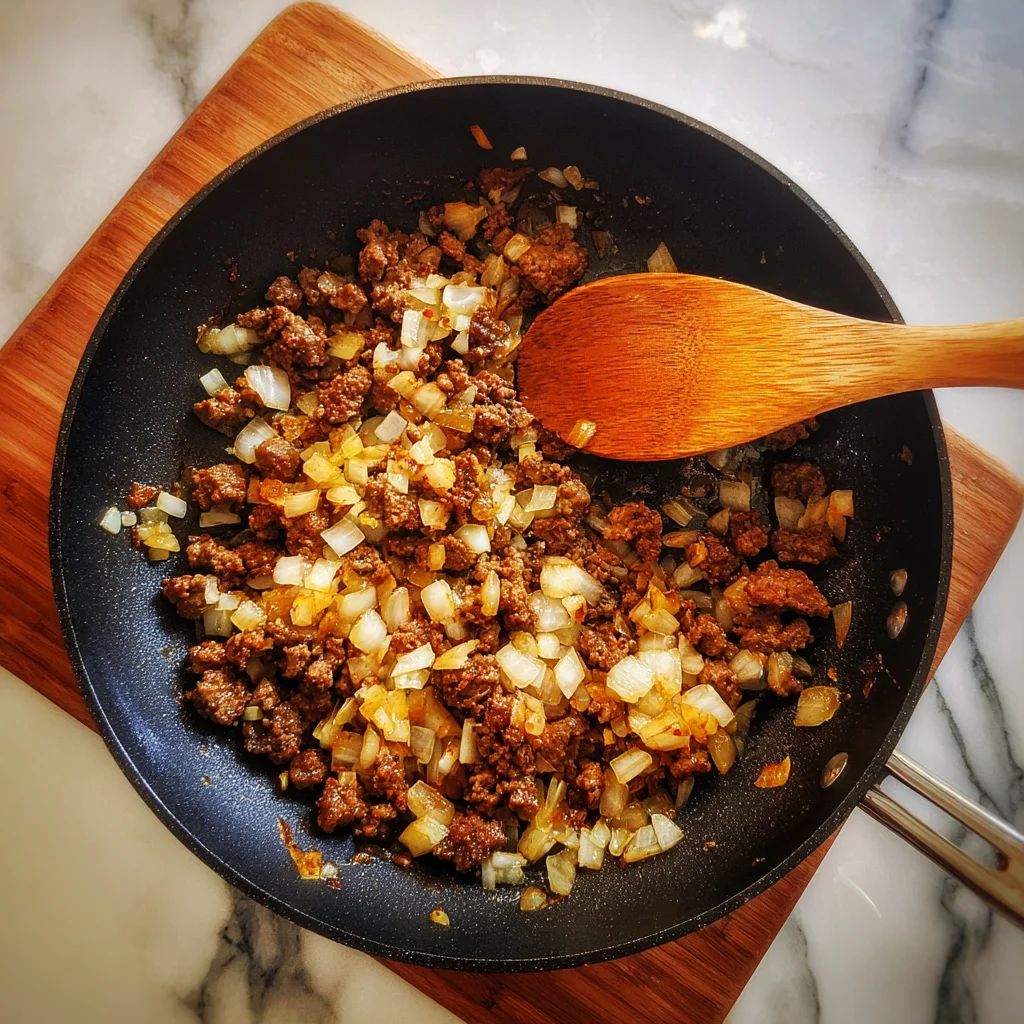
STEP 2: Add Onion and Garlic
Once the beef is cooked, toss in your diced onion and minced garlic. Cook it all together for another 2–3 minutes until the onion starts to soften and the garlic becomes fragrant. This step builds a lot of the flavor base, so don’t skip it!
If you’re feeling a little spicy, you can even add in a chopped jalapeño here for some heat.
STEP 3: Bring on the Taco Flavor
Now it’s time for that classic taco kick. Stir in one packet of taco seasoning, making sure it evenly coats the beef and onions. You can use a store-bought packet or your favorite homemade blend if you’ve got one. Personally, I keep a few packets on hand at all times for quick dinners like this one.
Immediately after adding the seasoning, stir in the uncooked rice, beef broth (or water), corn, and salsa. Everything comes together right in the skillet. Give it all a good stir to combine.
This is where the magic happens—you’re layering flavor upon flavor in a single pan. The rice soaks up all that delicious broth and seasoning while cooking, and the salsa adds a tangy kick that really brightens everything up.
STEP 4: Simmer to Perfection
Once everything’s mixed together, bring the skillet to a gentle simmer. Lower the heat to low, cover with a lid, and let it cook undisturbed for about 18 to 20 minutes. Be sure to check in once or twice and give it a gentle stir just to make sure nothing’s sticking to the bottom.
By the time the rice is tender and the liquid has been absorbed, you’re going to have one seriously satisfying skillet full of taco goodness. But don’t worry—we’re not done yet. There’s cheese involved. Lots of it.
Finish Strong with Melty Cheese & Easy Add-Ins
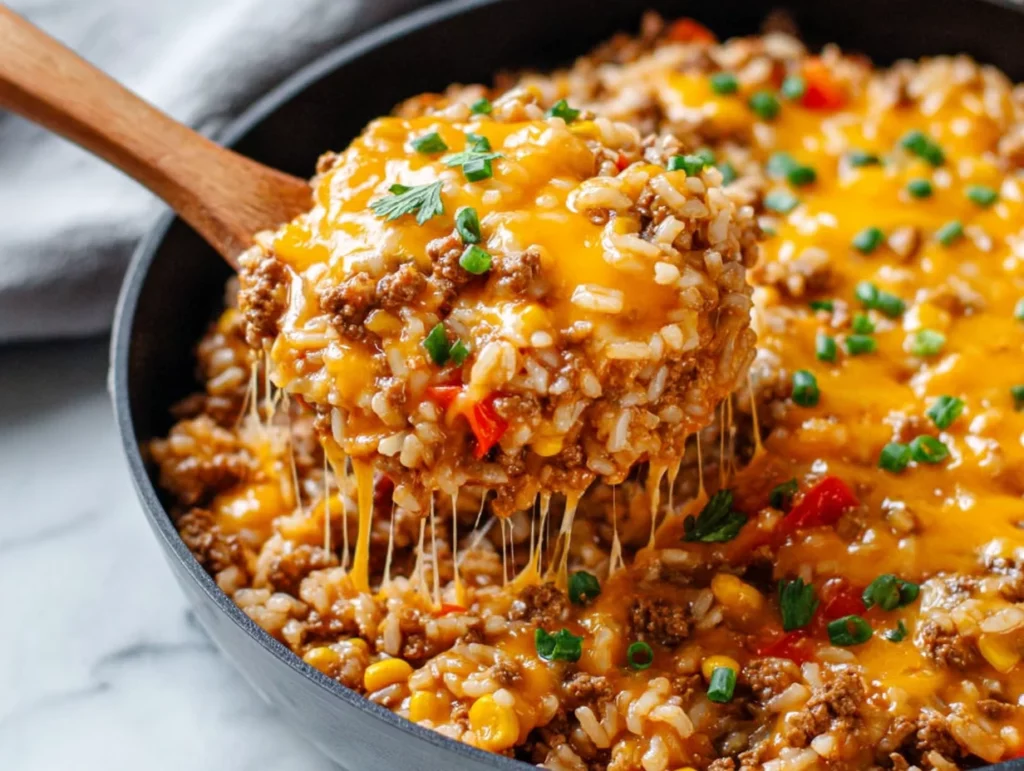
Now that your rice is perfectly tender and all those bold taco flavors have simmered into the dish, it’s time for the best part—the cheese. This is what takes Cheesy Taco Rice from a tasty skillet dinner to total comfort food territory. Melty, gooey, and completely irresistible.
If you’re cooking for cheese lovers (and let’s be real—who isn’t?), you might want to go a little heavier with the cheese. This dish is super forgiving, and it’s all about what you and your crew like best.
Let’s jump back into the final steps and then talk about some quick tips and variations to help you make this recipe your own.
STEP 5: Stir in the Cheese
Once the rice is cooked through and there’s no liquid left in the skillet, go ahead and remove it from the heat. Now, stir in half of your shredded cheese—that’s about ¾ cup if you’re sticking to the recipe. You’ll see it start to melt right into the hot rice and beef, making everything creamy and extra satisfying.
Use a good-quality cheddar or Mexican blend cheese here. You want something that melts easily but also adds that classic cheesy flavor. If you’re using pre-shredded cheese, give it a quick fluff before adding it to avoid clumps.
STEP 6: Add the Final Cheese Layer
Sprinkle the remaining ¾ cup of cheese evenly over the top of the rice. Then, cover the skillet again (you don’t need to turn the heat back on) and let it sit for 2–3 minutes. The residual heat will melt that final layer of cheese into a perfectly gooey topping.
There’s just something about lifting that lid and seeing all that melty cheese on top—it’s the kind of thing that makes you want to dive right in with a spoon.
STEP 7: Top and Serve
Now comes the fun part: toppings! You can keep it simple, or go all out depending on your mood (or what’s in the fridge).
Here are a few topping ideas that work really well with this dish:
-
Fresh chopped cilantro
-
Sliced green onions
-
A dollop of sour cream
-
A drizzle of hot sauce for some kick
-
Sliced avocado or a spoonful of guacamole
Scoop it into bowls and serve hot. It’s the kind of meal that makes people go quiet for a minute because they’re too busy enjoying it.
Tips & Variations to Make It Your Own
One of the best things about this recipe is how flexible it is. Once you’ve made it once, you’ll start to come up with your own favorite ways to mix it up. Here are some of my go-to tips and variations:
Make It Lighter
-
Swap the ground beef for lean ground turkey or chicken. It still tastes amazing but cuts down on fat and calories.
-
Use reduced-fat cheese if you’re looking to lighten it up a bit.
Add Extra Veggies
-
Stir in chopped bell peppers, zucchini, or even a handful of spinach when you add the onions and garlic.
-
Toss in a drained can of black beans with the corn to bulk it up with more fiber and protein.
Spice It Up
-
Use a spicy salsa or add a diced jalapeño with the onion for extra heat.
-
A sprinkle of crushed red pepper flakes or a few dashes of hot sauce also do the trick.
Get Creative with Leftovers
-
Use leftovers as a filling for burritos or tacos.
-
Stuff it into bell peppers, top with cheese, and bake for an easy second-day meal.
-
Reheat and top with a fried egg for a savory, Tex-Mex-style breakfast.
FAQs & Final Thoughts
By now, you’ve got the full rundown on how to make this Cheesy Taco Rice skillet from start to finish. Whether it’s for a quick weeknight dinner, a casual get-together, or a meal prep session for the week ahead, this recipe has you covered.
Before we wrap things up, I want to answer a few of the most common questions that tend to come up with this kind of one-skillet meal. From rice swaps to storage tips and make-ahead advice, this FAQ section is here to help you feel confident every step of the way.

Frequently Asked Questions
Can I use brown rice instead of white rice?
Yes, but with a few adjustments. Brown rice takes longer to cook and requires more liquid. You’ll need to increase the simmer time to about 35–40 minutes and possibly add another ½ cup of broth or water. Make sure to keep the lid on tightly and stir occasionally to prevent sticking.
Can I make this ahead of time?
Absolutely! Cheesy Taco Rice is a great make-ahead dish. You can prepare it completely, let it cool, and store it in an airtight container in the fridge for up to 4 days. Reheat on the stove or in the microwave. You might want to add a splash of broth or water when reheating to bring back the moisture.
Can I freeze Cheesy Taco Rice?
Yes, it freezes well. Let it cool completely, then transfer it to a freezer-safe container. Freeze for up to 2 months. To reheat, thaw overnight in the fridge and warm it up on the stove or in the microwave. Again, a little added liquid will help bring it back to life.
What kind of salsa works best?
Any salsa you enjoy eating will work here. I usually use a chunky, medium-heat red salsa, but green salsa (salsa verde) or even a smoky chipotle version would be delicious. Just avoid anything too watery, or the rice might end up mushy.
Is this recipe spicy?
As written, it’s mild to medium, depending on the salsa and taco seasoning you use. If you want it spicier, go for a hot salsa, use spicy taco seasoning, or add chopped jalapeños when sautéing the onions.
Can I use pre-cooked rice instead of uncooked rice?
This recipe is designed for uncooked rice to absorb all the flavors as it cooks. If you only have pre-cooked rice, you can still make it work—but reduce the liquid significantly and shorten the cooking time. Add the rice once the meat and other ingredients are cooked and just heat it through.
What can I serve with Cheesy Taco Rice?
Honestly, it’s a full meal on its own. But if you’re feeding a crowd or just want to round it out a bit, try serving it with tortilla chips, a side salad, or some roasted veggies. You could also wrap it in tortillas for quick burritos.
Final Thoughts: Your New Weeknight Favorite
There’s just something so satisfying about a hot skillet full of Cheesy Taco Rice. It’s cozy, filling, and packed with flavor—without being fussy or complicated. You can pull it together in about 30 minutes with pantry staples, and it always hits the spot. Whether you’re serving it to your family, doubling the recipe for guests, or using leftovers for a killer burrito lunch the next day, it just works.
This recipe is one of those trusty “back-pocket” meals that you’ll turn to again and again. And because it’s so customizable, you can make it a little different every time and never get bored.
PrintCheesy Taco Rice

Cheesy Taco Rice is a simple, one-pan meal loaded with bold taco flavor, seasoned ground beef, tender rice, and melted cheese. It’s a comforting and satisfying dinner that comes together quickly and hits all the notes of a classic taco night—without the mess. Perfect for busy weeknights, meal prep, or casual family dinners, it’s easy to customize and endlessly craveable.
- Author: Mark's Recipe
Ingredients
1 tablespoon olive oil
1 pound ground beef
1 small onion, diced
2 cloves garlic, minced
1 packet taco seasoning
1 cup long-grain white rice
2 cups beef broth or water
1 cup canned corn, drained
1 cup salsa
1 ½ cups shredded cheddar or Mexican blend cheese
Salt and black pepper to taste
Fresh cilantro, sour cream, or green onions for topping (optional)
Instructions
1 Heat olive oil in a large skillet over medium heat. Add the ground beef and cook until browned, breaking it apart with a spatula. Drain excess grease if necessary.
2 Add the diced onion and garlic to the skillet and cook for 2 to 3 minutes, until softened and fragrant.
3 Stir in the taco seasoning, uncooked rice, beef broth, corn, and salsa. Bring to a simmer, then reduce heat to low and cover the skillet with a lid.
4 Let it simmer gently for 18 to 20 minutes, or until the rice is tender and the liquid is absorbed. Stir occasionally to prevent sticking.
5 Once the rice is cooked, remove the skillet from heat. Stir in half of the shredded cheese until melted and creamy.
6 Sprinkle the remaining cheese over the top and cover the skillet for a few minutes to allow the cheese to melt.
7 Serve hot, topped with fresh cilantro, green onions, or a dollop of sour cream if desired.
Notes
You can substitute ground turkey or chicken for a lighter version. For extra spice, use hot salsa or add a diced jalapeño with the onion. This dish works great for leftovers and can be turned into burrito filling or a taco-stuffed pepper mix the next day. If you prefer a creamier texture, stir in a spoonful of sour cream or cream cheese at the end.


")
