If you’re anything like me, there’s something downright irresistible about the combination of warm, melty chocolate and buttery pie crust. And when it comes straight out of the oven and gets that perfect scoop of vanilla ice cream on top? Game over. That’s exactly what makes this Hot Fudge Pie one of my all-time favorite desserts to whip up when I’m craving something indulgent, yet simple enough to pull together on a cozy night in.
This pie hits all the right notes—it’s rich, velvety, just the right amount of fudgy, and baked into a flaky crust that holds everything together like a chocolatey dream. It’s basically like serving up a slice of warm brownie batter in pie form. Honestly, it doesn’t get better than that.
I first made this hot fudge pie on a whim for a dinner party, and I still remember the silence at the table after the first bite—followed quickly by everyone asking for seconds. That’s when I knew I had a winner on my hands. And the best part? It’s surprisingly easy to make. No fancy equipment. No complicated steps. Just good-quality ingredients and a little chocolate magic.
Let’s jump in and get started on this gooey chocolate wonder!
Ingredients You’ll Need
-
9-inch unbaked pie crust
-
8 ounces semisweet chocolate, chopped
-
1 cup heavy cream
-
½ cup packed brown sugar
-
2 tablespoons unsalted butter, cut into pieces
-
2 large eggs, room temperature
-
1 teaspoon vanilla extract
-
Pinch of salt
-
Whipped cream or vanilla ice cream for serving (optional)
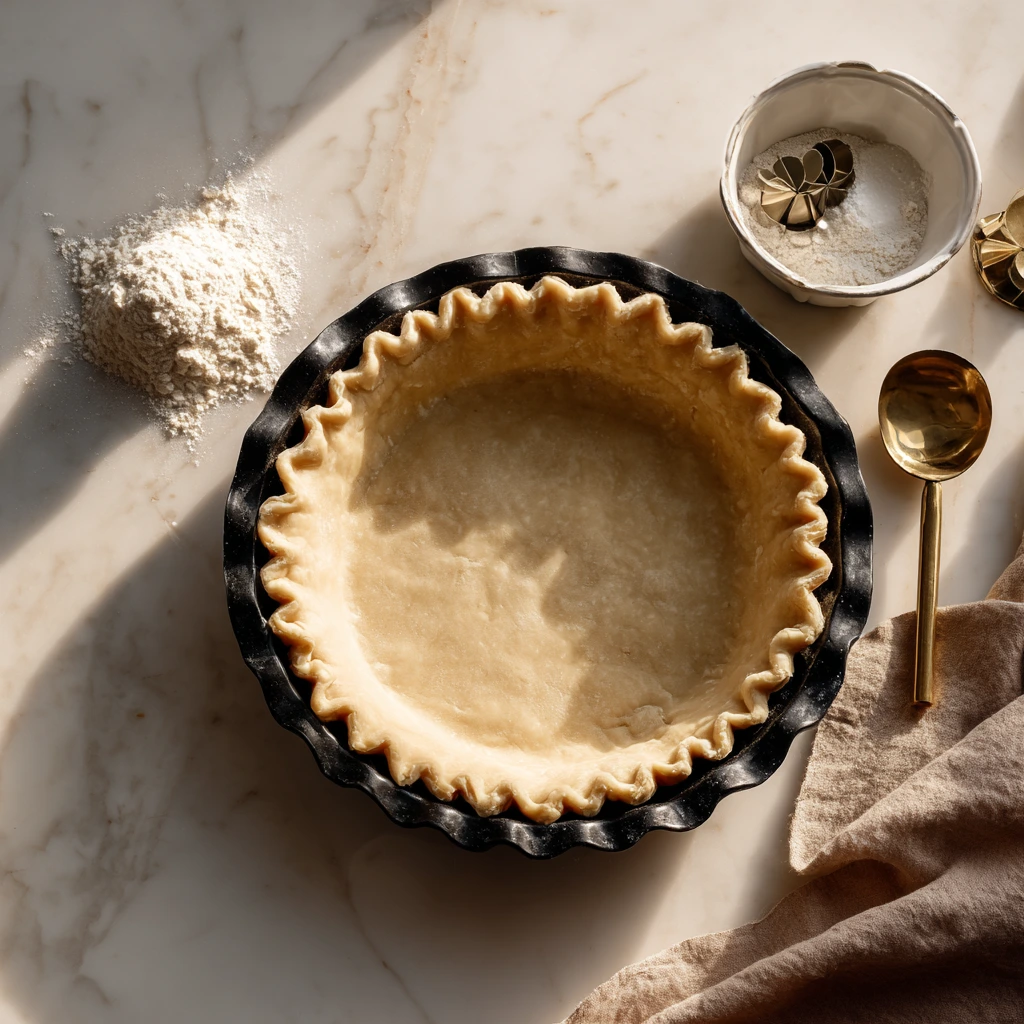
STEP 1: Pre-Bake the Crust
Before we dive into all the chocolaty goodness, we need to make sure our pie crust is ready to go. Preheat your oven to 350°F and fit your unbaked pie crust into a 9-inch pie pan. Take a few moments to crimp the edges—this not only makes it look pretty, but helps the crust hold its shape while baking.
To prevent the crust from puffing up, line it with parchment paper and fill it with pie weights or dried beans. Bake for about 12 minutes, until the edges just begin to turn a light golden color. Remove the weights and parchment, then pop the crust back in the oven for another 5 minutes to let the bottom firm up.
This step makes a big difference in the final texture of your pie. You want a crust that’s crisp enough to hold that luscious filling without getting soggy.
![]()
STEP 2: Melt the Chocolate Filling
While your crust is baking, let’s get that hot fudge filling started. In a heatproof bowl, combine the chopped semisweet chocolate, heavy cream, brown sugar, and butter. Set the bowl over a saucepan of gently simmering water (you’re basically creating a double boiler here) and stir until everything is melted and completely smooth.
Once the mixture is silky and glossy, take it off the heat and let it cool for about 2 minutes. You want it warm—but not hot—before you add the eggs, otherwise, you risk scrambling them. And nobody wants bits of cooked egg in their pie.
STEP 3: Whisk the Eggs and Combine
In a separate bowl, whisk your eggs until they’re pale and slightly frothy—this helps create that light, custard-like texture. Slowly, and I mean slowly, pour the warm chocolate mixture into the eggs while whisking constantly. This gradual tempering process ensures a smooth, creamy filling without any curdling.
Once everything is combined, stir in the vanilla extract and a pinch of salt. You should have a shiny, uniform filling that smells absolutely amazing.
Hot Fudge Pie: Gooey, Fudgy Perfection
Now that we’ve got our crust pre-baked and our hot fudge filling whipped into a glossy, chocolatey dream, it’s time to bring this dessert together and finish it off in the oven. This next part is quick and simple, but it’s where all the magic happens.
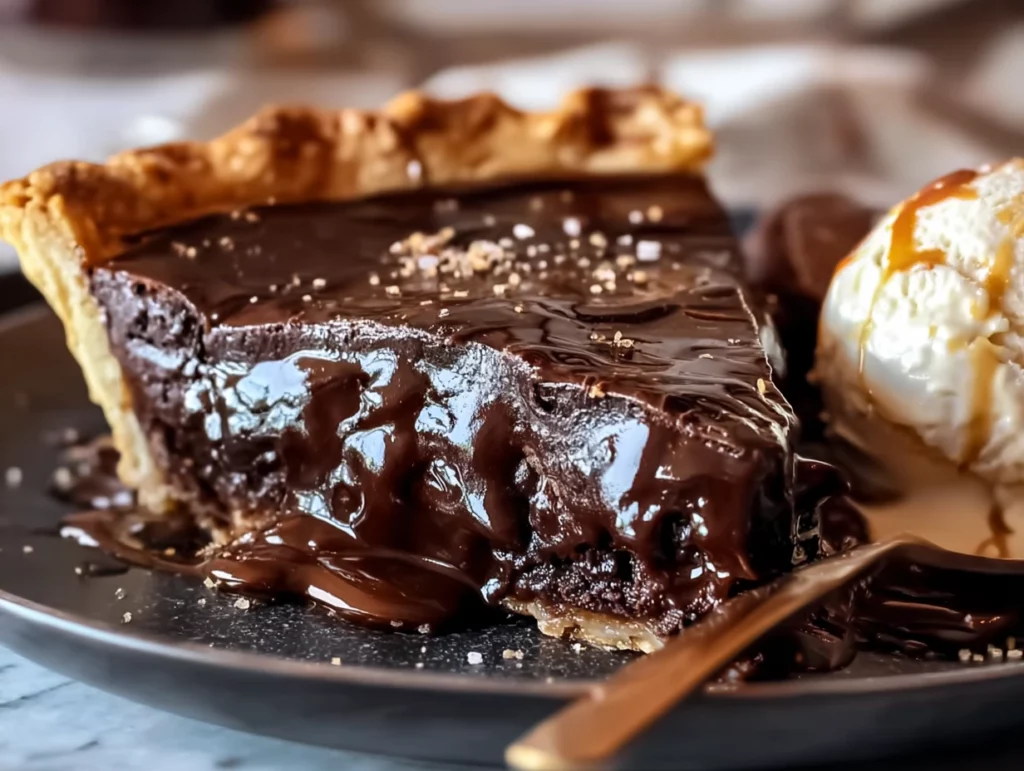
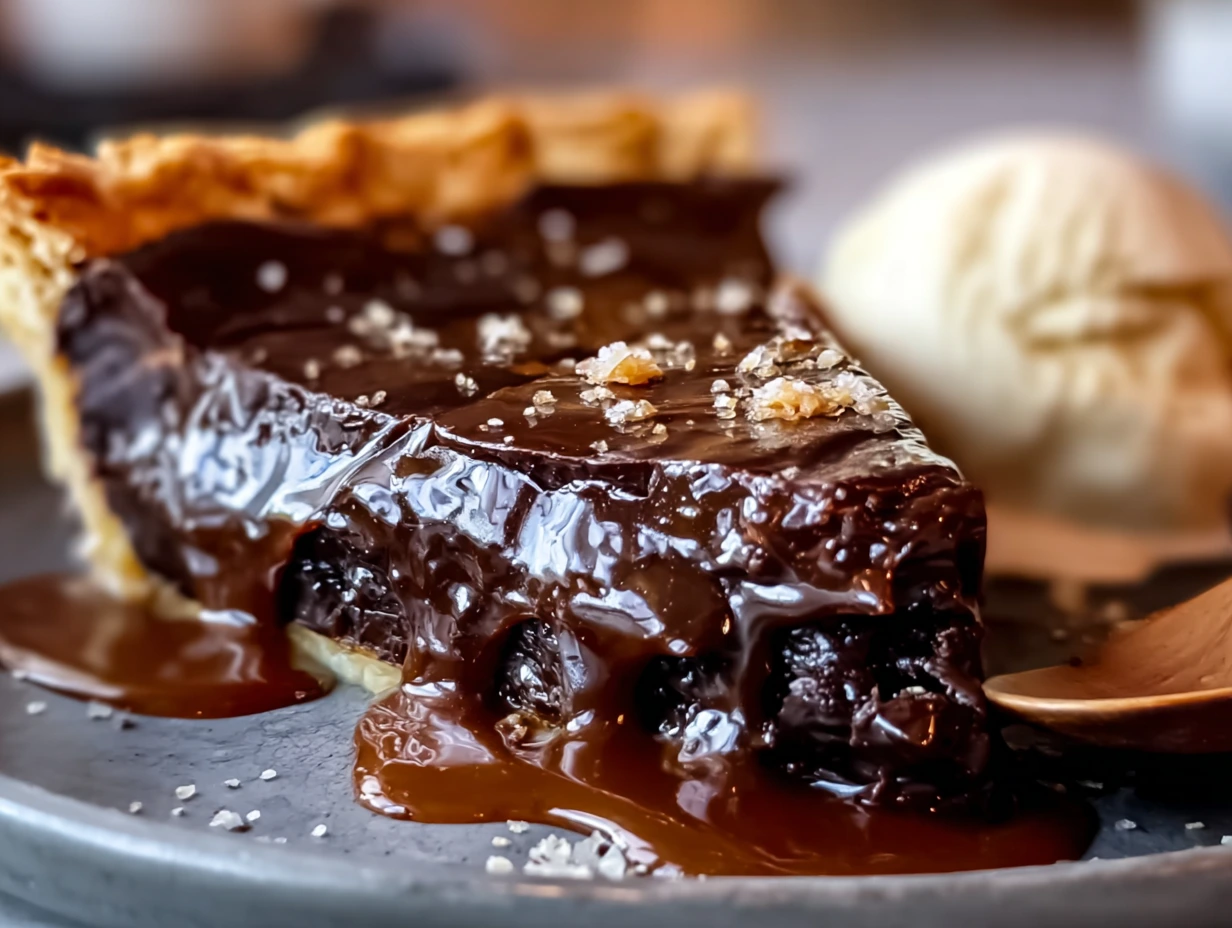
This pie is designed to be served warm, just slightly set in the center so it stays gooey and soft, with that unmistakable hot fudge texture. It’s the kind of dessert that doesn’t need frosting or fancy toppings—just a spoon and maybe some vanilla ice cream to cut through the richness.
Let’s pick up right where we left off and get that pie into the oven.
STEP 4: Fill and Bake the Pie
Now that your crust is golden and your filling is smooth and ready, it’s time to assemble. Carefully pour the warm chocolate mixture into your pre-baked crust. Use a rubber spatula to smooth out the top—this will help it bake evenly.
Slide the pie into the 350°F oven and bake for about 18 to 22 minutes. You’re looking for a center that is just set but still slightly wobbly when you give the pan a gentle shake. That soft center will firm up just enough as the pie cools, but still keep its fudgy texture.
Whatever you do, don’t overbake it. The gooey middle is what makes this pie so special, and baking it too long will give it more of a dense brownie texture—still delicious, but not quite the same.
STEP 5: Let It Rest (It’s Worth the Wait)
Once your pie comes out of the oven, the smell alone will make it hard to wait—but trust me, letting it rest for at least 15 minutes is key. That short rest helps everything settle and makes it much easier to slice. If you try to cut it straight from the oven, the filling may still be too runny to hold its shape.
And if you’re planning to serve it with vanilla ice cream, now’s the time to scoop it out and get it ready—because the second that warm pie meets cold ice cream? Pure bliss.
Tips to Make It Even More Amazing
This pie is fabulous as-is, but if you’re in the mood to experiment or take it up a notch, here are a few variations and tips that I love:
-
Swap in Dark Chocolate: If you love a more intense chocolate flavor, try using 4 ounces of dark chocolate and 4 ounces of semisweet. It adds a deep, rich taste that’s perfect for serious chocolate lovers.
-
Add Espresso Powder: Stir in 1 teaspoon of espresso powder when melting the chocolate. It won’t make the pie taste like coffee—it just deepens the chocolate flavor and adds an extra layer of richness.
-
Make It Ahead: You can bake this pie a day in advance, then reheat individual slices in the microwave for about 10-15 seconds, or warm the whole pie in a low oven (around 275°F) until heated through. It tastes just as good the next day—maybe even better.
-
Serve It Cold: Not in the mood for warm pie? This hot fudge pie also tastes incredible chilled. The filling firms up into a dense, truffle-like texture that’s so satisfying straight from the fridge.
-
Add a Nutty Crunch: For some texture, sprinkle chopped toasted pecans or walnuts over the top before baking. It adds a little crunch and makes the pie feel even more decadent.
Hot Fudge Pie: FAQ and Final Thoughts
By now, your kitchen probably smells like a chocolate dream, and your pie is cooling on the counter, ready to be devoured. Before we wrap things up, let’s go over a few frequently asked questions that tend to come up when baking this Hot Fudge Pie. Whether you’re wondering how to store it, switch up the ingredients, or serve it differently, I’ve got you covered.
FAQ: Your Hot Fudge Pie Questions Answered
1. Can I use store-bought pie crust?
Absolutely. This recipe is all about simplicity, and a good-quality store-bought pie crust works perfectly. If you have a homemade crust you love, go for it—but no pressure to make one from scratch.
2. How do I know when the pie is done baking?
You’ll want to check for a center that’s just barely set but still a little wobbly. It should jiggle slightly when you move the pan but not look like liquid. Overbaking will result in a firmer, brownie-like texture instead of that soft, fudgy center.
3. Can I make this pie ahead of time?
Yes! You can bake it up to a day in advance. Store it covered at room temperature or in the fridge, and gently reheat it in a low oven (around 275°F) or microwave slices for about 10-15 seconds before serving.
4. What kind of chocolate should I use?
Semisweet chocolate is the standard for this recipe, but you can mix in dark chocolate for a bolder flavor. Just avoid chocolate chips if you can—they often contain stabilizers that don’t melt as smoothly as chopped bar chocolate.
5. How should I store leftovers?
Leftover slices can be stored in an airtight container in the fridge for up to 3 days. You can enjoy them cold (the texture becomes dense and truffle-like) or warm them up again before serving.
6. Can I freeze this pie?
You can freeze the fully baked and cooled pie. Wrap it tightly in plastic wrap and then in foil. It’ll keep well for up to a month. Thaw overnight in the fridge and reheat gently before serving.
7. What’s the best way to serve it?
This pie is best served warm with a scoop of vanilla ice cream or a dollop of whipped cream. The contrast of cold and hot is what really takes it over the top.
Final Thoughts: A Chocolate Dessert Worth Repeating
There’s something timeless about a dessert that brings everyone to the table with wide eyes and empty plates—and this Hot Fudge Pie does exactly that. It’s the kind of recipe you’ll bookmark, save, print, and come back to anytime you need a dessert that delivers every single time.
It’s not fussy. It doesn’t require fancy ingredients or hours in the kitchen. But it does deliver rich, fudgy flavor, a perfect texture, and that warm, comforting feeling we all want from a homemade treat.
So whether you’re baking it for a dinner party, a weekend family meal, or just to satisfy a weeknight chocolate craving, I hope you give this Hot Fudge Pie a try. And if you do? I’d love to hear how it turned out! Share your tweaks, your toppings, or who you surprised with a slice—and don’t be surprised if this becomes your new go-to chocolate dessert.
PrintHot Fudge Pie

An indulgent chocolate lover’s dream featuring a rich, velvety hot fudge filling baked in a flaky crust. Serve warm with a scoop of vanilla ice cream for a decadent dessert that’s sure to impress.
- Author: Mark's Recipe
Ingredients
9-inch unbaked pie crust
8 ounces semisweet chocolate, chopped
1 cup heavy cream
½ cup packed brown sugar
2 tablespoons unsalted butter, cut into pieces
2 large eggs, room temperature
1 teaspoon vanilla extract
Pinch of salt
Whipped cream or vanilla ice cream for serving (optional)
Instructions
Preheat the oven to 350 °F and fit the unbaked pie crust into a 9-inch pie pan, crimping the edges. Line the crust with parchment paper and fill with pie weights or dried beans. Bake until the edges begin to turn light golden, about 12 minutes. Remove weights and parchment, then bake another 5 minutes until the crust is set.
Meanwhile, combine chopped chocolate, heavy cream, brown sugar, and butter in a heatproof bowl. Place over a saucepan of gently simmering water, stirring until smooth and fully melted. Remove from heat and let cool for two minutes.
Whisk eggs in a separate bowl until pale, then gradually pour in the warm chocolate mixture, whisking constantly to prevent curdling. Stir in vanilla and salt until the filling is glossy and uniform.
Pour the chocolate filling into the pre-baked crust, smoothing the surface with a spatula. Bake until the center is just set but still slightly wobbly, about 18 to 22 minutes.
Allow the pie to rest at room temperature for 15 minutes before slicing. For an extra treat, serve each slice with a dollop of whipped cream or a scoop of vanilla ice cream while the pie is still warm.
Notes
For an even richer experience, swap half of the semisweet chocolate for dark chocolate. To deepen the flavor, add a teaspoon of espresso powder to the filling. The pie can be baked a day ahead and gently reheated in a low oven before serving. Leftover slices keep in the refrigerator for up to three days and taste fantastic cold or warmed.

")
