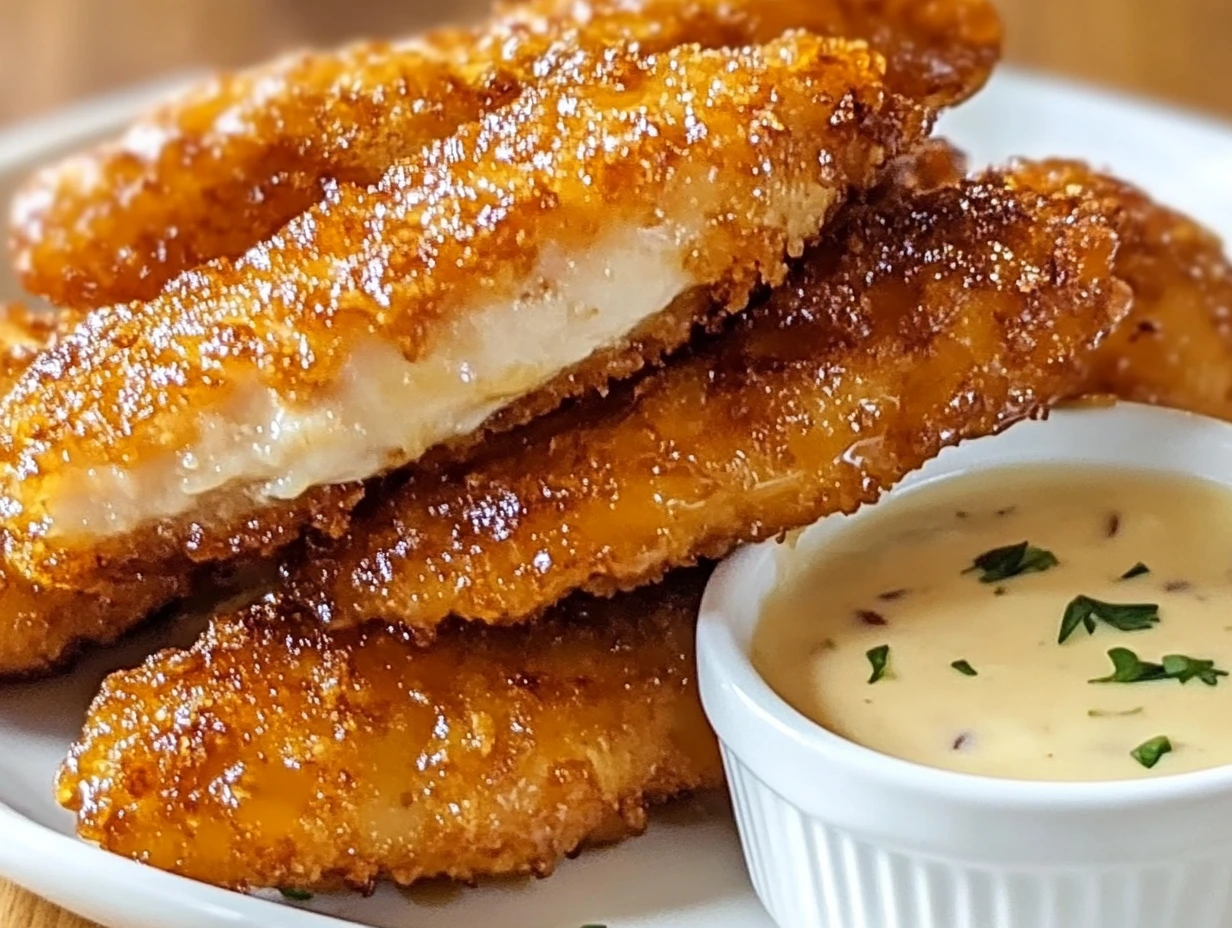
If you’re anything like me, you’ve probably stood in front of the fridge at 5 PM wondering what in the world to make for dinner. Something fast, something flavorful, and—if we’re being honest—something the whole family will actually eat without negotiating over bites. Enter: Air Fryer Honey Butter Garlic Chicken Tenders. They’re sweet, savory, a little crispy on the outside, juicy on the inside, and ridiculously easy to throw together.
What makes this recipe a total game changer? It’s all about that magical sauce—melted butter, sticky honey, just the right amount of garlic, and a little kick from red pepper flakes (if you’re feeling bold). Plus, everything comes together in the air fryer, which means no greasy splatter, no giant pots of oil, and less cleanup.
I made these for a casual weekend dinner, and let’s just say they disappeared before I could even plate the sides. Whether you’re prepping for a game day snack, a quick weeknight dinner, or a fun twist on chicken tenders for the kids, this recipe is here to save the day.
Let’s dive in and get started with the first steps of this delicious recipe!
Ingredients You’ll Need
For the Chicken Tenders:
-
1 lb chicken tenders (or boneless, skinless chicken breasts cut into strips)
-
1 cup all-purpose flour
-
2 large eggs, beaten
-
1 cup panko breadcrumbs
-
1 tsp garlic powder
-
1 tsp paprika
-
Salt and pepper, to taste
-
1–2 tbsp olive oil spray
For the Honey Butter Garlic Sauce:
-
3 tbsp unsalted butter, melted
-
2 tbsp honey
-
2 cloves garlic, minced
-
½ tsp garlic powder
-
¼ tsp red pepper flakes (optional)
-
1 tbsp fresh parsley, chopped (for garnish)
STEP 1: Preheat the Air Fryer
Start by preheating your air fryer to 375°F (190°C). This takes about 3 to 5 minutes depending on your model, but preheating is important to make sure the chicken gets crispy from the start. While that’s happening, give the air fryer basket a quick spray with olive oil to prevent sticking.
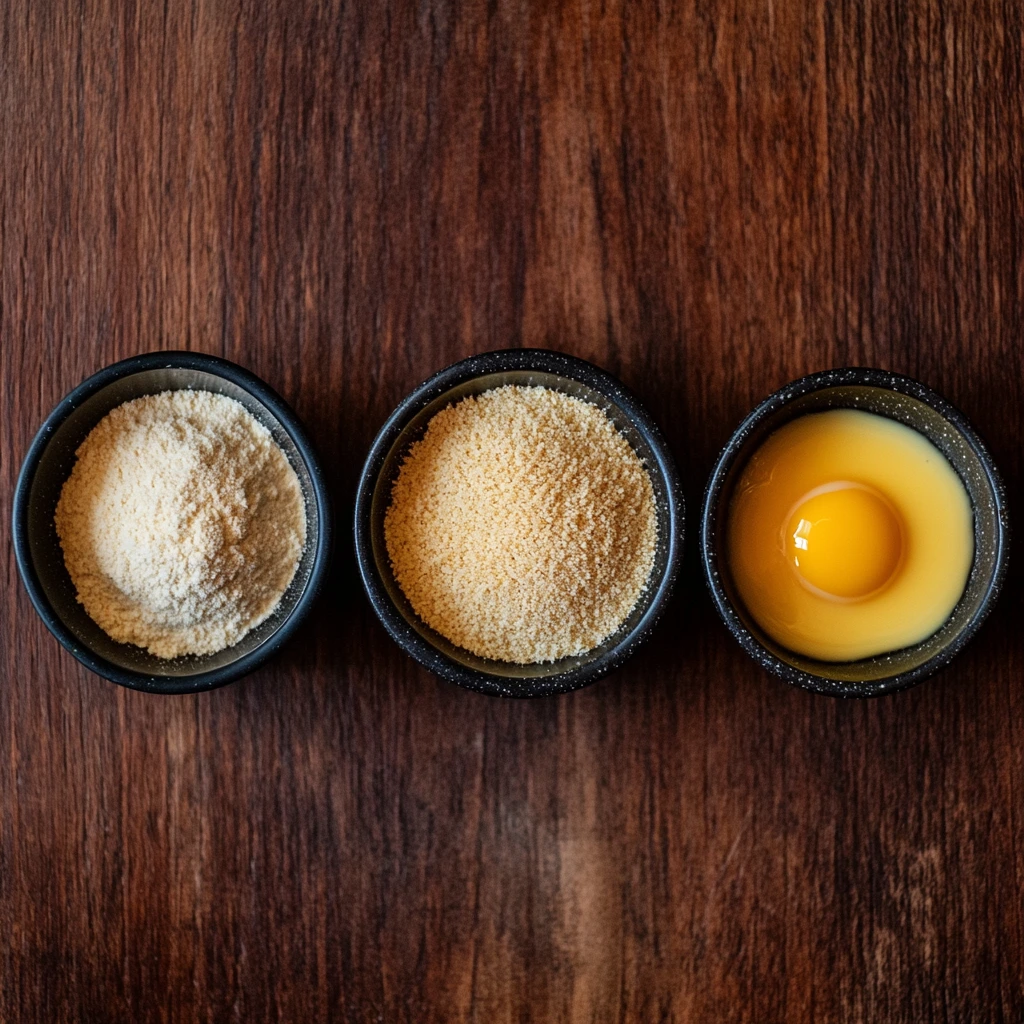
STEP 2: Set Up Your Breading Station
This step is key to getting that crunchy coating just right. You’ll want to grab three shallow bowls or plates.
-
Bowl 1: Combine the flour with salt, pepper, garlic powder, and paprika. This seasoned flour adds the first layer of flavor.
-
Bowl 2: Crack your eggs and beat them.
-
Bowl 3: Pour in your panko breadcrumbs. Panko gives the tenders that perfect light crunch.
STEP 3: Dredge and Bread the Chicken
Take each chicken tender and follow the three-step coating process:
-
Dredge it in the seasoned flour, making sure it’s evenly coated.
-
Dip it into the beaten egg, allowing any excess to drip off.
-
Coat it in panko breadcrumbs, pressing gently so the crumbs stick well.
Don’t rush through this step—pressing the panko firmly helps keep everything in place during air frying.
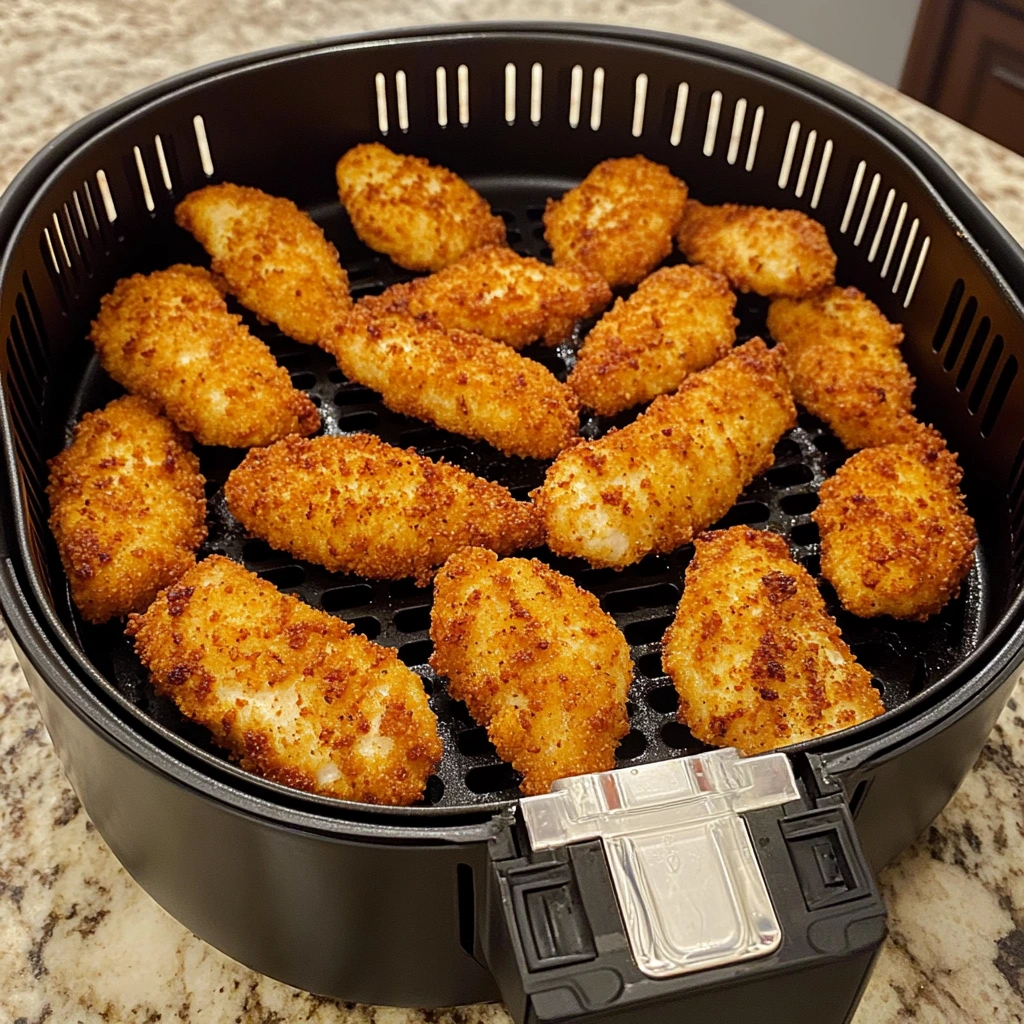
STEP 4: Load Up the Air Fryer
Place your breaded chicken tenders in a single layer in the air fryer basket. Don’t overcrowd them—air needs to circulate around each piece for even cooking. If needed, cook them in batches. Give the tops a quick spritz with olive oil spray.
Air Fryer Honey Butter Garlic Chicken Tenders – Crispy Meets Saucy
Now that you’ve got your chicken tenders prepped and ready in the air fryer, it’s time for the real magic to happen. If you’re anything like me, this is the part where the kitchen starts to smell amazing and everyone starts wandering in asking, “What are you making?” Trust me—this dish smells just as good as it tastes.
In this part, we’ll finish cooking the tenders to golden perfection, whip up that finger-licking honey butter garlic sauce, and talk about a few helpful tricks that’ll take your chicken tenders from good to completely irresistible.
Let’s pick up right where we left off.
STEP 5: Air Fry the Chicken Tenders
With your chicken tenders nicely spaced in the air fryer basket, it’s time to cook.
Air fry at 375°F (190°C) for 8 to 10 minutes, flipping halfway through. You’re looking for that golden brown color and a nice crispy exterior. The internal temperature should reach 165°F (75°C) when fully cooked—don’t skip the meat thermometer if you want to be sure.
If you’re working in batches, keep your finished tenders warm in a low oven while you cook the rest.
Pro Tip: If you want an extra crisp finish, let your breaded chicken rest on a wire rack for 5–10 minutes before placing it in the air fryer. This little pause helps the coating stick and crisp up even more.
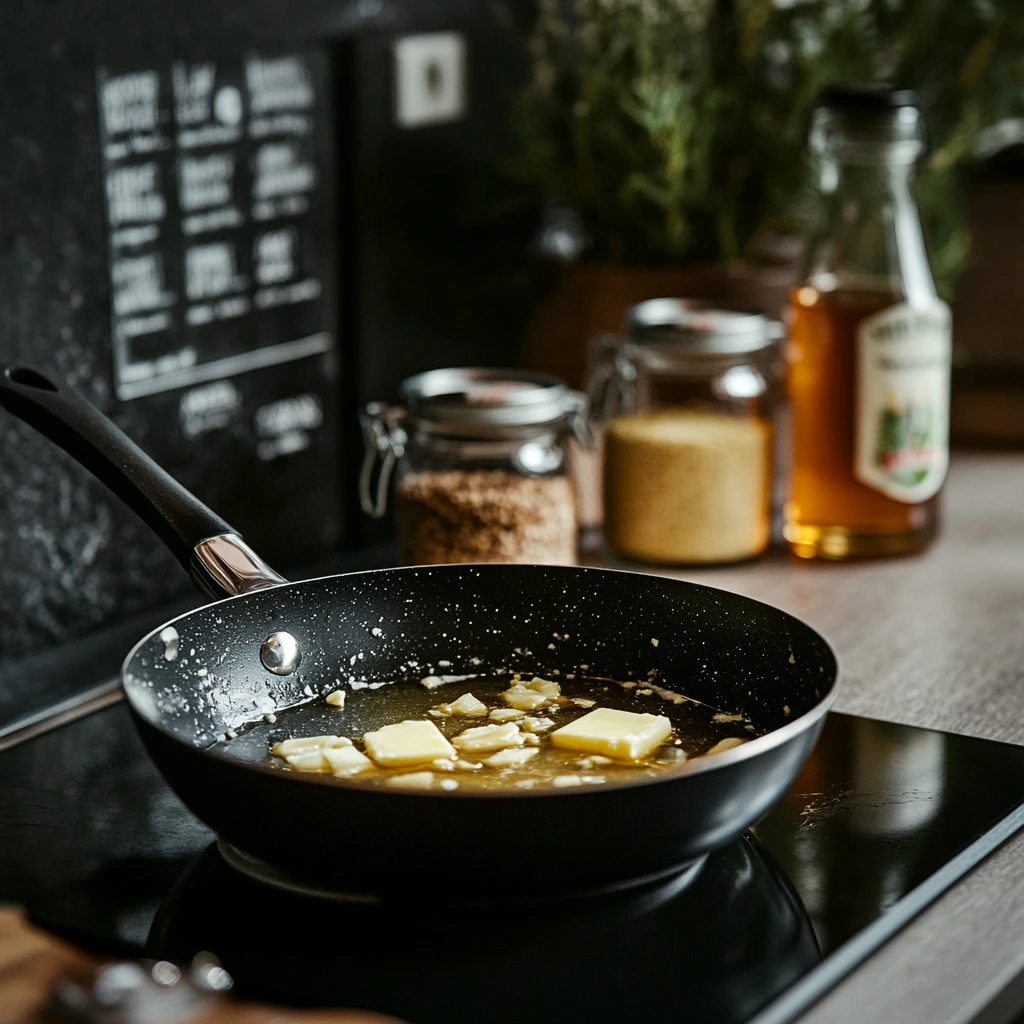
STEP 6: Make the Honey Butter Garlic Sauce
While the chicken is cooking, it’s time to make the sauce that turns these tenders into something special. This sauce is simple, but it’s packed with flavor—the perfect balance of buttery richness, sweet honey, and savory garlic.
Here’s how to make it:
-
In a small saucepan, melt 3 tablespoons of unsalted butter over medium heat.
-
Once melted, add 2 cloves of minced garlic and sauté for about 1 minute until fragrant (but not browned).
-
Stir in 2 tablespoons of honey, ½ teaspoon of garlic powder, and ¼ teaspoon of red pepper flakes if you’re using them. The red pepper flakes add a subtle heat that complements the sweetness.
-
Let it all bubble together for another minute or so, then remove from heat.
This sauce will be slightly thick and glossy—just what you want for coating those crispy tenders.
STEP 7: Toss the Chicken in the Sauce
Once your tenders are done, transfer them to a large mixing bowl. Pour the warm honey butter garlic sauce over the chicken and gently toss to coat every piece. Be careful not to break the breading; use a rubber spatula or tongs to help with this step.
At this point, you might be tempted to sneak a bite—and honestly, I wouldn’t blame you. But hang tight, because we’re almost ready to serve.
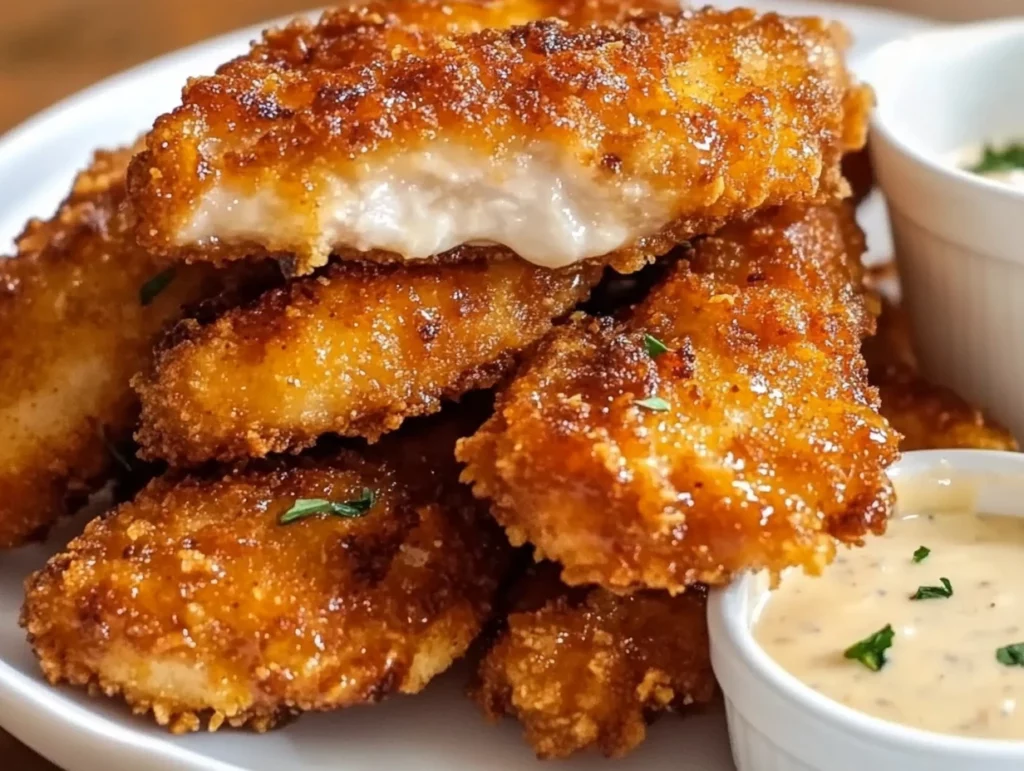
STEP 8: Garnish and Serve
To finish things off, sprinkle your chicken tenders with freshly chopped parsley for a pop of color and a hint of freshness. Serve them hot right away for the best flavor and texture.
These are perfect as a main dish with sides like coleslaw, roasted vegetables, or even a simple salad. Or serve them up as an appetizer at your next get-together—they’re guaranteed to be a hit.
Tips & Variations
-
Spice Level: If you want to turn up the heat, add a little extra red pepper flakes or a dash of hot sauce to the honey butter mixture.
-
Gluten-Free Option: Swap out the all-purpose flour and panko breadcrumbs for your favorite gluten-free alternatives.
-
Make It a Meal: Serve these tenders on top of a bed of rice or wrapped in a tortilla with lettuce and ranch for a fun twist.
-
Storage: Leftovers? Store them in an airtight container in the fridge for up to 3 days. Reheat in the air fryer to keep that crispy texture.
Air Fryer Honey Butter Garlic Chicken Tenders – FAQ and Final Thoughts
You’ve made it to the final part of this finger-lickin’ recipe journey—and if you’re anything like me, you’re already thinking about when you can make these Air Fryer Honey Butter Garlic Chicken Tenders again. They’ve got everything: crispiness, sweetness, buttery goodness, and just enough garlic to make you go back for one more bite. Before we wrap things up, I want to answer a few of the most common questions that tend to come up with this recipe. These tips and tricks will help you get the best results every time.
Frequently Asked Questions
1. Can I make these chicken tenders ahead of time?
Yes, you can prep the breaded chicken tenders ahead of time and store them in the fridge for a few hours before air frying. Just be sure to let them come to room temperature for about 10–15 minutes before cooking so they cook evenly.
2. What’s the best way to reheat leftovers?
The air fryer is perfect for reheating. Just pop the tenders back in at 350°F for 3–5 minutes until heated through and crispy again. Avoid the microwave—it’ll make them soggy.
3. Can I use frozen chicken tenders instead of fresh?
You can, but you’ll need to thaw them completely before breading. Using fresh or fully thawed chicken helps the coating stick better and ensures even cooking.
4. What can I use instead of panko breadcrumbs?
Regular breadcrumbs will work in a pinch, but panko gives that extra crunch. Crushed cornflakes or crushed Ritz crackers are also great alternatives for a crispy coating.
5. Is there a dairy-free version of the sauce?
Yes! Swap the butter with a dairy-free alternative like vegan butter or even olive oil. It’ll change the flavor slightly, but you’ll still get that sweet-savory garlic glaze.
6. Can I bake these instead of using an air fryer?
Absolutely. Bake the tenders on a parchment-lined baking sheet at 400°F for 20–25 minutes, flipping halfway through. They won’t be quite as crispy as air-fried, but they’ll still be delicious.
7. How can I tell if the chicken is fully cooked?
The best way is to use a meat thermometer. The internal temperature should read 165°F (75°C). The outside will be golden and crispy, and the inside should be juicy and no longer pink.
Final Thoughts
These Air Fryer Honey Butter Garlic Chicken Tenders have become a weeknight staple in our house. They’re fast, flavorful, and totally foolproof—even on busy nights when I don’t feel like fussing over dinner. The air fryer makes them crispy without the mess of deep frying, and that honey butter garlic sauce? It’s honestly restaurant-level good.
Whether you serve them up with a side salad, wrap them in a tortilla, or just pile them on a plate with your favorite dipping sauce, they’re going to disappear fast. And if you’ve got kids? Get ready for requests to make them again… and again.
PrintAir Fryer Honey Butter Garlic Chicken Tenders

These Air Fryer Honey Butter Garlic Chicken Tenders are crispy, juicy, and coated in a sweet and savory sauce that’s hard to resist. With the convenience of the air fryer, you’ll get that perfect crunch without deep frying, while the buttery garlic glaze takes these tenders to the next level. Perfect for a quick dinner or appetizer.
- Author: Mark's Recipe
Ingredients
For the Chicken Tenders:
1 lb chicken tenders or boneless, skinless chicken breasts cut into strips
1 cup all-purpose flour
2 large eggs, beaten
1 cup panko breadcrumbs
1 tsp garlic powder
1 tsp paprika
Salt and pepper, to taste
1–2 tbsp olive oil spray
For the Honey Butter Garlic Sauce:
3 tbsp unsalted butter, melted
2 tbsp honey
2 cloves garlic, minced
½ tsp garlic powder
¼ tsp red pepper flakes (optional)
1 tbsp fresh parsley, chopped (for garnish)
Instructions
Preheat your air fryer to 375°F (190°C) for 3–5 minutes. Lightly grease the basket with olive oil spray.
Set up a breading station with three bowls. In the first, combine flour with salt, pepper, garlic powder, and paprika. In the second, place the beaten eggs. In the third, add the panko breadcrumbs.
Dredge each chicken tender in the seasoned flour, shaking off the excess. Dip into the eggs, then coat in panko breadcrumbs, pressing gently so the crumbs stick.
Place the breaded chicken tenders in a single layer in the air fryer basket, ensuring there is space between each for air circulation. Lightly spray the tops with olive oil spray.
Air fry for 8–10 minutes, flipping halfway through, until the tenders are golden brown and the internal temperature reaches 165°F (75°C). Work in batches if needed.
While the chicken cooks, melt butter in a small saucepan over medium heat. Add minced garlic and sauté for 1 minute until fragrant.
Stir in honey, garlic powder, and red pepper flakes if using. Cook for another 1–2 minutes, then remove from heat.
Place the cooked chicken tenders in a large bowl and drizzle with the honey butter garlic sauce. Toss gently to coat evenly.
Garnish with chopped parsley and serve immediately.
Notes
For extra crispy tenders, let the breaded chicken rest for 5–10 minutes before air frying. This dish pairs well with coleslaw, roasted veggies, or a light salad. Leftovers can be reheated in the air fryer to maintain crispiness.


")
