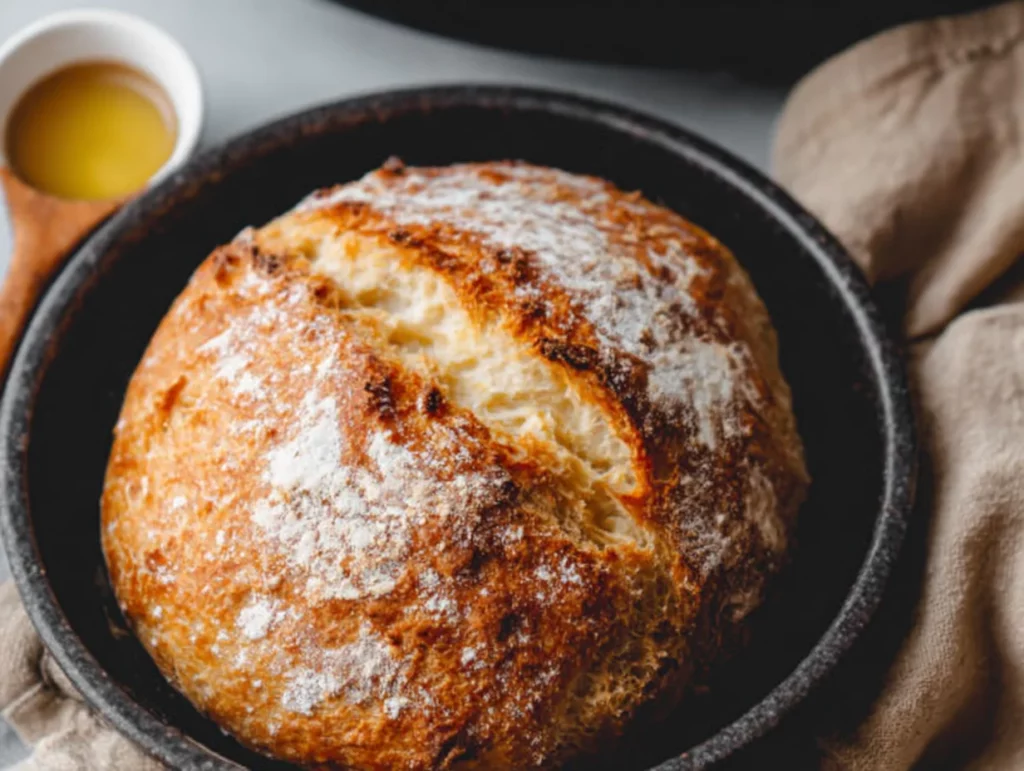
If there’s one thing I absolutely love, it’s fresh, homemade bread—but let’s be honest, most days I just don’t have the time (or energy) for kneading, rising, waiting, and babysitting the oven. That’s where this Air Fryer Bread in 30 Minutes comes to the rescue. No yeast, no rising time, no dough drama—just warm, soft, golden bread with a lightly crisp crust ready to enjoy in half an hour. Yes, really!
I stumbled upon this quick bread method one busy weeknight when I had a pot of soup bubbling away and absolutely nothing to serve with it. No rolls, no baguette, not even crackers. Out of desperation, I decided to play around with what I had on hand, and—bam!—this easy, no-yeast air fryer bread was born. Now it’s a go-to in our house anytime we want something fresh and warm without the hassle.
Whether you’re pairing it with soup, turning it into a sandwich, or just slathering on some butter for a cozy snack, this bread delivers on all fronts. It’s soft and fluffy inside, golden and slightly crispy outside—and the best part is, it doesn’t require any special equipment or advanced baking skills. If you’ve got an air fryer and a mixing bowl, you’re good to go.
Let’s dive right in and get started with the easiest bread recipe you’ll ever make.
Ingredients You’ll Need:
-
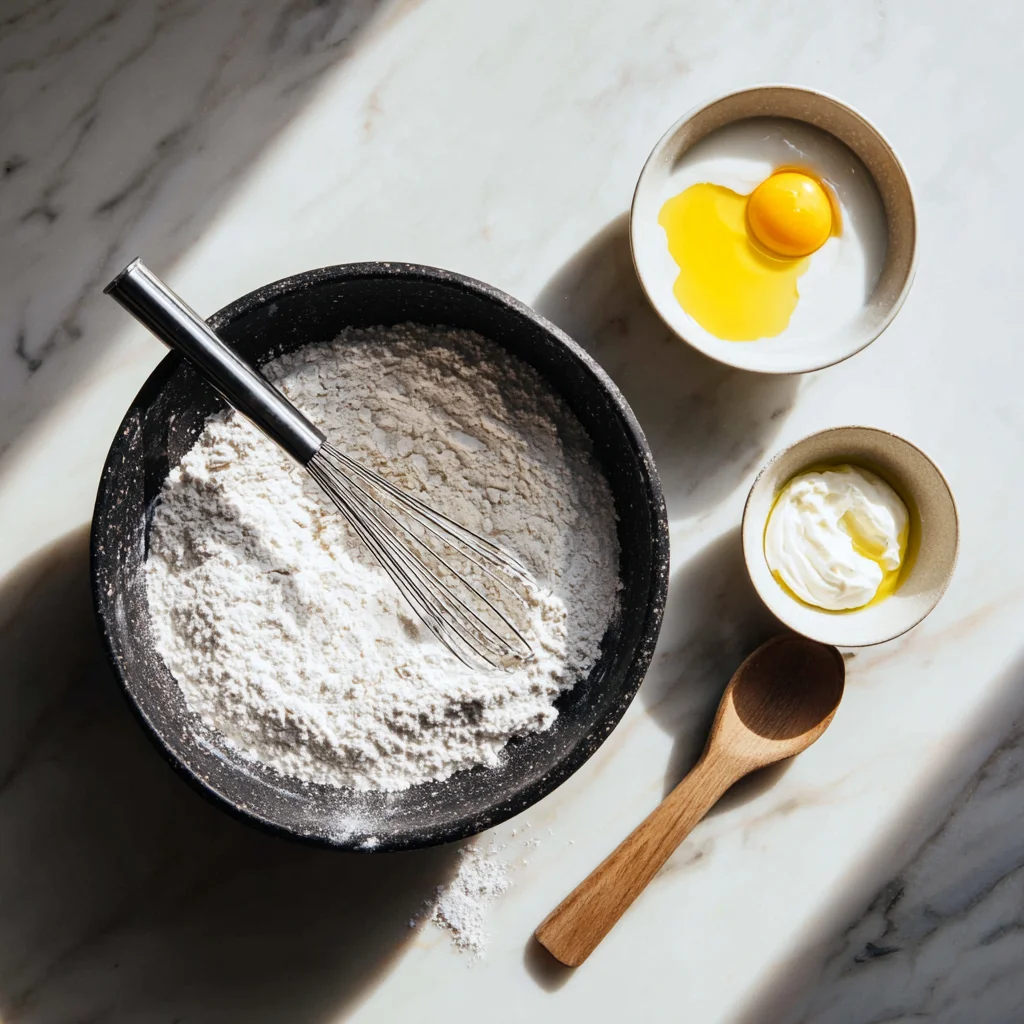
2 cups all-purpose flour
-
1 tablespoon sugar
-
1 tablespoon baking powder
-
½ teaspoon salt
-
¾ cup milk
-
2 tablespoons plain yogurt or sour cream
-
1 tablespoon olive oil
-
Optional toppings: melted butter, garlic, herbs
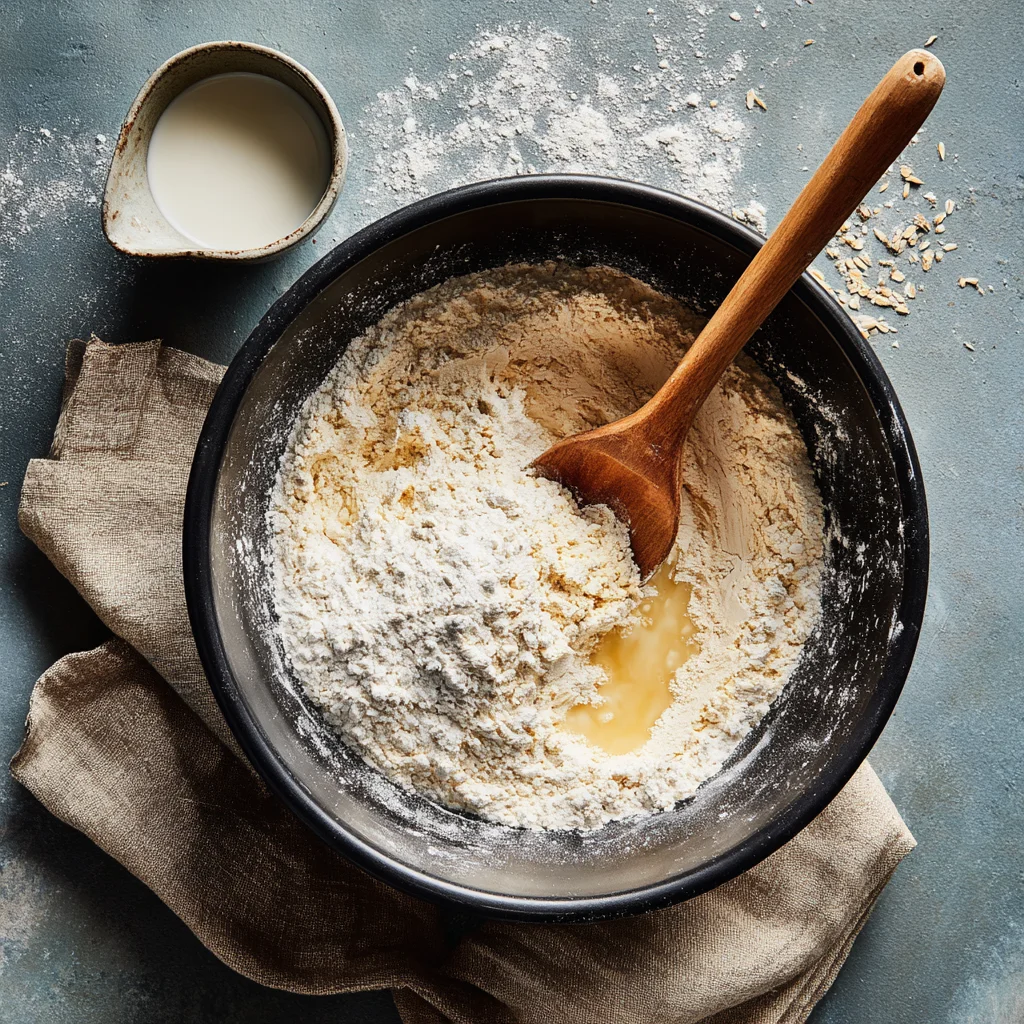
STEP 1: Mix Your Dry Ingredients
Start by grabbing a large mixing bowl and whisking together the flour, sugar, baking powder, and salt. This combo is the backbone of your quick bread—no yeast needed here. The baking powder gives us that nice rise without having to wait around for hours.
Tip: Make sure your baking powder is fresh! Old baking powder can lead to dense or flat bread.
STEP 2: Combine the Wet Ingredients
In a separate bowl, whisk together the milk, yogurt (or sour cream), and olive oil. This mixture adds moisture and tenderness to the bread while keeping it light. The yogurt or sour cream adds a little tang and also helps with the texture—trust me, it makes a big difference.
STEP 3: Bring It All Together
Now, pour the wet mixture into your dry ingredients and stir everything together until a soft dough forms. You’re not aiming for a super smooth or elastic dough like with traditional yeast bread. This one should come together fairly quickly.
If your dough feels too sticky, add an extra tablespoon of flour at a time until it’s easier to handle. If it feels too dry or crumbly, add a small splash of milk. It should be soft, a little tacky, and easy to shape without falling apart.
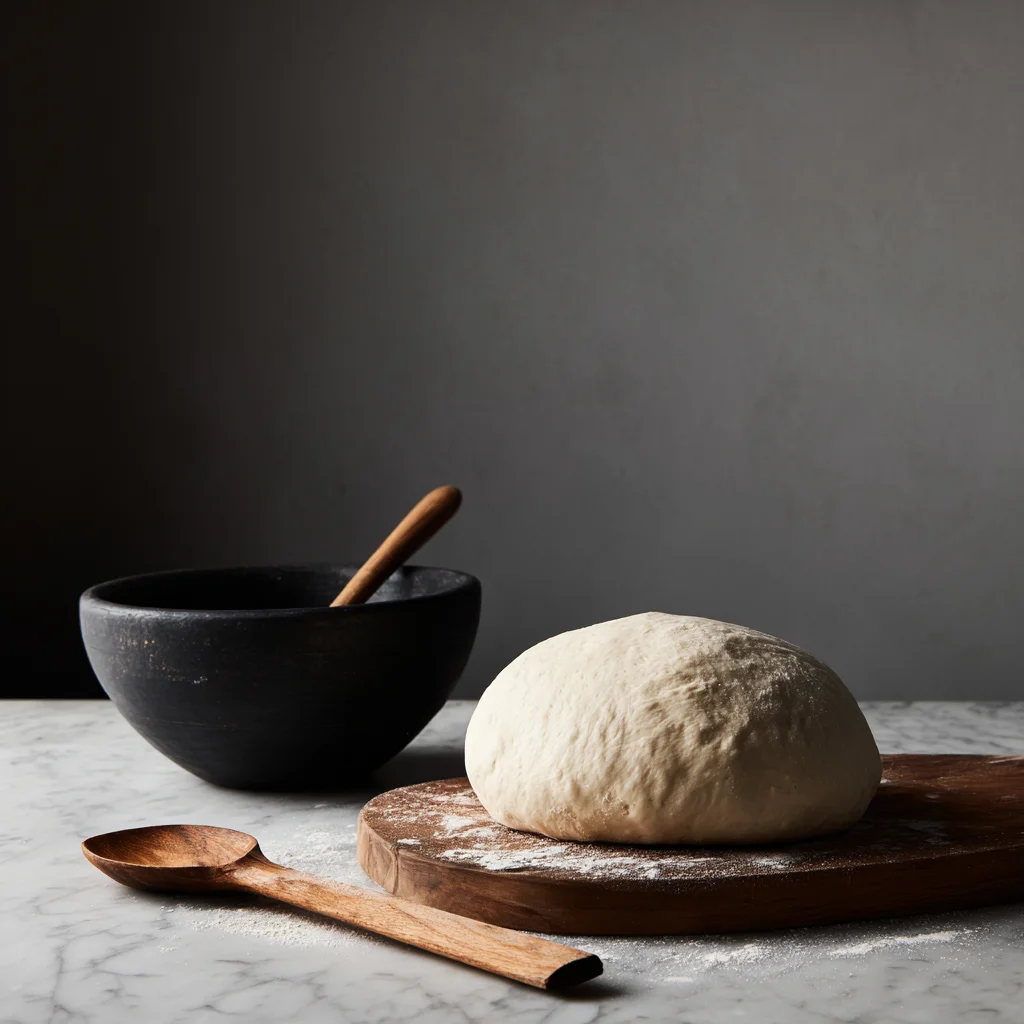
STEP 4: Knead and Shape
Lightly flour your countertop or a clean surface, and gently knead the dough for about 1 minute—just enough to bring it together and smooth it out. Then, shape it into a round or oval loaf that will fit comfortably in your air fryer basket.
You don’t need to be fancy here—just a nice compact loaf shape is perfect.
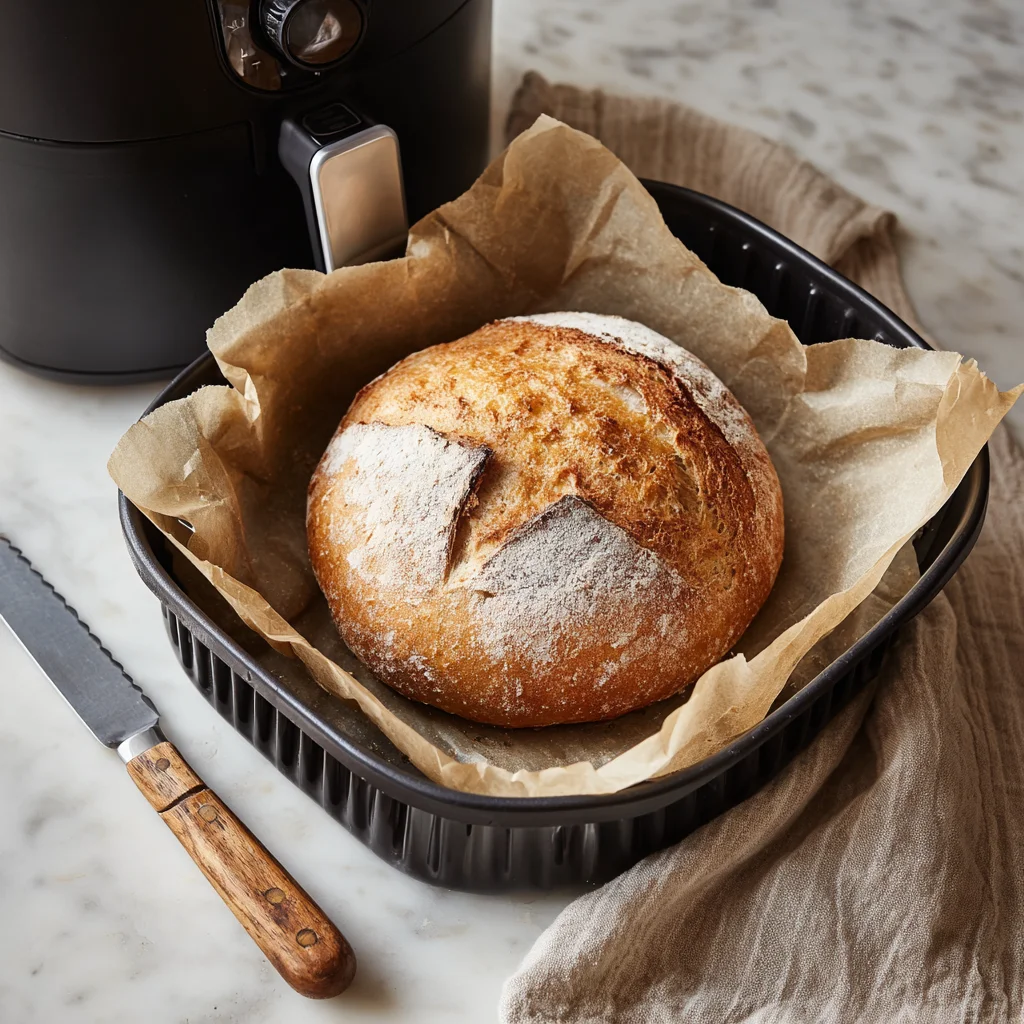
STEP 5: Prep Your Air Fryer
Line your air fryer basket with a piece of parchment paper (this helps prevent sticking and makes clean-up so much easier), and place your shaped dough inside. Use a sharp knife to lightly score the top of the dough—this gives the bread a lovely rustic look and helps it cook evenly.
Optional: You can sprinkle on a few herbs or brush the top with olive oil if you want to add extra flavor.
How to Cook Air Fryer Bread to Golden, Fluffy Perfection
Now that your dough is mixed, shaped, and nestled into your air fryer basket, we’re just a few minutes away from freshly baked, warm bread that smells absolutely heavenly. This part is where the air fryer truly shines—it gives the loaf a beautifully golden top, a slightly crisp crust, and a soft, tender interior. All without preheating the oven or dirtying extra pans.
Ready to finish things up? Let’s get that bread baked and talk through some easy tips to make this recipe your own.
STEP 6: Air Fry the Bread
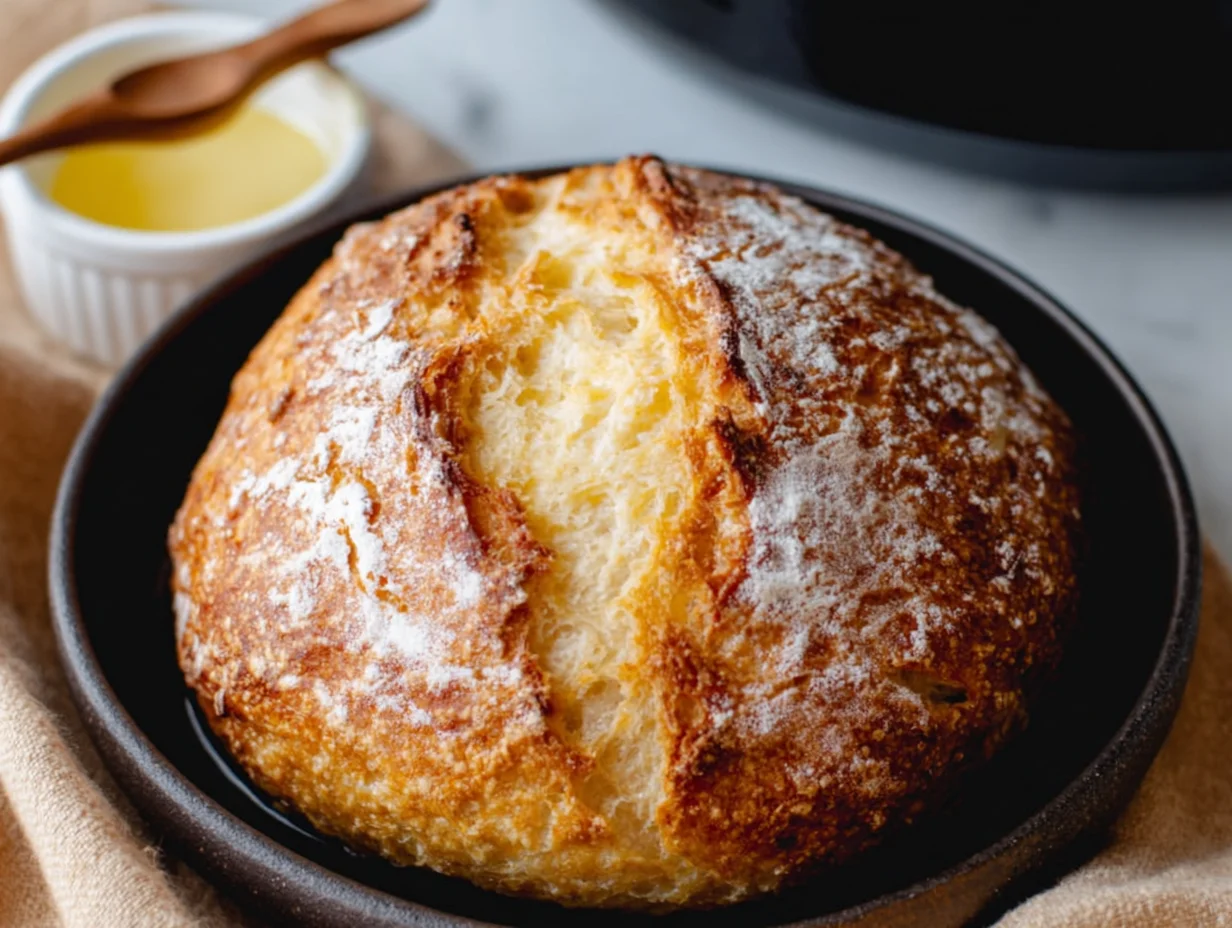
Set your air fryer to 320°F (160°C) and cook the bread for 20 to 22 minutes. The exact time will depend a little on your air fryer model and how thick your loaf is, so start checking around the 20-minute mark.
You’re looking for a golden brown top and a loaf that sounds slightly hollow when tapped. If you’re not sure if it’s done, insert a toothpick or skewer into the center—it should come out clean with no wet dough.
If it needs a little more time, pop it back in for another 2 to 3 minutes. Just keep an eye on it so it doesn’t get too dark.
Pro Tip: If your air fryer runs hot or has a smaller basket, check around the 18-minute mark just to be safe.
STEP 7: Cool Slightly Before Slicing
Once your bread is golden and cooked through, carefully lift it out of the air fryer basket using the parchment paper and place it on a wire rack or cutting board. Let it cool for at least 5 to 10 minutes before slicing.
I know it’s tempting to dig in right away (believe me, I’ve been there), but letting it rest helps the texture settle and prevents it from getting gummy or collapsing when you cut into it.
Optional Finishing Touches
This step is totally up to you, but if you want to take things to the next level, try one of these simple upgrades:
-
Brush the top with melted butter while it’s still warm for a softer crust and a little extra richness.
-
Sprinkle on a touch of garlic powder or herbs before baking for a savory twist.
-
Mix in a handful of grated cheese or chopped olives to the dough for a flavorful variation.
Easy Variations to Try
One of the best things about this recipe is how adaptable it is. Here are a few of my favorite ways to change it up:
-
Cheesy Herb Bread: Add ½ cup of shredded cheddar or mozzarella and a teaspoon of dried Italian herbs to the dough.
-
Garlic Butter Loaf: Mix 1 teaspoon of garlic powder into the dough and brush the finished bread with garlic butter.
-
Whole Wheat Version: Swap out up to 1 cup of the all-purpose flour for whole wheat flour. You may need an extra tablespoon or two of milk to keep the dough soft.
-
Sweet Cinnamon Bread: Add 1 tablespoon of sugar and a sprinkle of cinnamon to the dough for a slightly sweet version. Serve with butter and honey for a real treat.
Storage & Reheating Tips
This bread is best enjoyed fresh, but if you have leftovers (lucky you!), here’s how to keep them:
-
Store in an airtight container at room temperature for up to 2 days.
-
Reheat slices in the air fryer at 300°F for 2-3 minutes, or pop them in the toaster for a crisp edge.
-
Freeze: Slice the bread, place parchment between slices, and freeze in a zip-top bag. Toast from frozen or thaw overnight and warm in the air fryer.
Your Air Fryer Bread Questions—Answered!
By now, your kitchen probably smells amazing and your freshly baked air fryer bread is cooling on the counter, ready to slice and serve. Before we wrap things up, I want to take a minute to answer some of the most frequently asked questions about this recipe. Whether you’re wondering about substitutions, baking time, or how to store it, I’ve got you covered.
FAQ: Common Questions About Air Fryer Bread
1. Can I use whole wheat flour instead of all-purpose flour?
Yes, you can substitute up to 50% of the all-purpose flour with whole wheat flour. Just keep in mind that whole wheat flour absorbs more moisture, so you may need to add a bit more milk to keep the dough soft and workable.
2. What if I don’t have yogurt or sour cream?
If you don’t have yogurt or sour cream, you can use buttermilk or increase the milk slightly (though the texture may be a little less rich). Greek yogurt, plain or lightly thinned, works really well too.
3. Can I make this bread vegan?
Absolutely. Use unsweetened non-dairy milk (like almond or oat milk), replace the yogurt/sour cream with a plant-based alternative, and make sure your oil is vegan-friendly. The texture might be slightly different, but still delicious.
4. How do I know when the bread is fully cooked inside?
Insert a toothpick or skewer into the center of the bread. If it comes out clean or with just a few crumbs, the bread is done. You can also tap the top—if it sounds hollow, it’s ready. If it seems undercooked, just return it to the air fryer for a few more minutes.
5. Can I double this recipe?
You can, but keep in mind that the size of your air fryer basket will determine how much dough it can handle. For a double batch, you may want to divide the dough in half and cook in two separate batches to ensure even cooking.
6. Can I make individual rolls instead of one loaf?
Yes! Shape the dough into 4 to 6 smaller rolls and reduce the cooking time to 10-14 minutes, checking for doneness with a toothpick.
7. Can I add cheese, herbs, or other mix-ins?
Definitely. This dough is super versatile. Try adding shredded cheese, dried herbs, roasted garlic, or even chopped olives directly into the dough for a flavor-packed variation.
Final Thoughts: Why You’ll Love This Air Fryer Bread
This quick and easy air fryer bread has completely changed the way I think about homemade bread. No more waiting hours for yeast to rise or worrying about complicated kneading techniques. With just a handful of pantry ingredients and about 30 minutes, you can have warm, soft bread on the table—perfect for busy weeknights, lazy weekends, or whenever you need something comforting and homemade without the fuss.
What I love most about this recipe is how forgiving and customizable it is. Whether you keep it simple or get creative with flavors, it always turns out delicious. And the fact that you can make it without turning on the oven? Total bonus.
So if you’ve never made bread before or you’re just looking for a quick shortcut, I really hope you give this air fryer version a try. Once you do, I think it’ll earn a permanent spot in your recipe rotation like it has in mine.
PrintAir Fryer Bread in 30 Minutes
This quick air fryer bread is soft on the inside with a golden, lightly crisp crust—ready in just 30 minutes from start to finish. It’s a simple, no-fuss recipe that doesn’t require lengthy kneading or rising time, making it perfect for when you need warm, homemade bread in a hurry. Ideal as a side for soups and salads, or to use for sandwiches and toast.
- Author: Mark's Recipe
Ingredients
2 cups all-purpose flour
1 tablespoon sugar
1 tablespoon baking powder
½ teaspoon salt
¾ cup milk
2 tablespoons plain yogurt or sour cream
1 tablespoon olive oil
Optional toppings: melted butter, garlic, herbs
Instructions
1 In a large mixing bowl, whisk together the flour, sugar, baking powder, and salt. In a separate bowl, combine the milk, yogurt or sour cream, and olive oil.
2 Pour the wet ingredients into the dry ingredients and stir until a soft dough forms. If the dough feels too sticky, add a little more flour, one tablespoon at a time. If it’s too dry, add a splash of milk.
3 Lightly flour a surface and knead the dough gently for about 1 minute until smooth. Form into a round or oval loaf shape that fits your air fryer basket.
4 Line the air fryer basket with parchment paper and place the shaped dough inside. Lightly score the top with a sharp knife for a rustic look.
5 Air fry at 320°F for 20 to 22 minutes. Check for doneness by inserting a toothpick into the center—if it comes out clean and the top is golden brown, it’s done. If needed, air fry for an additional 2 to 3 minutes.
6 Remove the bread from the basket and let it cool for 5 to 10 minutes before slicing.
Notes
This is a quick bread, so there’s no yeast or rising time required. You can add grated cheese, chopped herbs, or minced garlic to the dough for extra flavor. For a softer crust, brush the top with melted butter right after baking. Store leftovers in an airtight container for up to two days, or slice and freeze for later use.


")
